RBD Block Challenge – Block 9 by Jill Finley: Step-by-Step Quilt Tutorial
The Riley Blake Designs (RBD) Block Challenge is an exciting series that showcases some of the finest quilt designers and their creative block patterns. One of the most eye-catching additions is Block 9, designed by the talented Jill Finley. Known for her fresh, bright color choices and clean piecing, Jill has once again delivered a pattern that is both beautiful and enjoyable to make.
In this tutorial, we’ll explore the detailed process of making Block 9 by Jill Finley as part of the RBD Block Challenge. Whether you’re a dedicated fan of the RBD series or just now discovering this quilt-along, this block will expand your skills and introduce you to new techniques.
This article will guide you through the entire pattern, from cutting fabric to final assembly. You’ll also get exact measurements for each piece, making this an excellent reference for your quilt projects. Let’s dive into this creative block that embodies modern elegance with classic inspiration.
The RBD Block Challenge is a yearly event where well-known designers come together to create one-of-a-kind quilt patterns. Each block can stand alone or be combined into a sampler quilt. The beauty of this challenge is how it invites quilters of all levels to join and grow.
Block 9, designed by Jill Finley, features balanced symmetry and a floral-inspired center that’s perfect for spring or summer quilts. Jill’s designs often emphasize fresh color palettes and precise piecing, and this block is no exception.
If you’re collecting all blocks from the challenge or just starting here, Block 9 offers a creative opportunity to experiment with colors and textures while building your quilting confidence.
Before starting your block, make sure you have the right materials. High-quality cotton quilting fabric is recommended. Jill Finley often uses bright, clear tones in her fabric selections—perfect for this cheerful, structured design.
Background Fabric (white or cream): ¼ yard
Main Fabric A (center & accents): fat eighth
Fabric B (petals or points): fat eighth
Fabric C (outer units): fat eighth
You’ll also need thread that matches or complements your fabric, a rotary cutter, cutting mat, quilting ruler, iron, and sewing machine with a ¼” foot. Accuracy is key when making this block.
Here are the exact measurements and cutting instructions for making the Block 9 quilt pattern by Jill Finley. Be sure to label your pieces as you cut to keep everything organized.
(4) rectangles – 2½” x 4½”
(4) squares – 2½” x 2½”
(8) squares – 1½” x 1½”
(4) rectangles – 1½” x 2½”
(1) square – 2½” x 2½” (center)
(4) rectangles – 1½” x 4½”
(4) rectangles – 2½” x 4½”
(4) squares – 1½” x 1½”
(4) rectangles – 1½” x 2½”
(4) squares – 2½” x 2½”
Keep your pieces sorted by color and size. Laying them out on a design board or piece of felt will help as you assemble the block.
The Block 9 quilt pattern includes several units that come together to form a symmetrical and eye-catching design. Let’s break the block into components.
Start with the 2½” square from Fabric A for the center. Surround it with four 1½” x 2½” rectangles from Fabric C to create a framed square. Sew the top and bottom rectangles first, then the side rectangles.
Press seams away from the center. This unit becomes the focal point of the block and sets the tone for color placement. Double-check measurements after pressing—it should now measure 4½” x 4½”.
This framed center square adds depth and draws the eye toward the middle of the block. It’s also a nice opportunity to showcase a bold print or contrasting color.
Next, you’ll create Flying Geese units, which form the petals or star points in the block design.
Use the 2½” x 4½” rectangles from Fabric B as the base. Attach two 1½” x 1½” squares of background fabric to the corners using the stitch-and-flip method. Draw a diagonal line on the wrong side of each square, stitch on the line, trim ¼” away, and press.
Repeat this step for all four rectangles. You will end up with four Flying Geese units measuring 2½” x 4½”. These form the dynamic “starburst” of the block.
Keep the units facing the correct direction for symmetry. Consistency in piecing will ensure sharp points and clean lines in your finished quilt block.
To balance the center and the starburst, you’ll make four corner units. These are made from background rectangles and Fabric C squares.
Sew a 1½” x 2½” rectangle of background to a 2½” square of Fabric C. Press open, and then add a 2½” x 4½” background rectangle to complete the unit.
These units frame the center and extend the block visually. As always, press carefully and square up each unit to maintain precision.
Corner units add structure and create a border-like effect that brings cohesion to the overall quilt pattern. You can modify colors in these sections to change the tone of your final quilt.
Now that all units are prepared, it’s time to assemble your block. Lay out the pieces in a 3×3 grid:
Row 1: Corner unit – Flying Geese – Corner unit
Row 2: Rectangle (Fabric A) – Center Unit – Rectangle (Fabric A)
Row 3: Corner unit – Flying Geese – Corner unit
Sew the units into rows, pressing seams toward the Flying Geese units in Rows 1 and 3, and away from the center in Row 2. Then sew the rows together to complete your block.
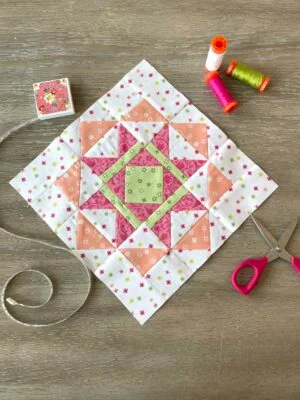
The finished block should measure 12½” x 12½” unfinished. Trim and square up as needed. Congratulations—Block 9 is complete!
Accuracy in cutting and stitching is crucial for this block. Use a scant ¼” seam allowance and press carefully after each step. A pressing plan can also help keep bulk to a minimum.
Choosing fabrics with contrast will help highlight the block’s design. If you want a softer look, go with tone-on-tone prints. For more impact, mix solids and prints with bold color transitions.
Keep a fabric swatch journal if you’re doing all RBD Challenge blocks. This helps you maintain color consistency and track your fabric use throughout your quilt project.
Block 9 by Jill Finley works beautifully in a sampler quilt with other RBD challenge blocks. It also looks stunning when repeated across a quilt top, forming dynamic secondary patterns.
Try rotating the block for a fresh perspective. When placed side-by-side, the starburst and framed center create interlocking effects that add complexity to your overall quilt patterns.
You can even resize the block by scaling up or down for different purposes: think pillow covers, mini quilts, or table runners. The versatility of this block makes it a valuable addition to your quilting toolbox.
[botao link={https://www.rileyblakedesigns.com/assets/images/sewalongs/RBDBlockChallenge/2025/HaloStar.pdf} texto={PATTERN HERE } corfundo={#183396} corletra={#fff}]
The RBD Block Challenge – Block 9 by Jill Finley is more than just a beautiful design—it’s a celebration of skill, color, and creativity. Jill’s clean, fresh aesthetic shines through, and making this block is a rewarding experience for quilters of all skill levels.
Whether you’re working on the full RBD quilt or just picking favorite blocks, Block 9 is a must-make. It teaches important techniques, encourages color play, and results in a stunning finished product.
Don’t forget to share your version on social media with hashtags like #RBDblockchallenge or #Block9byJillFinley to inspire and connect with other quilters around the world!