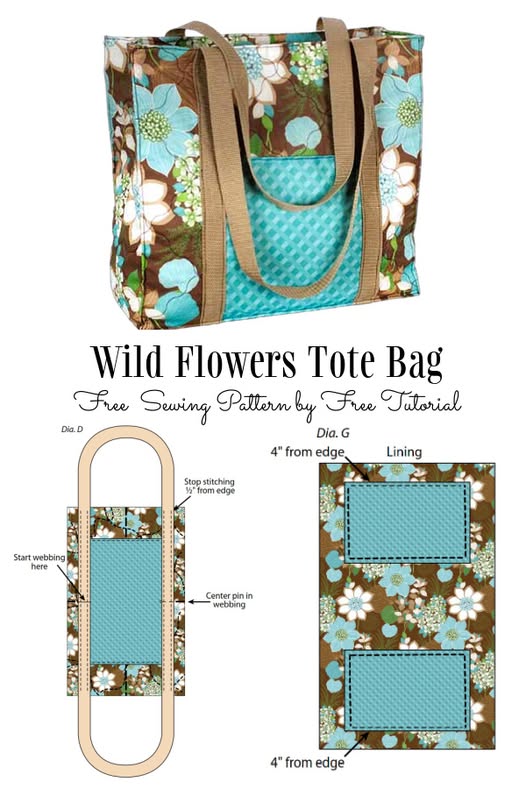
Creating a Wild Flowers Tote Bag is a fantastic way to combine functionality with artistic quilting. Whether you’re a beginner or an experienced quilter, this pattern will help you craft a stylish and durable tote bag featuring intricate floral designs. In this tutorial, we’ll guide you through the essential steps, including fabric selection, cutting, assembling quilt patterns, and finishing touches.
Selecting the right fabric is the first step in ensuring your tote bag turns out beautifully. Opt for high-quality quilt fabric that is both durable and visually appealing. Cotton fabric is an excellent choice due to its versatility and ease of handling.
For the floral patterns, consider using a mix of vibrant prints and solid colors that complement each other. A balance between bright and neutral tones will enhance the overall aesthetic of your tote bag. If you prefer a more subtle look, opt for pastels or earth tones.
In addition to the outer fabric, you’ll need a sturdy lining fabric to add durability. Quilted cotton, linen, or canvas work well for the interior. Make sure to prewash and iron all fabrics before cutting to prevent shrinkage and ensure precise measurements.
Before starting, gather all the necessary materials and tools. Having everything on hand will make the quilting process smoother and more enjoyable. The materials include quilt fabric, batting, lining fabric, and coordinating thread.
You’ll also need cutting tools such as a rotary cutter, quilting ruler, and fabric scissors. These tools will help achieve clean, accurate cuts for a professional finish. Additionally, quilting pins or clips will keep the fabric in place during sewing.
A sewing machine with a walking foot attachment is recommended for quilting the fabric layers. If you’re hand-sewing, ensure you have sturdy needles designed for quilting. Lastly, a steam iron is essential for pressing seams and giving your tote bag a polished look.
Precise fabric cutting is key to a well-structured tote bag. Using a rotary cutter and quilting ruler, cut the following pieces:
To add stability, layer the batting with the outer fabric and baste them together. This will create a quilted effect and reinforce the tote bag. Mark any additional quilting designs using a fabric pen for guidance.
Once the fabric pieces are prepared, it’s time to assemble the tote bag. Begin by quilting the outer fabric and batting together using a simple straight-line stitch. This will add texture and dimension while securing the layers.
Next, sew the two quilted panels together along the sides and bottom, using a ½-inch seam allowance. For added durability, reinforce the seams with a zigzag stitch or serger. Repeat this step for the lining, leaving a small opening at the bottom for turning later.
After the main bag structure is complete, box the corners by folding each bottom corner into a triangle and stitching across. This step helps the tote bag stand upright and provides extra space inside.
The tote bag straps should be sturdy enough to support weight without stretching. Fold each 3” x 24” strap in half lengthwise, press, and stitch along the long edges to create durable handles.
Position the straps 4 inches from each side seam and pin them in place on the outer fabric. Sew them securely using reinforced stitching to prevent wear and tear. For added style, you can topstitch along the edges of the straps.
Turn the lining fabric inside out and place the outer bag inside it, aligning the top edges. Sew around the top, ensuring the straps are securely sandwiched between the layers. Finally, turn the bag right side out through the opening in the lining, stitch the opening closed, and press for a crisp finish.

One of the best aspects of making a quilted tote bag is the opportunity to personalize it. You can add decorative quilt stitching, embroidery, or appliqué to enhance the floral theme. Hand-sewn details can bring an artistic touch to your creation.
If you want extra functionality, consider adding an interior or exterior pocket. This is especially useful for storing small items like keys, wallets, or mobile phones. A magnetic snap or button closure can also be incorporated for added security.
Experiment with different quilt patterns, colors, and textures to make each tote bag unique. Whether for personal use or as a thoughtful handmade gift, your Wild Flowers Tote Bag will stand out with its beautiful quilted design.
Congratulations on completing your Wild Flowers Tote Bag – Pattern! This project is a wonderful way to practice quilting while creating something practical and stylish. By following these step-by-step instructions, you’ve learned how to select fabric, cut and quilt panels, assemble the bag, and add finishing touches.
[botao link={https://www.free-tutorial.net/2022/01/wild-flowers-tote-bag-tutorial.html} texto={PATTERN HERE} corfundo={#183396} corletra={#fff}]
Quilted tote bags are not only fashionable but also environmentally friendly, providing a sustainable alternative to plastic bags. Whether you use your tote for shopping, work, or travel, it will showcase your creativity and quilting skills.
Now that you’ve mastered this pattern, why not explore other quilt patterns for more DIY projects? Keep experimenting, and enjoy the satisfaction of crafting beautiful quilted accessories!