The Tree Hanging Ornament Pattern is a festive crochet project designed to create a graceful spiral Christmas tree that can be displayed on a tree, door handle, wall hook, gift package, or holiday garland. Instead of building a traditional flat triangle, this design uses a long crocheted strip that gradually becomes wider, allowing it to be arranged into the recognizable shape of a Christmas tree. The open spaces between the layers give the ornament a light and elegant appearance while keeping the crochet stitches clearly visible. Small beads can be added as decorations, while a crocheted star and hanging loop complete the top. This is also a practical project for using small amounts of yarn left from other holiday crafts. Because the construction is repetitive, the crochet Christmas tree ornament can be enjoyable for beginners who already know the basic stitches as well as experienced crocheters looking for a quick seasonal project.
One of the most attractive characteristics of this Tree Hanging Ornament Pattern is that the final appearance can be changed simply by choosing different yarn colors and decorations. Traditional forest green creates a classic Christmas tree, while cream, white, burgundy, gold, or even soft pastel shades can give the ornament a completely different personality. The example style shown in the inspiration image combines a dimensional spiral tree with small golden accents, creating a handmade decoration that looks detailed without requiring complicated shaping. The project mainly uses chain stitches, single crochet, double crochet, slip stitches, and strategically placed increases. These stitches create the length and gradual expansion necessary for forming the spiral layers. Once the crochet strip is finished, the tree is shaped from the smallest upper section toward the widest lower section and secured so that each layer remains visible.
Before starting the Tree Hanging Ornament Pattern, it helps to understand that gauge is not as critical as it would be for a garment. However, stitch consistency still matters because uneven tension can cause some parts of the spiral to twist more strongly than others. A medium-fine yarn produces a delicate ornament, while thicker yarn creates a larger and more rustic decoration. Cotton yarn provides excellent stitch definition and keeps the layers firm, while acrylic yarn is lightweight and easy to work with. For an ornament approximately 7 to 9 inches (18 to 23 cm) tall, a light or DK-weight yarn with a 3.0 to 4.0 mm crochet hook is a useful starting combination. You can adjust the number of chains, increases, and spiral sections depending on the size you want, making this pattern easy to personalize for different Christmas decorating styles.
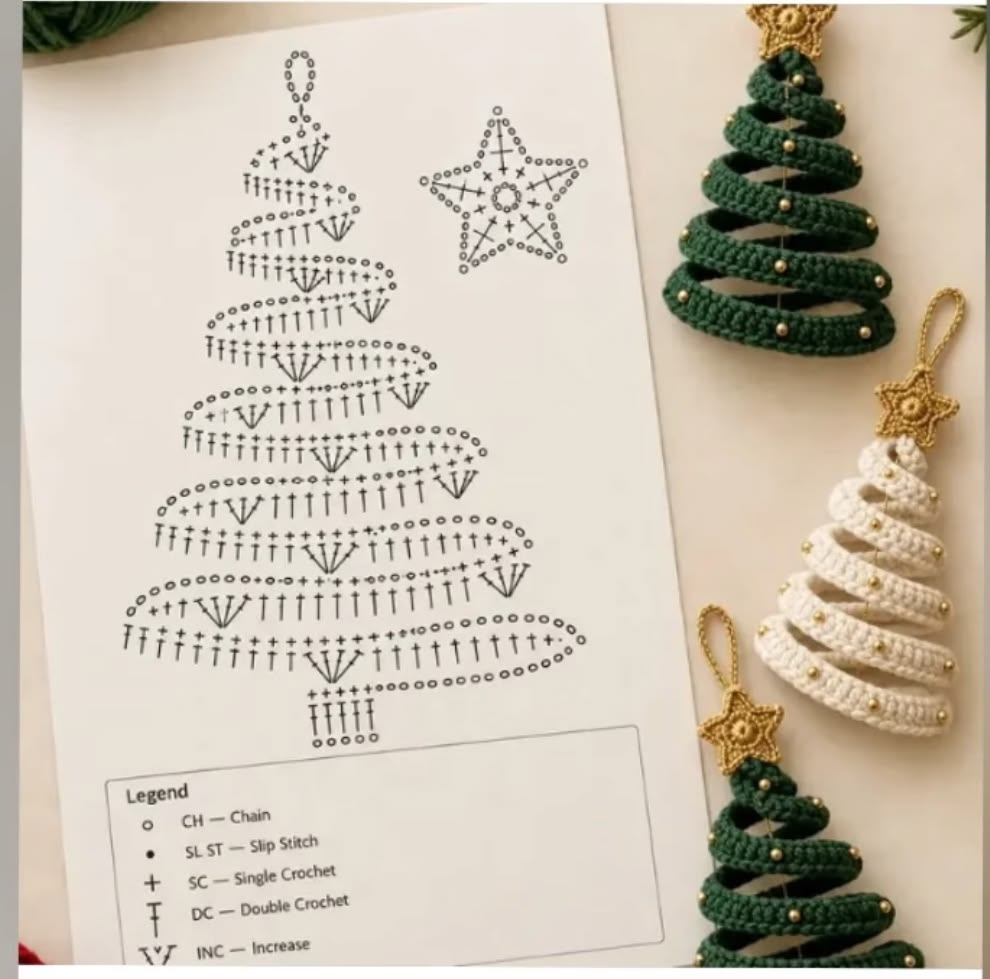
Materials, Crochet Stitches, and Preparation for the Ornament
For one Tree Hanging Ornament Pattern, prepare approximately 25 to 40 yards (23 to 37 meters) of green or cream yarn for the tree. You will also need a small amount of gold, yellow, or contrasting yarn for the star. A crochet hook between 3.0 and 4.0 mm generally works well with light or DK-weight yarn. Keep scissors, a yarn needle, stitch markers, sewing thread, and optional decorative beads nearby. If you plan to hang the ornament from a Christmas tree, prepare a small length of decorative cord or use crocheted chains to create the hanging loop.
The first important stitch is the chain stitch, normally abbreviated as ch in U.S. crochet terminology. Chains create the foundation of the spiral strip and are also useful when forming the hanging loop at the top. To make a chain, create a slip knot on the hook, yarn over, and pull the yarn through the loop. Continue repeating the motion until the required number of chains has been made. Try to keep the foundation chain relaxed because an overly tight chain can prevent the strip from curving naturally.
The single crochet, abbreviated sc, is useful for creating firm sections and strengthening edges. Insert the hook into the appropriate stitch, yarn over, and pull up a loop so that two loops are on the hook. Yarn over again and pull through both loops. Single crochet creates a compact fabric, making it helpful near the beginning of the tree or wherever additional structure is needed. It can also be used around the star or hanging loop for a stronger finish.
The main height of the tree strip can be created with double crochet, abbreviated dc. Yarn over before inserting the hook into the stitch, pull up a loop, yarn over and pull through two loops, then yarn over again and pull through the final two loops. Double crochet stitches are taller than single crochet stitches, which helps the strip develop quickly. They also create the attractive vertical stitch texture visible throughout a dimensional spiral tree. Working them consistently will help each layer look balanced after assembly.
An increase, commonly written as inc, means placing more than one stitch into the same base stitch. For this project, increases are especially important because they help widen the crochet strip as it moves toward the lower part of the tree. A simple double crochet increase can be created by working two double crochets into the same stitch. More dramatic curves can be made by occasionally working three stitches into one location. The increases should become slightly more frequent as you approach the bottom sections so the tree can form wider loops.
The slip stitch, abbreviated sl st, is used for joining and finishing. Insert the hook into the specified stitch, yarn over, and pull the yarn through both the stitch and the loop already on the hook in one motion. Slip stitches are almost flat, so they are useful when you want a secure join without adding noticeable height. In this crochet ornament pattern, slip stitches can help close the top loop, join a star, or secure decorative details. They can also be used when finishing the base of the small trunk.
Crocheting the Spiral Tree from Top to Bottom
Begin the Tree Hanging Ornament Pattern with a foundation chain that will become the central working edge of the spiral strip. A practical starting point is approximately 75 to 95 chains for a medium ornament. The exact number is flexible because the final shape depends on both the chain length and the number of increases added throughout the strip. After completing the chain, turn carefully so the chain does not twist. Work the first stitches into the back bumps of the foundation chain when possible because this creates a cleaner edge.
For the narrow top section, begin with several single crochet stitches or short groups of double crochet. A possible sequence is to work one single crochet into each of the first 5 to 7 chains, followed by several double crochets. This creates a smaller upper section that can curl tightly near the star. Do not add too many increases immediately because the top should remain narrow. The gradual expansion is what creates the recognizable tree silhouette.
Continue along the chain using double crochet stitches while beginning to introduce increases. For example, work one double crochet into each of the next several stitches, then place two double crochets into the following stitch. Repeat this spacing gradually. Early in the strip, an increase every 8 to 10 stitches may be enough. As the crochet piece grows, you can reduce the distance between increases so the later sections curve more strongly.
Around the middle of the strip, begin working increases more frequently. You might work several regular double crochets followed by a double crochet increase, repeating the combination along the row. The purpose is not to create a perfectly mathematical circle but to develop a controlled ruffle. When the strip is laid flat, it should begin curling gently on its own. This natural curl is what will later help create the individual branches or layered sections of the tree.
For the lower portion of the Tree Hanging Ornament Pattern, continue using double crochet while making the curves wider. The longest lower loops need more fabric than the upper ones, so increases can be placed every 3 to 5 stitches depending on your yarn and tension. If the strip becomes extremely ruffled, reduce the number of increases. If it remains almost straight, add a few more. The goal is a strip that curves easily without folding heavily over itself.
When the entire foundation chain has been worked, finish the edge neatly. You can add one light row of single crochet along the outer side if you want a firmer ornament. Another option is to finish after the double crochet row, which creates a softer and more flexible spiral. Fasten off while leaving a yarn tail long enough for assembly. Lay the strip on a flat surface and gently arrange it into several expanding loops to preview the final tree shape before permanently securing anything.
Shaping, Assembling, and Decorating the Crochet Christmas Tree
To assemble the crochet Christmas tree ornament, begin at the narrow end of the crocheted strip. Curve this section into a small upper loop. Below it, create another loop that extends slightly farther to each side. Continue moving downward, alternating the strip from left to right while allowing every new layer to become wider. Viewed from the front, the finished arrangement should resemble a stylized Christmas tree made from stacked curved branches.
A useful approach is to thread a long yarn needle with matching yarn and pass it vertically through the center of the arranged layers. Start near the bottom and carefully pass through the central point of each spiral section. Avoid pulling the yarn too tightly because the spaces between the layers are part of the dimensional effect. Once you reach the top, secure the thread while keeping each level evenly separated. This internal support helps the tree maintain its shape when hanging.
The bottom can be finished with a small crocheted trunk. Chain approximately 5 to 7 stitches, then work several single crochet or double crochet stitches back across the chain to form a small rectangle. Depending on your preferred appearance, you can make the trunk in brown, gold, cream, or the same color as the tree. Position it behind the widest lower layer and sew it securely in place. Keep the trunk relatively small so it does not overpower the spiral design.
Decorative beads can transform a simple Tree Hanging Ornament Pattern into an elegant holiday decoration. Small gold beads, pearl beads, wooden beads, or lightweight craft beads can be sewn along the outer edges of the spiral. Place them at regular intervals or use a more natural arrangement. Avoid adding extremely heavy beads because they may pull the crochet strip downward. If the ornament will be used around small children or pets, consider replacing detachable beads with securely stitched yarn bobbles.
The star can be crocheted separately using gold or yellow yarn. Start with a small adjustable ring, work several single crochet stitches into the ring, and close it with a slip stitch. Create each star point by chaining several stitches, working back toward the center with slip stitch, single crochet, and possibly half double crochet, then joining back to the center. Repeat around the circle until five points are formed. Adjust the chain length depending on how large you want the star to appear in relation to the tree.
Finally, attach the star securely to the top of the spiral tree. Add a hanging loop by chaining approximately 20 to 30 stitches and joining the chain back near the star with a slip stitch. A longer loop works well for door handles, while a shorter loop may be better for Christmas tree branches. Weave all yarn ends carefully into the back of the work. Once the ends are hidden, gently reshape the spiral so every level is evenly spaced and clearly visible.
Finishing Techniques, Size Adjustments, and Creative Variations
Blocking can make a significant difference in the finished appearance of a Tree Hanging Ornament Pattern. If you use cotton yarn, lightly dampen the ornament and arrange the spiral layers into the desired shape on a blocking mat or towel. Pin the sections carefully without stretching them excessively. Allow the ornament to dry completely before removing the pins. This process encourages the curves to remain consistent and gives the finished crochet work a cleaner appearance.
If you prefer a firmer ornament, you can use tighter tension or choose a smaller hook than normally recommended for the yarn. Cotton yarn is particularly suitable when structure is important. Another option is to create two identical spiral trees and lightly join them together, although this will produce a thicker result. For most hanging decorations, a single crocheted strip with a central support thread is lightweight enough while still keeping the three-dimensional appearance.
Changing the foundation chain is the easiest way to adjust the final size. For a miniature ornament, try approximately 50 to 65 chains and use lightweight yarn with a smaller hook. For a larger decorative tree, use 100 or more chains and increase the number of widening sections. Remember that increasing the chain length alone will not automatically create a balanced tree. The frequency of crochet increases should also be adjusted so the lower layers expand proportionally.
Color variation provides another way to personalize the Tree Hanging Ornament Pattern. Traditional green with gold decorations creates a recognizable Christmas style, while ivory with gold beads offers a softer and more elegant appearance. Burgundy with cream accents can create a warm vintage look. White yarn with silver beads produces a snowy winter theme. You could even crochet several trees in coordinating colors and arrange them together as a handmade holiday display.
The same construction method can also be used for gift decorations. Instead of using the finished crochet tree only as an ornament, attach it to a reusable fabric gift bag, holiday basket, or decorative package. A smaller version can become a gift tag when paired with a blank paper label on the back. Because the project requires relatively little yarn, making multiple ornaments is practical when you need several handmade Christmas gifts. Each tree can be customized with different bead colors or star styles.
Before considering the project complete, inspect every attachment point. Make sure the star is firmly sewn to the top, the hanging loop is secure, and any beads are tightly attached. Trim only after all yarn tails have been woven through several stitches. Hold the ornament vertically and examine the silhouette from a short distance. Adjust the spiral sections with your fingers until the smallest layer is at the top and each successive layer becomes wider, creating the balanced shape that defines this Tree Hanging Ornament Pattern.
Frequently Asked Questions About the Tree Hanging Ornament Pattern
What skill level is recommended for this pattern?
This project is suitable for confident beginners and intermediate crocheters. You should be comfortable making chain stitches, single crochet, double crochet, slip stitches, and increases. The shaping may look complicated in the finished ornament, but most of the effect comes from arranging a simple curved crochet strip.
What yarn works best for a crochet Christmas tree ornament?
Cotton and cotton-blend yarns are excellent because they provide strong stitch definition and good structure. Acrylic yarn also works well and creates a lightweight ornament. Light or DK-weight yarn is a versatile choice for medium-sized decorations.
How large should the finished ornament be?
A medium Tree Hanging Ornament Pattern can measure approximately 7 to 9 inches (18 to 23 cm) from the star to the bottom of the trunk. The exact size depends on yarn thickness, hook size, foundation chain length, and how widely the spiral sections are arranged.
Why is my crochet strip curling?
Curling is expected in this project. The combination of tall stitches and increases intentionally creates the curved strip needed to form the tree. If the strip forms extremely tight ruffles, you may be adding too many increases. If it stays almost straight, you may need additional increases.
Can I make the tree without beads?
Yes. The ornament can be beautiful without additional decorations. You can leave the spiral completely plain or replace beads with tiny crocheted bobbles, contrasting yarn knots, embroidery stitches, miniature bows, or small yarn stars.
How do I keep the spiral layers separated?
Pass a matching yarn strand or strong sewing thread vertically through the central points of the layers. Secure the sections while leaving a little space between them. This method allows the ornament to remain dimensional instead of collapsing into one flat bundle.
Can I use thicker yarn?
Yes, but thicker yarn will create a larger ornament. Use a hook appropriate for the yarn and consider reducing the number of foundation chains. Bulky yarn may create a heavier tree, so make sure the hanging loop and central support are strong enough.
How can I make the ornament smaller?
Use thinner yarn, a smaller hook, and fewer foundation chains. A miniature crochet tree ornament can be created from approximately 50 to 65 chains, depending on the yarn. Keep the same general concept of fewer increases near the top and more increases toward the bottom.
Is blocking necessary?
Blocking is not mandatory, but it can improve the appearance significantly. It helps control the curves, straighten uneven areas, and establish the spacing between the layers. Cotton yarn generally responds especially well to light blocking.
Can several ornaments be made from one skein of yarn?
Usually, yes. This pattern uses a relatively small amount of yarn compared with larger crochet projects. The exact number will depend on yarn weight, skein size, ornament dimensions, and whether you also use the main yarn for the hanging loop and trunk.
How can I make the tree more dimensional?
Use slightly firmer tension and arrange the loops so each level extends forward and outward instead of lying completely flat. The vertical center thread should support the shape without compressing the sections. Small beads positioned along the edges can also emphasize the dimensional spiral.
Can the star be replaced with another topper?
Absolutely. A small bow, bell, snowflake, pom-pom, wooden bead, or simple crocheted loop can replace the star. The topper should remain lightweight so the ornament hangs straight.
Conclusion
The Tree Hanging Ornament Pattern combines simple crochet techniques with clever shaping to create a decorative spiral Christmas tree that looks much more intricate than the individual stitches used to make it. Throughout this tutorial, you learned how chains, single crochet, double crochet, slip stitches, and crochet increases can be combined to produce a gradually widening strip. You also learned how to arrange that strip into layered branches, stabilize the center, crochet a small trunk, make a star topper, add a hanging loop, and decorate the finished ornament with optional beads.
The most important part of this project is the gradual transition from narrow upper sections to wider lower sections. Keeping fewer increases near the top and adding them more frequently toward the bottom creates the characteristic Christmas tree silhouette. Careful assembly then transforms the curved crochet strip into a dimensional ornament with visible spaces between each spiral level.
This pattern is also easy to customize. You can make a classic green and gold tree, an elegant white version, a warm vintage ornament, or an entire collection in coordinating holiday colors. Changing the yarn weight, hook size, foundation chain, decorations, and star style gives you many possibilities while preserving the same basic construction method.