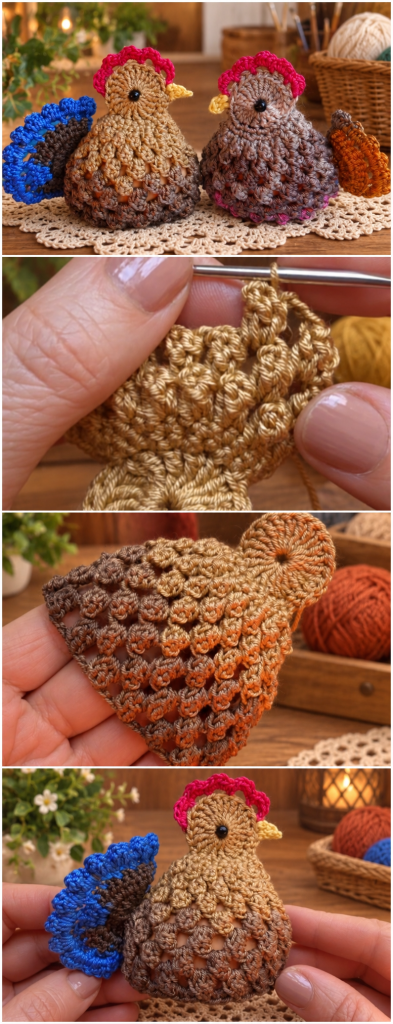
Crochet Chickens Pattern is a charming handmade project for anyone who enjoys creating decorative crochet animals with texture, personality, and a country-inspired look. These little crochet chickens can be used as seasonal decorations, farmhouse accents, handmade gifts, table ornaments, or simply as cheerful additions to a crochet collection. The design shown in the reference style combines a rounded body, a small head, a bright comb, a tiny beak, textured wings, and a decorative tail, creating a finished piece that looks detailed without requiring extremely complicated shaping. One of the most attractive parts of this project is the opportunity to play with yarn colors, especially warm browns, beige, cream, rust, pink, red, blue, and other shades that can give each chicken an individual personality.
A well-made Crochet Chickens Pattern depends on building the project in logical sections instead of trying to create every detail at once. The main body can be worked from the center outward or from the bottom upward, depending on the style you prefer, while the head and decorative pieces are added separately. The open textured section across the lower body gives the chicken a delicate lace effect, while clustered stitches and small loops can create the feathered appearance seen around the wings and tail. This mix of solid crochet and decorative texture makes the pattern interesting for intermediate beginners as well as experienced crocheters who enjoy small projects that can be completed without using a large amount of yarn.
Another advantage of this Crochet Chickens Pattern is that you can easily personalize the finished size and color combination. A smaller hook and lightweight cotton yarn can produce a compact ornament, while worsted-weight yarn and a larger hook can create a fuller tabletop chicken. Cotton yarn is especially useful because it holds stitch definition well and gives decorative feathers a crisp shape. Acrylic yarn also works nicely when you want a softer finish. Throughout this tutorial, the instructions use common U.S. crochet terminology and explain the construction process carefully so you can understand how the different parts come together.
Materials, Crochet Stitches, and Preparation for the Crochet Chickens Pattern
For one medium crochet chicken, prepare approximately 60 to 90 yards of main-color yarn, plus small amounts of contrasting yarn for the comb, beak, tail, feet, and decorative feather details. A finished chicken made with DK or light worsted yarn will usually measure approximately 5 to 7 inches tall, or about 13 to 18 cm, depending on yarn thickness, hook size, and personal tension. If you want a smaller ornament, use thinner cotton thread and a smaller hook.
A 3.5 mm to 4.0 mm crochet hook works well for most light worsted yarns. You may also need a yarn needle, small scissors, stitch markers, fiberfill if you want a stuffed version, and either safety eyes or embroidered eyes. If the finished item will be given to a young child, embroidered eyes are generally a better choice than detachable plastic pieces.
The main stitches used in this Crochet Chickens Pattern include chain (ch), slip stitch (sl st), single crochet (sc), half double crochet (hdc), double crochet (dc), and several decorative combinations. A chain stitch creates the foundation and open spaces. A single crochet produces firm fabric. A double crochet creates height and is ideal for the airy lower-body sections.
You can create the feathered texture using cluster stitches, small shells, picots, or grouped double crochets. One easy feather cluster can be made by working several double crochets into the same stitch or chain space. When these groups are repeated across a row, they create rounded sections that resemble overlapping feathers.
A useful color combination for a traditional hen is beige or tan for the upper body, brown for the lower body, red or deep pink for the comb, and yellow for the beak. The tail can be brown, blue, rust, green, or any bold contrast. Using variegated yarn across the lower body can also create natural-looking feather changes without requiring frequent yarn changes.
Before beginning, make a small gauge sample. Exact gauge is not critical for a decorative chicken, but consistent tension matters. If your stitches are too loose, the body may lose its shape. If they are extremely tight, the decorative sections may become stiff. Aim for neat stitches that still have enough flexibility to curve naturally.
How to Crochet the Main Body and Head
Begin the Crochet Chickens Pattern with the body. One simple construction method is to work the body in a flat circular or semicircular shape before folding or shaping it. Start with a magic ring, then work approximately 10 to 12 double crochets into the ring. Pull the center closed and join with a slip stitch.
For the next round, increase regularly by working two stitches into selected stitches. For example, you may work 2 dc in each stitch around if you want a quick increase, or alternate one double crochet and an increase for a slower expansion. Continue increasing until the upper body section reaches approximately 2½ to 3 inches across.
Once the upper body is established, begin creating the open lower feather section. Work combinations such as dc, ch 1, skip 1, repeating across the row. On the following row, work decorative clusters into the chain spaces. A simple combination is 3 dc into each ch-1 space, followed by a chain stitch before moving to the next space.
Continue the feather rows, gradually increasing the width if necessary. The body should become wider near the lower center before narrowing slightly toward the final edge. You can change yarn colors every one or two rows to imitate natural chicken feathers. Brown, rust, tan, and cream work beautifully together.
To create the head, attach the main-color yarn at the upper edge of the body and work a small rounded section. Another option is to crochet the head separately. Start with a magic ring, work six single crochets into the ring, and increase evenly during the next few rounds until the head reaches approximately 1½ to 2 inches in diameter.
When the head reaches the desired size, stop increasing and work one or two rounds evenly. If the chicken will be stuffed, lightly fill the head before closing. For a flatter decorative chicken, you can leave the head unstuffed and sew it directly onto the body. Position the head slightly forward rather than perfectly centered to create a more natural chicken profile.
Creating the Comb, Beak, Wings, Tail, and Feather Details
The comb is one of the most recognizable elements in the Crochet Chickens Pattern. Attach red, pink, or deep coral yarn to the top of the head. Work several small scallops using a combination such as sc, hdc, dc, hdc, sc across adjacent stitches. Repeat this sequence two or three times to create a ruffled chicken comb.
For the beak, use yellow or golden yarn. Attach the yarn to the side of the head where you want the face to point. Chain 3, then work a slip stitch or single crochet back toward the head. You can make a slightly fuller beak by working one single crochet, one half double crochet, and a slip stitch along the chain before fastening off.
The wings can be worked directly onto the body or crocheted separately. For a separate wing, chain approximately 8 to 10 stitches. Work single crochet along the first section, half double crochet through the middle, and double crochet near the widest section. Then work back along the opposite side to create a rounded feather shape.
To give the wing extra texture, add small loops or scallops along the lower edge. For example, work sl st, ch 3, 2 dc in the same stitch, sl st in the next stitch. Repeat this decorative unit along the bottom half of the wing. This creates overlapping crochet feathers that coordinate with the textured body.
The tail is another place where you can be creative. Begin with a circular or fan-shaped base in brown or another dark color. Around the outer edge, add several scallops using a contrasting shade such as blue, red, rust, or green. A bright tail can make the finished chicken especially eye-catching.
To create a fan tail, work several rows of increasing stitches so the piece gradually widens. On the final row, add shells made with 5 dc in one stitch, followed by a slip stitch in the next section. Repeat across the top curve. Sew the tail securely to the back of the body so it angles slightly upward rather than lying completely flat.
Assembly, Shaping, Finishing, and Styling Your Crochet Chickens
After all the components are complete, begin assembling the Crochet Chickens Pattern. First attach the head if it was made separately. Use the main body color and a yarn needle so the joining stitches blend into the fabric. Position the head securely and check that it sits straight before tying off the yarn.
Next attach the wing to the side of the body. Place the upper edge near the middle of the chicken and allow the textured lower edge to remain slightly loose. This small amount of movement creates dimension and prevents the wing from appearing completely flat against the body.
Sew the tail behind the chicken. If your tail is large, use several secure stitches across its base. Avoid attaching only one small point because the tail may rotate or sag. A wide attachment area helps the fan remain upright and gives the chicken a balanced shape.
Add the eyes after the main assembly is complete. Small black safety eyes can produce a polished appearance, while embroidered French knots or simple satin stitches work well for a completely soft crochet design. Place the eye slightly above the center of the head and close enough to the beak to create a friendly expression.
If you want the chicken to stand upright, lightly stuff the lower section with fiberfill before closing the body. Do not overfill the openwork area because excessive stuffing can push through the decorative spaces. Another option is to place a small fabric pouch filled with polyester stuffing or weighted pellets inside the lower body before closing.
Finally, weave in every yarn end carefully. Shape the comb, beak, wings, and tail with your fingers. If necessary, lightly steam-block the decorative pieces without pressing them flat. Your completed crochet chicken can now be displayed as a farmhouse decoration, seasonal centerpiece, handmade gift, kitchen accent, or collectible crochet figure.
Frequently Asked Questions About the Crochet Chickens Pattern
What yarn is best for a Crochet Chickens Pattern?
Cotton, cotton-blend, and acrylic yarn are all suitable. Cotton provides excellent stitch definition, making it particularly useful for textured feathers, combs, wings, and tails. Acrylic produces a softer, lighter chicken and is often easier to find in many colors.
What size crochet hook should I use?
For DK or light worsted yarn, a hook between 3.5 mm and 4.0 mm usually works well. If you want a tighter stuffed chicken, choose the smaller hook. For a softer decorative version, you may prefer the larger size.
Can a beginner make this crochet chicken?
An adventurous beginner who understands chains, single crochet, double crochet, increases, and joining can make this project. The decorative feathers may require a little patience, but they are generally created by repeating simple stitch groups.
How large will the finished chicken be?
Using medium yarn, the finished chicken may measure approximately 5 to 7 inches tall, or 13 to 18 cm. Changing yarn thickness and hook size will change the final dimensions.
Do I need to stuff the chicken?
No. The project can be made as a flat or lightly dimensional decoration. Stuffing is useful if you want a rounded tabletop chicken, but it is optional.
How can I make the body look more feathered?
Use repeated shell stitches, cluster stitches, chain spaces, and contrasting colors. Alternating solid rows with open textured rows creates a layered appearance similar to overlapping feathers.
Can I make the tail larger?
Yes. Add additional increase rows before crocheting the decorative outer edge. You can also add extra scallops or use a contrasting color to make the tail more visible.
Why is my chicken curling while I crochet?
Curling usually occurs when there are too few increases or when the tension is too tight. Add increases more frequently or use a slightly larger hook. Gentle blocking can also help.
Can I use leftover yarn for this Crochet Chickens Pattern?
Yes. This is an excellent scrap-yarn project because the comb, beak, tail, wing accents, and feather rows require relatively small amounts of yarn. Combining different browns and neutral shades can also make the chicken appear more natural.
How can I make several chickens look different?
Change the body color, comb color, tail shape, wing placement, or yarn texture. You can create beige hens, brown hens, white chickens, colorful decorative birds, or even seasonal versions using holiday colors.
Should I use safety eyes or embroidery?
Both options work for decorative pieces. Embroidered eyes are useful when you prefer an entirely yarn-based finish. Small safety eyes give the chicken a glossy, polished appearance.
How do I keep the tail upright?
Attach the tail across a wider section of the back and use several strong sewing stitches. If the tail is especially large, you can also slightly stiffen it through blocking.
Can this pattern be turned into a hanging ornament?
Yes. Crochet a small chain loop and sew it securely behind the head. A lightweight version made with cotton yarn is particularly suitable as a hanging decoration.
Can I make a family of different-sized crochet chickens?
Absolutely. Use thicker yarn and a larger hook for the larger chicken, then use thinner yarn and a smaller hook for smaller versions. You can also reduce the number of body rounds to create chicks.
How do I make the comb more ruffled?
Add extra scallops or use taller stitches. Repeating combinations of half double crochet, double crochet, and treble crochet will produce a fuller comb.
Conclusion
The Crochet Chickens Pattern is a creative project that combines simple shaping with decorative crochet textures. Throughout this tutorial, you learned how to prepare the yarn and materials, crochet the main body, shape the head, add open feather sections, create the comb and beak, crochet textured wings, build a colorful fan-shaped tail, and assemble all the pieces into a finished chicken.
The most important part of this project is understanding that each decorative feature can be adjusted. You can change the number of feather rows, modify the tail, increase or decrease the head size, experiment with different yarn weights, and combine colors to create chickens that look completely different while using the same basic construction method.
A Crochet Chickens Pattern is also a wonderful way to use leftover yarn because the small decorative pieces require only short amounts of each color. Whether you choose traditional farmhouse shades or bold modern colors, the finished chicken can become a beautiful handmade decoration with plenty of personality.
Once you are comfortable with the basic construction, consider making several chickens together and varying their colors, combs, tails, and sizes. A small handmade flock can create a charming display for a table, shelf, craft room, seasonal arrangement, or handmade gift collection.
I hope this tutorial helped you understand every major step needed to create your own crochet chicken, from the first stitches to the final assembly and finishing details. Take your time with the decorative feathers and shaping because these small details are what give the finished project its character.