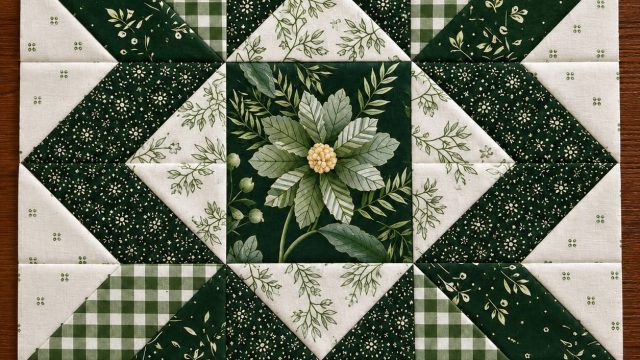
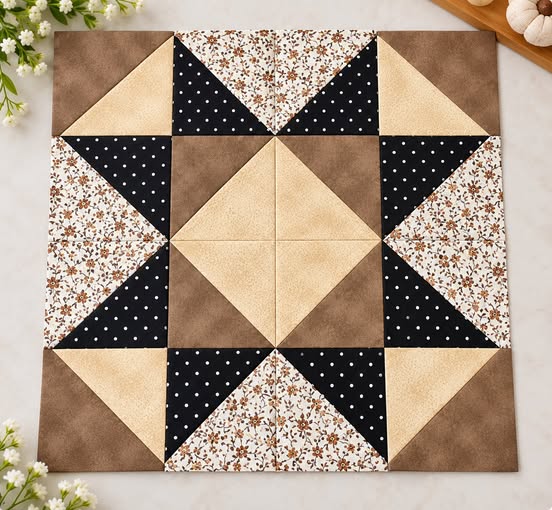
The Sawtooth Star Quilt Block Pattern is one of those quilting designs that can feel both traditional and surprisingly fresh depending on the fabrics you choose. The project shown in the photo uses geometric pieces arranged around a strong central shape, creating a balanced composition with the recognizable character of a star-inspired quilt block.
Warm brown, cream, floral, and dark dotted fabrics give the design a cozy appearance, while the contrast between light and dark sections makes every triangle easy to see. This type of arrangement is especially attractive for quilters who enjoy working with precise geometric units but still want plenty of freedom when selecting colors and prints. With careful cutting, consistent seam allowances, and patient pressing, the same visual effect can be recreated at home without needing overly complicated construction methods. A Sawtooth Star quilt block is traditionally recognized by a central square surrounded by pointed star units, often constructed with flying geese. The photographed project has a broader geometric interpretation, combining triangle-based units in a larger grid to produce a star-like composition. This is important when recreating a quilt from visual inspiration: instead of concentrating only on the name of a block, study how the individual shapes interact. In this example, the eye is immediately drawn toward the light center, while darker triangles around it provide definition. Floral fabric adds movement and softness, and brown sections act almost like a neutral frame. Understanding these relationships will make it easier to adapt the Sawtooth Star Quilt Block Pattern to different fabric collections while preserving the overall visual balance.
Another wonderful quality of this project is that you do not need to duplicate the exact colors in the photograph. Think of the fabrics as four roles: a light fabric, a medium fabric, a dark contrast fabric, and a printed accent fabric. Cream can become pale gray, pink, ivory, or light blue. Brown can be replaced by sage, burgundy, navy, or another medium-to-dark shade. The black dotted fabric can become any strong contrasting color, while the floral print can be replaced by gingham, tiny stars, leaves, or another small-scale print. What matters most is preserving enough contrast to reveal the geometry. Before cutting anything, place the fabrics beside one another and check whether the light, medium, dark, and printed sections remain visually distinct.
Understanding the Sawtooth Star Quilt Block Pattern and Fabric Layout
Before sewing the Sawtooth Star Quilt Block Pattern, study the structure of the photographed block. It can be viewed as a square composition divided into smaller square sections, many of which are themselves divided diagonally. These diagonal divisions are responsible for creating the points, directional movement, and star-like appearance. Breaking a complicated-looking block into simple units is one of the most useful skills in quilting because it turns an intimidating project into a sequence of manageable sewing steps.
For a beginner-friendly recreation, decide on your finished block size before calculating individual pieces. A large practice block is often easier because larger triangles are more forgiving than very tiny ones. You can draft the design as a three-by-three grid, with each major section occupying an equal amount of space. The central area can then be subdivided to form the light diamond effect visible in the photograph. Remember to add the appropriate seam allowance to every cut piece according to the piecing method you use.
Fabric selection has a major influence on the final appearance. The photographed example combines a warm brown tonal fabric, creamy beige, black with small white dots, and a delicate brown floral print. The brown and cream establish warmth, while the black creates dramatic contrast. The floral sections soften the geometric lines. When selecting your own fabrics, try to reproduce these differences in value rather than simply searching for identical colors.
Prewashing is optional and depends on your normal quilting practice, but all fabrics should be prepared consistently. Press them before cutting so folds do not distort your measurements. A rotary cutter, acrylic quilting ruler, and cutting mat are particularly helpful for this quilt block pattern, since accurate squares and straight edges contribute directly to accurate triangle units.
When working with triangles, remember that diagonal fabric edges can stretch more easily than straight grain edges. Handle freshly cut pieces gently and avoid pulling them while sewing or pressing. Pressing is different from aggressively moving the iron back and forth. Place the iron down, lift it, and reposition it when necessary. This helps the quilt star points remain crisp and prevents the units from becoming distorted.
Before assembling the complete block, arrange every finished unit on a flat surface. Compare the arrangement with the reference image and rotate pieces until the diagonal lines point in the correct directions. This simple step prevents one of the most common quilting frustrations: discovering after sewing that a triangle or printed section has been turned the wrong way.
Step-by-Step Construction of the Geometric Quilt Units
Begin by cutting the squares and triangles needed for your chosen block dimensions. Because quilters may want to make this project in different sizes, it is more useful to work from a proportional grid than to assume one mandatory measurement. Divide your desired finished width into three equal major sections. Add seam allowances when calculating the cutting dimensions, and make a small test unit before cutting an entire set of fabrics.
The easiest triangle sections can be created as half-square triangle units, commonly abbreviated as HSTs. Place two fabric squares right sides together, draw a diagonal guideline, and use your preferred HST construction technique. After sewing, cut and press the unit open. Trim each completed HST to the required unfinished measurement. Accurate trimming is especially important because several diagonal seams need to meet neatly when the full block is assembled.
Use the cream and brown fabrics for some of the corner and central units. Their lower contrast creates the softer geometric sections visible in the photo. Next, pair the dark dotted fabric with the floral print for stronger directional units. These combinations produce the alternating visual rhythm that makes the Sawtooth Star Quilt Block Pattern interesting rather than visually flat.
For a more traditional interpretation of a Sawtooth Star, you can construct pointed sections using flying geese units. A flying geese unit consists of one larger triangular shape bordered by two smaller contrasting triangles. These units are frequently used to create the four groups of star points surrounding the center of a classic Sawtooth Star. If you want the project to resemble the photographed arrangement more closely, however, concentrate on matching its larger triangle layout rather than forcing every section into a conventional flying geese construction.
After creating the individual units, square each one carefully. Place the quilting ruler over the block, align the diagonal ruler marking with the sewn diagonal seam, and trim only what is necessary. Repeat on all sides. Small inconsistencies can accumulate quickly across a multi-unit block, so this intermediate trimming step often determines whether the final rows align neatly.
Finally, return all completed pieces to your design surface and rebuild the entire layout before joining anything permanently. Check the floral direction, dark triangles, cream center, and brown corners. Take a quick reference photo of your arrangement if helpful. You can then consult it while carrying individual units to your sewing machine, reducing the chance of accidentally changing their orientation.
Assembling and Pressing the Sawtooth Star Quilt Block
Start assembly by joining neighboring pieces into the major sections of the block. Use a consistent quarter-inch seam allowance, which is standard for many pieced quilt patterns. Consistency matters more than sewing quickly. If one seam is slightly wider and another slightly narrower, the difference can make intersections difficult to match when several units are joined.
Press each seam after sewing instead of waiting until the entire block has been assembled. Depending on fabric thickness and your preferred technique, seams can be pressed to one side or open. Alternating seam directions between neighboring units can help the seam allowances nest together at intersections. Nested seams make it easier to match corners and produce cleaner geometric lines.
Pay particular attention to the center of the project. In the photograph, the light fabric creates a diamond-like focal area surrounded by brown. Four diagonal lines converge toward this central composition, so inaccurate seams become especially visible here. Pinning or carefully clipping matching points before sewing can prevent the layers from shifting.
Once the smaller sections are completed, join them into horizontal rows. Lay the rows back on the table after every seam and make sure the star quilt block still resembles your planned arrangement. Do not hesitate to remove a short seam if a unit has accidentally been rotated. Correcting the orientation immediately is usually much easier than discovering the problem after all the rows are attached.
Sew the completed rows together, matching the vertical intersections carefully. Begin by aligning important seam junctions rather than simply matching the outer edges. Pin those intersections first and then secure the spaces between them. Sew at an even pace, allowing the machine to feed the fabric naturally. Avoid pulling from behind the presser foot because that can stretch diagonal sections.
After the final row is attached, give the Sawtooth Star Quilt Block Pattern a careful final press. Measure the block vertically, horizontally, and diagonally. Minor variations are normal in handmade patchwork, but the block should remain reasonably square. If trimming is necessary, remove only a small amount and make sure important star points are not accidentally cut away.
Finishing the Quilt Block and Creating Your Own Color Variations
A single Sawtooth Star Quilt Block can become much more than a sample. It can be transformed into a pillow cover, table topper, wall hanging, tote panel, or decorative mini quilt. Several matching blocks can also be joined into a larger quilt. This flexibility is one reason traditional geometric blocks remain popular: one construction idea can lead to many different handmade projects.
If turning the block into a mini quilt or table topper, prepare a backing fabric and batting slightly larger than the pieced top. Layer the backing, batting, and quilt top, then baste the layers using your preferred method. Make sure the quilt top remains flat and centered before beginning the quilting stage.
For the quilting itself, simple designs can complement the strong patchwork geometry beautifully. Stitching in the ditch, straight-line quilting, diagonal lines, or gentle echo quilting around the central shapes can all work well. The objective is not to cover the piecing with elaborate stitching but to support the design while securing the three layers.
Binding provides the final frame. A dark binding can emphasize the black dotted sections, while brown creates a softer continuation of the warm palette. Cream gives the project a lighter finish. If your version uses brighter colors, select a binding that repeats one of the main fabrics so the finished project looks intentionally coordinated.
You can also experiment with a scrappy Sawtooth Star Quilt Block Pattern. Instead of using one floral fabric, choose several small floral prints with similar background colors. Replace the single brown with multiple earthy tones or use several dark fabrics instead of one dotted print. Maintaining consistent light, medium, and dark values will help preserve the recognizable geometry even when many prints are introduced.
Most importantly, treat the reference project as inspiration rather than a restriction. Quilting becomes especially rewarding when traditional geometry reflects your own taste. Pastels can create a delicate nursery-style block, jewel tones can make it dramatic, and neutral linen-inspired fabrics can produce a modern farmhouse appearance. The construction principles remain essentially the same while the personality of the finished Sawtooth Star Quilt Block Pattern changes completely.
FAQ About the Sawtooth Star Quilt Block Pattern
What is a Sawtooth Star Quilt Block Pattern?
A Sawtooth Star Quilt Block Pattern is a classic geometric quilting design traditionally featuring a central square surrounded by pointed star sections. Traditional versions commonly use flying geese units to form the star points. Modern variations may reinterpret the geometry through half-square triangles, contrasting fabrics, and alternative center arrangements.
Is the Sawtooth Star suitable for beginners?
Yes. A simplified version can be approachable for confident beginners because it relies heavily on straight seams and basic geometric units. The main challenge is precision. Practicing half-square triangles, consistent quarter-inch seams, accurate trimming, and careful pressing will make construction much easier.
What fabrics work best for this quilt block?
Quilting cotton is an excellent choice because it is stable, widely available, and relatively easy to cut and piece. For a look inspired by the photograph, combine a light neutral, a medium earthy tone, a strong dark fabric, and a small-scale floral or printed fabric.
How can I make my star points more accurate?
Cut carefully, sew with a consistent seam allowance, and square up individual units before final assembly. When joining sections, pay attention to where the point intersects the seam allowance. Avoid stretching diagonal edges and use pins when necessary to keep intersections aligned.
Can I change the colors shown in the original design?
Absolutely. Color customization is one of the best features of this pattern. Instead of copying specific colors, preserve the contrast relationships. Choose one light fabric, one medium fabric, one strong dark fabric, and one accent print. This approach gives you freedom while keeping the geometric design clearly visible.
What is the difference between half-square triangles and flying geese?
A half-square triangle is a square made from two triangular fabric sections, generally in contrasting fabrics. A flying geese unit is rectangular and visually contains a larger central triangle flanked by two smaller triangles. Both are fundamental quilting units and can appear in star-based patterns.
Why does my finished quilt block look uneven?
Common causes include inaccurate cutting, inconsistent seam allowances, stretched bias edges, or units that were not trimmed before assembly. Check each stage separately. Correcting individual units before joining the rows is easier than trying to square a severely distorted completed block.
Can this pattern be used to make an entire quilt?
Yes. Repeat the Sawtooth Star Quilt Block Pattern across multiple blocks and arrange them in rows. You can place blocks directly beside one another or add sashing between them. Alternating fabric combinations from block to block can also create a beautiful secondary pattern across a larger quilt.
How should I press quilt block seams?
Press rather than aggressively sliding the iron across the fabric. Seams may be pressed open or to one side depending on your construction preference. When neighboring seams are pressed in opposite directions, they can often nest together and make intersections easier to match.
How can I make the photographed style look more modern?
Try solid fabrics, low-volume backgrounds, monochromatic palettes, or bold contrasting colors. Reducing the number of printed fabrics can emphasize the geometric structure, while using modern small-scale prints can maintain visual interest without overwhelming the star shape.
Conclusion
The Sawtooth Star Quilt Block Pattern combines recognizable quilting tradition with enough flexibility to encourage personal creativity. By studying the photograph as a collection of smaller geometric units, selecting fabrics according to light, medium, dark, and accent values, and constructing accurate triangle sections, you can gradually recreate the balanced star-inspired appearance without treating the project as one complicated piece.
Throughout this project, the most important techniques are careful cutting, accurate half-square triangles, optional flying geese units for a traditional interpretation, consistent quarter-inch seams, thoughtful pressing, and careful matching at intersections. Building and trimming the individual components before assembling the final rows helps create cleaner points and a more balanced finished block.
The warm brown, cream, floral, and dark dotted palette shown in the inspiration image is only one possibility. You can personalize your Sawtooth Star Quilt Block Pattern with pastels, farmhouse neutrals, bold modern colors, scraps, florals, or seasonal fabrics while following the same fundamental construction principles. That freedom is part of what makes quilting such an enjoyable creative process.
Now I would love to know your sincere opinion about this Sawtooth Star Quilt Block Pattern. What color combination would you choose for your own version? Leave your thoughts and suggestions, and share which quilt pattern or quilting technique you would like to explore next.