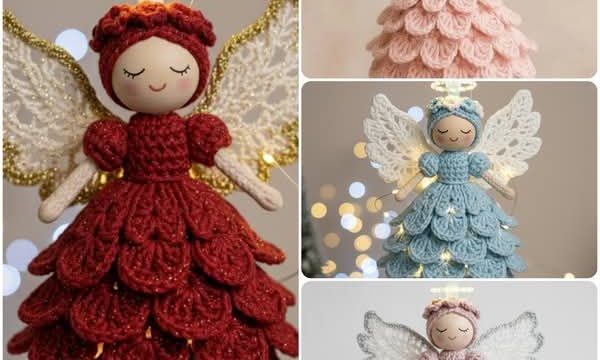
The Crochet Doll Ornament Pattern is a charming handmade project that combines crochet texture, playful colors, and sweet doll-inspired details in one small decorative piece. This design features a round doll head, a crocheted cap with a hanging loop, tiny arms, and a wonderfully textured body made from layered petal or puff-style stitches. The finished ornament can be adapted for Christmas trees, nursery decorations, handmade gift toppers, craft displays, or seasonal garlands.
Because the project is relatively small, it is also a practical way to use leftover yarn while practicing several useful US crochet stitches.One of the most appealing qualities of this Crochet Doll Ornament Pattern is how easily the appearance can be personalized. Pastel pink, lavender, sage green, cream, yellow, and blue create the soft handmade look seen in the inspiration, but the same construction can work with traditional Christmas colors, neutrals, rainbow combinations, or scraps from previous projects.
The layered body is especially important because it gives the doll dimension without requiring a complicated amigurumi construction. By changing the number of textured clusters, their colors, and the length of the body, every little doll can have its own personality while following essentially the same pattern.
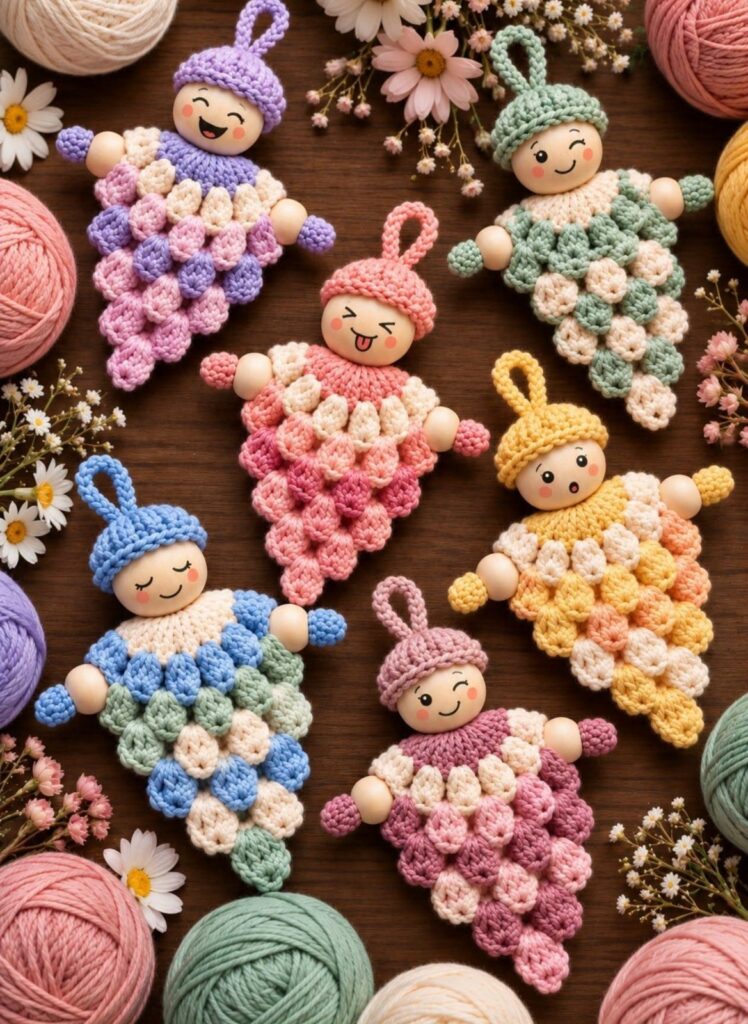
This tutorial uses US crochet terminology and explains the construction as a customizable interpretation of the pictured project. Since yarn thickness, hook size, tension, wooden bead size, and individual stitch style can change the final dimensions, stitch counts should be treated as a practical starting point rather than an absolute measurement. For a small ornament, a finished length of approximately 12–16 cm, including the hanging loop, works beautifully. Before beginning, read through the complete pattern so you understand how the cap, collar, textured body, arms, and finishing details work together.
Materials, Crochet Abbreviations, and Preparing the Doll
For this Crochet Doll Ornament Pattern, choose a smooth cotton or cotton-blend yarn in approximately DK or light worsted weight. You will need a main color, a contrasting color, and cream or another neutral shade. A crochet hook around 3.0–3.5 mm is a useful starting point, although you should choose a hook that produces compact stitches without making the fabric excessively stiff. You will also need a large unfinished wooden bead for the head, two smaller wooden beads for the hands, a yarn needle, scissors, stitch markers, and optional embroidery or non-toxic craft supplies for facial details.
The main US crochet abbreviations used throughout this project are: ch = chain, sl st = slip stitch, sc = single crochet, hdc = half double crochet, dc = double crochet, st/sts = stitch/stitches, sp = space, rep = repeat, inc = increase, and FO = fasten off. You may also use a puff or cluster stitch for the dimensional petals. Understanding these basic abbreviations before starting makes the instructions much easier to follow.
For the textured body, use a simple puff stitch variation: yarn over, insert the hook into the indicated stitch, yarn over and pull up a loop. Repeat this action two more times in the same stitch until several loops are on the hook. Yarn over and carefully pull through the accumulated loops, then secure with ch 1. The goal is to produce a plump oval petal rather than a flat stitch. If your yarn is thin, you can add another yarn-over repetition to make each puff fuller.
Begin with the collar that will sit immediately beneath the wooden head. With your chosen collar color, make a small adjustable ring or chain long enough to fit neatly around the lower portion of the head attachment. A useful starting construction is ch 12, join with a sl st without twisting, then work 1 sc in each ch around. Join with a sl st. Check the opening against your bead before continuing because wooden beads vary considerably in diameter.
For the next round, create the foundation for the doll’s decorative body. Ch 1, then work increases evenly around by alternating 1 sc in the next st and 2 sc in the following st. Continue around and join with a sl st. If your foundation begins to cup too strongly, add additional increases. If it ripples excessively, reduce the number of increases. You want a small, mostly flat circular collar that can support the first row of textured petals.
Before proceeding, decide on your color sequence. The ornaments in the inspiration use harmonious combinations such as pink and cream, lavender and blush, blue and sage, yellow and cream, and green with neutral accents. Selecting two or three coordinated colors creates enough contrast to reveal every textured stitch while maintaining a cohesive appearance. Cut short yarn samples and arrange them together first if you are unsure about your palette.
Crochet the Layered Puff-Stitch Doll Body
Start the first decorative layer immediately beneath the collar. Attach the first body color and ch 1. Work one puff or cluster into the first available stitch, secure it with ch 1, skip the next stitch if necessary for spacing, and make another puff. Continue around the foundation. These stitches should sit closely enough to resemble overlapping petals, scales, or tiny bundles of yarn. Join the round neatly with a sl st.
For the second layer, attach your contrasting color behind or slightly below the previous round. Work into the spaces between the first row of puffs whenever possible. This staggered positioning is what creates the rich layered crochet texture visible in the finished ornament. Make one puff in each selected space and secure each with ch 1. Avoid stacking every puff directly underneath the one above it because staggered clusters produce a more natural cascading effect.
Continue building the body downward using alternating colors. At the beginning, maintain approximately the same number of puffs for one or two rounds. Then gradually decrease the width. One easy method is to skip one additional space every few clusters. Another method is to join two foundation spaces before making the next puff. There is no need to force exact decreases as long as both sides of the ornament remain visually balanced.
Around the middle of the body, the doll should be widest. After reaching this point, begin narrowing each subsequent layer more noticeably. For example, if one row contains approximately eight textured petals, the next could contain seven, followed by six, five, and finally three or four. The precise count depends on yarn weight and desired dimensions. Place the piece flat after every round and visually check the silhouette before fastening off.
Finish the bottom with a small pointed section. Attach your final color to the center of the lowest layer and work a compact puff. On the next section, use a smaller cluster or several sc decreases to create a tapered tip. Another option is to crochet ch 3, hdc in second ch from hook, sc in next ch, and attach this miniature tapered piece beneath the last puff. Secure all ends carefully on the back.
Once the textured body is complete, gently shape each cluster with your fingers. Do not aggressively stretch the ornament because the dimensional texture is part of its appeal. If you prefer a slightly flatter crochet ornament, lightly arrange it beneath a towel and allow it to rest. Cotton yarn generally responds well to gentle shaping. Avoid heavy pressing, especially when wooden beads or synthetic yarns are already attached.
Make the Doll Head, Crochet Hat, Hanging Loop, and Arms
Choose a smooth wooden bead large enough to become the focal point of your Crochet Doll Ornament Pattern. A bead approximately 25–35 mm in diameter generally works well, depending on the size of your crocheted body. The head can be left natural or decorated with a simple expression. If adding facial details, keep them minimal: small eyes, a curved mouth, and tiny cheek accents are enough to give each ornament a distinctive personality.
To make the crochet cap, create a magic ring and work 6 sc into the ring. Pull the ring closed. For Round 2, work 2 sc in each st around for 12 stitches. For Round 3, work 1 sc in the next st, 2 sc in the next st, repeating around. For Round 4, work 1 sc in each st around. Continue without increasing until the cap is deep enough to cover approximately the upper third of your wooden bead.
Try the cap over the bead frequently. The hat should fit securely but should not be stretched so tightly that the stitches become distorted. If you need additional width, add another increase round using 1 sc in the next 2 sts, 2 sc in the next st around. For a smaller bead, stop increasing earlier. Finish the lower edge with one round of sl sts or reverse single crochet if you want a more defined brim.
The hanging loop can be crocheted directly from the top of the cap. Join yarn at the center top and ch 18–25, depending on the desired loop size. Fold the chain back toward its starting point and attach it with a sl st. For a stronger loop, work sl st in each ch before attaching the end. Fasten off securely because this loop will support the complete weight of the ornament.
For each arm, join yarn near the upper side of the collar. Ch 5–7, depending on the scale of your doll, then work sl st or sc back across the chain. Thread a small wooden bead onto the arm to create a hand. After the bead, add a tiny crocheted ball or puff in the body color. You can create this by working several sc into a magic ring, closing it tightly, and stitching it to the end of the arm.
Repeat the same construction on the opposite side, making sure both arms are approximately equal in length. The arms can point outward, slightly downward, or at different angles to give each doll more character. Before securing everything permanently, lay the ornament flat and compare both sides. Small asymmetries can be charming, but adjusting the position now will create a cleaner finished handmade crochet doll.
Finally, position the wooden head between the collar and cap. Depending on your materials, the components can be secured with strong sewing thread, yarn passed through a bead opening, or another appropriate craft attachment method. Make sure every component is firmly connected, especially when the ornament will be stored and reused each year. Weave crochet ends through several neighboring stitches and trim only after checking that the knots and joins are stable.
Finishing, Color Variations, Sizing, and Decorating Ideas
After assembling your Crochet Doll Ornament Pattern, inspect the back carefully. Weave every loose yarn tail through several stitches using a yarn needle. Change direction once or twice while weaving so the yarn is less likely to pull free. Avoid cutting ends immediately beside knots. A well-finished back makes the ornament look professional and helps the piece survive repeated handling, storage, and seasonal decorating.
Facial expressions are an easy way to turn a group of identical crochet bodies into individual characters. One doll might have closed sleepy eyes, another a wide smile, and another a playful expression. Keep facial elements simple so they complement rather than overpower the crochet work. If the ornaments may be handled by small children, remember that decorative beads and other small components can present a choking hazard; these pieces are best treated as decorations rather than toys unless constructed specifically to applicable toy-safety requirements.
For a traditional Christmas version, combine red, forest green, cream, and gold-inspired yarn colors. For spring decorations, consider blush pink, lavender, pale blue, sage, and ivory. Autumn versions can feature pumpkin, mustard, rust, burgundy, and warm cream. The same crochet doll ornament construction can therefore be adapted to different seasons without changing the essential pattern.
You can also modify the size. For a miniature ornament, use fine cotton yarn, a 2.0–2.5 mm crochet hook, and smaller wooden beads. For a larger decoration, choose worsted yarn with approximately a 4.0 mm hook and increase the size of the head accordingly. Rather than relying entirely on fixed measurements, keep the proportions consistent: the head should remain visually balanced with the widest part of the textured body.
If you are making several ornaments as gifts, create them assembly-line style. Crochet all caps first, then all collars, followed by the textured bodies and arms. This approach makes the process faster because you repeat the same technique several times before moving to the next stage. You can then create unique color combinations and facial expressions during assembly, ensuring that every Crochet Doll Ornament Pattern feels individual.
For presentation, add a small handmade tag or place several dolls together in a decorative gift box. They can also be attached to wrapped gifts as reusable toppers or combined into a festive garland. A collection in coordinating pastel colors creates a particularly attractive display because the repeated puff-stitch texture connects all the pieces visually even when their colors and expressions differ.
Frequently Asked Questions About the Crochet Doll Ornament Pattern
Is the Crochet Doll Ornament Pattern suitable for beginners?
Yes, an adventurous beginner who understands chain, slip stitch, single crochet, increases, decreases, and basic puff stitches should be able to complete the project. The textured body may require a little practice, but it consists largely of repeated stitch groups.
What yarn works best for crochet doll ornaments?
Smooth cotton or cotton-blend yarn is an excellent choice because it produces defined stitches and holds dimensional textures well. Acrylic can also work. Avoid extremely fuzzy yarn when making your first ornament because it can make stitches more difficult to identify.
What hook size should I use?
For DK or light worsted yarn, approximately 3.0–3.5 mm is a practical starting range. The ideal hook depends on your yarn and tension. Your stitches should be compact while remaining comfortable to work.
How large should the finished ornament be?
A practical finished size is around 12–16 cm, including the loop, although there is no required measurement. You can create miniature or oversized versions simply by changing the yarn, hook, bead sizes, and number of body layers.
Can I make the head entirely from crochet instead of using a wooden bead?
Yes. Crochet a small amigurumi-style sphere using sc increases and decreases, stuff it lightly with fiberfill, and embroider the facial features. This variation is especially useful when you want a completely yarn-based ornament.
How do I make the textured body fuller?
Use larger puff stitches, place them closer together, or add additional layers. Working the next row of puffs between the clusters of the previous row also creates more depth. Be careful not to add so many stitches that the body becomes excessively heavy.
Why is my ornament curling?
Curling usually indicates that the stitch count and increases do not match the natural shape of the fabric. If the collar cups inward, add slightly more increases. If it becomes wavy, reduce them. Differences in tension can also affect the final shape.
Can I use leftover yarn for this pattern?
Absolutely. This is an excellent scrap yarn crochet project because each section requires relatively little yarn. Coordinating scraps can be turned into a colorful collection without purchasing multiple full skeins.
How can I make every doll look different?
Change the hat color, body palette, facial expression, arm position, number of textured layers, and hanging-loop color. You can also experiment with striped collars or alternate puff colors from row to row.
Can these ornaments be used as children’s toys?
A decorative version containing wooden beads or other small components should not automatically be considered a toy, particularly for babies or young children. If creating an item intended for play, use child-appropriate construction methods and materials and follow the relevant toy-safety requirements for your location.
How do I keep the hanging loop from stretching?
Make the loop with a slightly smaller hook or reinforce the chain by working sl sts back along the chain. Secure both ends firmly into several stitches at the top of the cap.
Can I turn this design into a Christmas garland?
Yes. Make several dolls and attach their individual loops to a longer crocheted chain. Leaving equal spacing between ornaments creates a colorful handmade garland for a mantel, wall, craft room, or Christmas display.
Conclusion
The Crochet Doll Ornament Pattern combines simple construction with beautiful dimensional details, making it a fun project for anyone who enjoys small decorative crochet pieces. Throughout this tutorial, you learned how to prepare the collar, create a layered puff-stitch crochet body, shape a small crochet cap, add a hanging loop, construct the arms, position the wooden head, and finish the ornament neatly.
The most important part of this pattern is understanding that the design is highly adaptable. Once you learn the basic structure, you can change the yarn colors, body length, puff-stitch arrangement, facial expressions, hat style, and overall dimensions. Pastel combinations produce a soft whimsical appearance, while classic holiday colors can transform the same pattern into a festive Christmas crochet ornament.
This project is also a wonderful opportunity to practice useful US crochet stitches on a manageable scale. Techniques such as sc, sl st, increases, decreases, puff stitches, magic rings, and chains appear repeatedly, helping you improve your crochet skills while creating something decorative and personal.
Start Your Journey to a Healthier Relationship Today