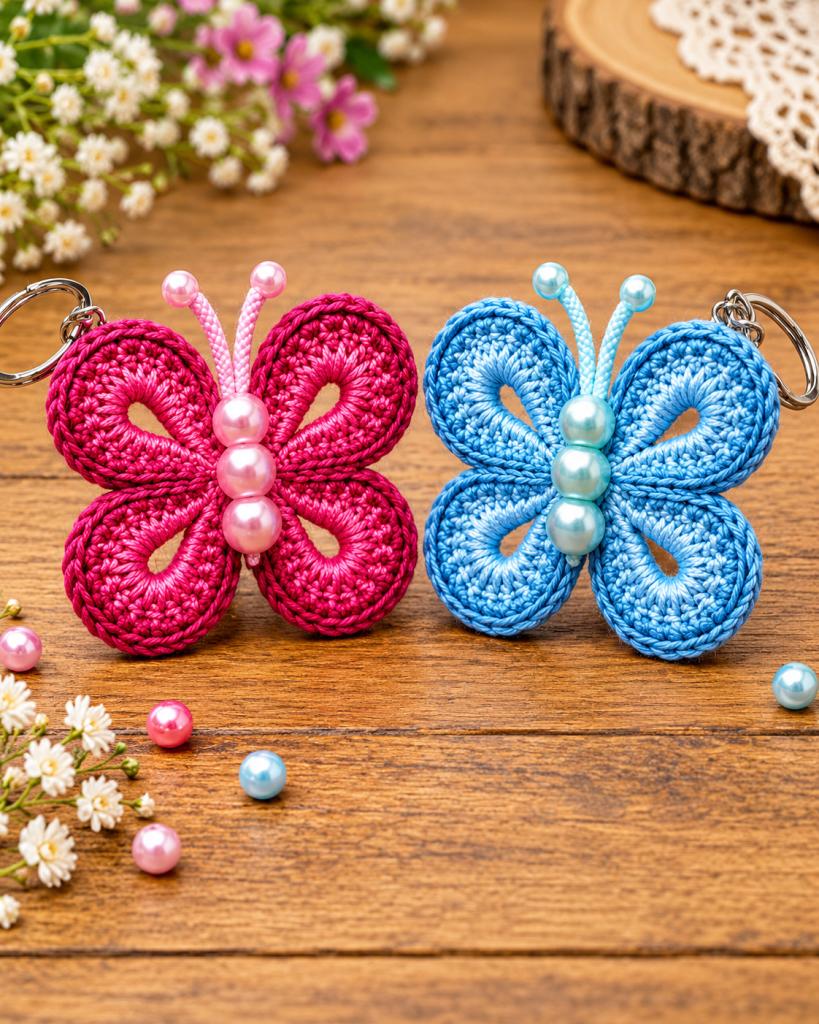
Crochet Butterfly Keychains Pattern is a cheerful handmade project that transforms a small amount of yarn into a beautiful butterfly accessory that can be attached to keys, handbags, backpacks, zipper pulls, or handmade gifts. Inspired by the colorful butterfly keychains shown in the photo, this design combines four rounded crochet wings, a narrow center body, decorative beads, antennae, and a metal key ring. Because the project is compact, it is also an excellent way to practice shaping, increasing, working around chains, and creating symmetrical crochet pieces without committing to a large project. The finished butterfly can be customized with bright colors, soft pastels, metallic-looking yarns, or contrasting borders, making every keychain slightly different and personal.
One of the most appealing things about this Crochet Butterfly Keychains Pattern is that it can be made with leftover yarn from other crochet projects. Cotton yarn is especially useful because it provides definition and helps the wings keep their shape, although acrylic or blended yarn can also work well. A finished butterfly can measure approximately 3.5 to 4.5 inches (9 to 11.5 cm) across depending on yarn weight, hook size, and personal tension. The pattern uses familiar U.S. crochet stitches, including chain, slip stitch, single crochet, half double crochet, and double crochet. Even if you are still improving your crochet skills, the small size of this project makes it easy to repeat a section when necessary.
The phrase Crochet Butterfly Keychains Pattern refers to the complete method used to crochet, shape, assemble, decorate, and finish a butterfly that can be connected to keychain hardware. The crochet portion forms the four wings, while beads or crocheted circles can create the body. Small cords or chains form the antennae, and a sturdy loop connects the butterfly to the metal ring. In this tutorial, the butterfly is created with two larger upper wings and two slightly smaller lower wings, helping produce the recognizable butterfly silhouette seen in the inspiration image. Careful finishing is important because a keychain will normally receive more movement and handling than a purely decorative crochet item.
Materials, Measurements, and Crochet Stitches for the Butterfly Keychain
For one butterfly, prepare approximately 20 to 30 yards (18 to 27 meters) of lightweight cotton or cotton-blend yarn. A sport or DK-weight yarn works especially well when you want compact, defined stitches. You can use one color for the entire butterfly, two coordinating shades, or one main shade with a darker border. Bright pink, turquoise, lavender, yellow, coral, and blue are attractive choices for small accessories.
A 2.5 mm to 3.5 mm crochet hook is a practical starting range. Choose the smaller hook if you want tighter, firmer fabric, since compact stitches help a crochet keychain resist stretching. The exact hook should still match your yarn and tension. Your stitches should be comfortable to work without leaving large spaces between them.
You will also need a yarn needle, small scissors, a metal key ring or lobster clasp, and optional decorative beads. For a butterfly similar to the photographed example, prepare three medium beads for the body and two smaller beads for the ends of the antennae. Make sure the bead holes are large enough for the cord or yarn that you plan to use.
The primary stitches in this Crochet Butterfly Keychains Pattern are simple. Chain (ch) creates the foundation and antenna cords. Slip stitch (sl st) joins rounds or moves the working yarn without adding much height. Single crochet (sc) produces firm fabric, while half double crochet (hdc) and double crochet (dc) create the height needed to round the wings.
Gauge is not extremely strict for a decorative butterfly, but consistency is important. A suggested finished size is about 4 inches (10 cm) wide and 3 inches (7.5 cm) tall before adding the key ring. If your butterfly is much larger than expected, try a smaller hook or thinner yarn. If it feels too tiny or difficult to shape, increase the hook size slightly.
Before beginning, remember that the wings should be symmetrical. Count stitches carefully and compare matching wings as you work. A small difference can usually be corrected during blocking and assembly, but accurate stitch counts will produce a cleaner handmade crochet butterfly and make the final keychain look more polished.
How to Crochet the Four Butterfly Wings Step by Step
Begin with the first upper wing. Chain 12 stitches. Starting in the second chain from the hook, work 1 single crochet, 1 half double crochet, 6 double crochets, 1 half double crochet, and 1 single crochet along the foundation chain. Work several stitches into the final chain so the work can curve around the end rather than stopping in a straight line.
Continue working along the opposite side of the foundation chain. Mirror the stitches from the first side so the wing develops into an elongated oval. Work a single crochet near the narrow end, half double crochets as the shape widens, double crochets through the widest area, and then return gradually to shorter stitches. Join with a slip stitch.
For the next round, chain 1 and work single crochet around the entire wing. Increase approximately every third or fourth stitch around the wide curve by placing 2 single crochets into the same stitch. Around the narrow inner end, keep the increases minimal. This difference creates the broad outside edge and tapered center needed for the butterfly shape.
Create the decorative opening inside the wing by forming a chain space during the second or third round. When you reach the central area, chain 5 or 6, skip 3 stitches, and continue crocheting around the wing. On the following round, crochet around the chain rather than closing the opening completely. This produces the teardrop-shaped space visible inside the wings and adds a delicate appearance without requiring complicated lace techniques.
Make a second upper wing using exactly the same method. Place the first wing beside the second one occasionally to compare their dimensions. If one wing appears wider, check whether you accidentally added an extra increase. Matching upper wings are one of the most important details in a successful Crochet Butterfly Keychains Pattern.
For the lower wings, repeat the basic oval construction using a slightly shorter foundation chain of about 9 or 10 chains. Use the same progression from short stitches to taller stitches, but reduce the total number of double crochets. Create the decorative opening again and finish with a neat single crochet border. Make two matching lower wings so you have four pieces ready for assembly.
Assembling the Butterfly Body, Antennae, and Key Ring
Arrange the four completed wings on a flat surface before sewing anything together. Position the two larger wings on top with their narrow ends pointing inward. Place the smaller wings directly below them. The four inner tips should meet closely in the center, forming the basic butterfly silhouette. Adjust the angles until both sides look balanced.
Thread a yarn needle with matching yarn and sew the upper wings together through several stitches at their narrow ends. Add the lower wings beneath them and stitch all four pieces securely through the center. Avoid pulling the stitches excessively tight because this can distort the wings. The goal is to create a strong center while keeping the outer edges open and rounded.
To form the body, you can use beads as shown in the inspiration image. Thread three beads vertically through the center using strong cord, embroidery thread, or durable yarn. A larger bead can be positioned near the upper body, followed by two similar beads below it. Sew through the butterfly center several times so the body is firmly anchored.
If you prefer an entirely crocheted version, crochet a short narrow tube instead of using beads. Chain 2 and work approximately 5 or 6 single crochets into the second chain from the hook. Continue working in a spiral for several rounds until the tube measures approximately 1.5 inches (4 cm). Lightly stuff it if desired, flatten it slightly, and sew it over the center seam.
For the antennae, cut two short lengths of sturdy cord or create two crochet chains approximately 2 to 2.5 inches (5 to 6.5 cm) long. Secure them behind the top of the butterfly body. Add a small bead to the end of each antenna if you want the playful beaded look shown in the photo. Tie secure knots and hide the ends inside the body whenever possible.
Attach the key ring at one upper corner or behind the center of the butterfly. One strong method is to crochet a small hanging loop by chaining 6 to 8 stitches, passing the chain through the key ring, and joining it securely to the butterfly with slip stitches. Sew through the attachment several times because this part will experience the greatest amount of pulling during everyday use.
Finishing, Shaping, Color Ideas, and Helpful Crochet Tips
After assembly, gently shape each wing with your fingers. If you are using cotton yarn, light blocking can improve the symmetry considerably. Pin the butterfly onto a blocking mat, arrange the wings evenly, lightly dampen the crochet fabric, and allow it to dry completely. Avoid soaking decorative beads or metal hardware unless you know they are water resistant.
The border can make a major difference in the finished design. Using a darker shade around a brighter center gives each wing additional definition. For example, a vivid pink butterfly can be edged with burgundy, while a sky-blue butterfly can be edged with royal blue. This simple contrast emphasizes the curved shape and makes the stitches easier to see.
You can also create a multicolored Crochet Butterfly Keychains Pattern by changing yarn shades between rounds. Try a pale center with a darker outer round, a rainbow combination, or four wings made from different scraps. When changing colors, finish the final yarn-over of the previous stitch using the new color so the transition remains neat.
When weaving in yarn ends, secure them more carefully than you might on a decorative item that stays at home. A keychain is frequently handled, placed inside bags, and pulled against other objects. Weave each end through several directions of the crochet fabric and trim only after confirming that the yarn cannot easily loosen.
If your wings curl, the most common reason is tight tension or too few increases. If the edges ripple dramatically, you may have added too many increases. A slight curve is not a problem because blocking and assembly will naturally shape the wings, but the pieces should generally lie flat before they are sewn together.
Once you understand the construction, this butterfly becomes a quick project that is easy to personalize. You can make several butterflies in coordinating colors, add them to gift packages, use them as backpack charms, or create matching accessories for friends and family. Because the project requires very little yarn, it is also a practical way to use attractive leftovers that are too small for larger crochet patterns.
Frequently Asked Questions About the Crochet Butterfly Keychains Pattern
Is this Crochet Butterfly Keychains Pattern suitable for beginners?
Yes. A beginner who is comfortable with chains, single crochet, half double crochet, double crochet, and slip stitches should be able to follow the project. The most important skills are stitch counting and making the second wing match the first. Working slowly on the first butterfly usually makes the following butterflies much easier.
What yarn works best for crochet butterfly keychains?
Cotton or cotton-blend yarn is a strong choice because it produces defined stitches and a firm finished fabric. DK or sport-weight yarn keeps the butterfly compact enough for a keychain. Acrylic can also be used, although very soft acrylic may create more flexible wings.
What size crochet hook should I use?
A 2.5 mm to 3.5 mm hook works well with many lightweight yarns. The goal is to create dense stitches that will not stretch too easily. Always consider the yarn thickness and your personal tension rather than relying only on one hook size.
How large should the finished butterfly be?
A convenient keychain size is approximately 3.5 to 4.5 inches (9 to 11.5 cm) across. However, the design can easily be made smaller or larger. Thinner yarn and a smaller hook create a miniature butterfly, while thicker yarn and a larger hook produce a larger bag charm.
Can I make the butterfly without beads?
Absolutely. The beads are decorative rather than structurally necessary. You can replace them with a crocheted body, embroidered knots, small crochet circles, or a wrapped yarn body. An all-crochet version is especially useful when you want a softer accessory.
How do I keep the butterfly wings flat?
Use a firm yarn, maintain even tension, and add increases around the curved edges. After the wings are completed, block them on a flat surface before assembly. Cotton yarn responds especially well to this shaping method.
Why are my two wings different sizes?
The most common reasons are inconsistent stitch counts, missed increases, or changes in tension. Count every round and make both matching wings using the same number of foundation chains and increases. Making the second wing immediately after the first can also help maintain consistent tension.
How can I make the key-ring attachment stronger?
Create the hanging loop with tight chains, reinforce the attachment with several sewing passes, and weave the yarn tail deeply into the butterfly. For frequently used keys, you can also use strong cord inside the crochet hanging loop for additional support.
Can this butterfly be used for something other than a keychain?
Yes. Without the metal ring, the butterfly can become a bag decoration, zipper pull, garland ornament, gift topper, appliqué, nursery decoration, or handmade embellishment. Smaller versions can also be sewn onto hats or fabric accessories.
How long does one crochet butterfly take to make?
The time depends on crochet experience and how much decoration you add. Once familiar with the wing construction, many crocheters can complete the crochet pieces relatively quickly. Additional time is needed for sewing, attaching beads, weaving in ends, and shaping the finished butterfly.
Can I sell finished butterflies made from this type of project?
Handmade butterflies can be attractive items for craft collections because they are lightweight, colorful, and easy to customize. If making several, pay special attention to strong assembly and consistent finishing so each finished accessory has the same level of quality.
How can I make the butterfly look more detailed?
Try adding a contrasting final round, using shiny yarn, combining two colors within each wing, adding pearl-style beads, or embroidering tiny accent stitches around the edges. Small changes can give the same basic Crochet Butterfly Keychains Pattern many different looks.
Conclusion
The Crochet Butterfly Keychains Pattern is a charming small crochet project that combines simple stitches with creative shaping and decorative finishing. Throughout this tutorial, you learned how to choose suitable yarn and hook sizes, crochet two large upper wings and two smaller lower wings, create decorative openings, assemble the butterfly symmetrically, add a beaded or crocheted body, make antennae, and securely attach the finished butterfly to a key ring.
You also learned how chain stitches, single crochet, half double crochet, double crochet, increases, borders, and careful blocking work together to create the finished shape. The project can be adapted with different yarn colors, contrasting edges, decorative beads, or an entirely crocheted body, allowing each butterfly to have its own personality while following the same basic construction.