The DIY Christmas Fabric Basket Pattern is a charming and practical sewing project that transforms beautiful holiday fabrics into a festive storage basket. With its structured square shape, cheerful Christmas prints, and decorative button closures, this handmade basket is perfect for organizing small items, displaying Christmas ornaments, or creating thoughtful holiday gifts. Whether you are an experienced sewing enthusiast or a beginner looking for a creative project, this tutorial offers a wonderful opportunity to make something both functional and decorative.
One of the most appealing features of this Christmas Fabric Basket Pattern is its clever construction. Instead of sewing several separate panels together, the basket begins with a simple cross-shaped fabric pattern that folds into a three-dimensional container.
The contrasting lining adds a professional appearance, while the fabric loops and buttons hold the corners together. This construction makes the project surprisingly approachable, even for those who are still developing their sewing skills. The finished basket can be placed on a holiday table, beside a Christmas tree, or on a sewing room shelf.
Another reason to love this DIY Fabric Storage Basket is its versatility. Although Christmas fabrics create a wonderfully festive result, the same design can be made using floral cotton, vintage prints, gingham, farmhouse patterns, or colorful quilting scraps. You can also customize the dimensions, add lightweight stabilizer for additional structure, or experiment with different button styles. The result is a reusable fabric basket that can become part of your seasonal decorations for many years.
Materials and Measurements for the Christmas Fabric Basket Pattern
Before beginning your Christmas Fabric Basket Sewing Tutorial, gather all the necessary supplies and prepare your fabrics. Choosing good-quality cotton is especially important because it helps the basket maintain its shape while making the sewing process easier.
For a traditional Christmas appearance, select red fabric with small holiday motifs for the exterior and green-and-white gingham for the lining. This combination creates a beautiful contrast reminiscent of classic handmade Christmas decorations.
Materials needed:
- 1 fat quarter of Christmas-print cotton fabric for the exterior.
- 1 fat quarter of coordinating cotton fabric for the lining.
- Lightweight fusible interfacing or fusible fleece for added structure.
- 4 decorative wooden or plastic buttons, approximately 0.6–0.8 inches (15–20 mm) in diameter.
- 4 small fabric loops or pieces of cotton ribbon.
- Coordinating polyester or cotton sewing thread.
- Sewing machine with a straight-stitch setting.
- Fabric scissors or rotary cutter.
- Quilting ruler and fabric marking pencil.
- Sewing clips or straight pins.
- Iron and ironing board.
- Hand-sewing needle for attaching buttons.
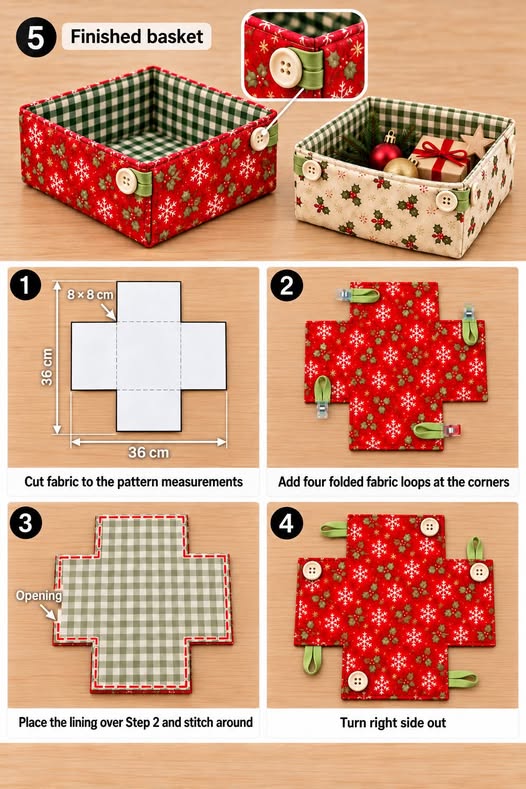
The original design shown in the reference image uses a cross-shaped template measuring approximately 36 × 36 cm (14.2 × 14.2 inches) at its widest points. The corner cutouts measure approximately 8 × 8 cm (3.15 × 3.15 inches), leaving a central square and four surrounding panels.
For an easy-to-measure interpretation of this design, start with a 36 × 36 cm square and remove an 8 × 8 cm square from each corner. This creates a cross-shaped piece with a 20 × 20 cm central area and four side panels that extend 8 cm outward.
The template measurements are cutting measurements rather than finished dimensions. After sewing with a 1 cm (3/8-inch) seam allowance, the approximate finished basket will have a base measuring 18 × 18 cm (7.1 × 7.1 inches) and sides approximately 7 cm (2.75 inches) tall.
If you prefer a firmer basket, apply interfacing to the wrong side of the exterior fabric before assembly. Lightweight fusible fleece provides a softly padded finish, while woven fusible interfacing creates a more flexible basket that folds easily.
When selecting buttons, consider both their decorative appearance and practicality. Natural wooden buttons look beautiful with traditional Christmas fabrics, while pearl-style or colorful plastic buttons can give the basket a more modern appearance.
Step-by-Step Instructions for Sewing the Christmas Fabric Basket
The construction of this Easy Christmas Fabric Basket Pattern is straightforward, but accurate measuring and careful stitching will help you achieve a professional finish. The basket is assembled flat before its corners are fastened together, making it easier to sew than many conventional fabric storage containers.
Step 1: Prepare the cross-shaped pattern
Begin by placing your exterior fabric on a flat cutting surface. Cut a square measuring 36 × 36 cm (14.2 × 14.2 inches). Carefully measure an 8 × 8 cm (3.15 × 3.15-inch) square at each corner and remove those four corner sections.
You should now have a symmetrical cross-shaped fabric piece with four rectangular extensions surrounding a central square. Use this first piece as a template to cut an identical shape from the lining fabric.
Step 2: Apply the stabilizer
If you are using fusible interfacing, cut it slightly smaller than the exterior fabric to reduce bulky seam allowances. Following the manufacturer’s instructions, fuse the stabilizer to the wrong side of the exterior fabric.
Press carefully without stretching the fabric. The stabilized material should remain flat, with no wrinkles or bubbles.
Step 3: Prepare the fabric loops
Cut four pieces of coordinating ribbon approximately 6–7 cm (2.4–2.75 inches) long, adjusting the length to accommodate your buttons.
Alternatively, create homemade fabric loops by folding narrow cotton strips lengthwise, stitching along the edge, turning them right side out, and pressing them flat.
Fold each strip into a small loop. Position the loops at four selected outer corners of the cross-shaped exterior piece, with the folded ends pointing inward toward the center of the fabric.
Baste each loop in place, making sure the raw ends extend into the seam allowance. The loops must be securely attached because they will hold the basket’s corners together.
Step 4: Attach the fabric lining
Place the lining fabric over the exterior fabric with the right sides facing each other. Carefully align all edges and corners, ensuring that the fabric loops remain sandwiched between the two layers.
Secure the pieces with sewing clips or pins. Sew around the entire cross-shaped perimeter using a 1 cm (3/8-inch) seam allowance, leaving an opening of approximately 6–8 cm (2.4–3.15 inches) along one straight edge for turning.
At each inward corner, stop with the needle down, lift the presser foot, pivot the fabric, and continue sewing. Accurate corner stitching is important for producing a neat basket.
Step 5: Turn the fabric right side out
After sewing the perimeter, trim excess fabric from the outer corners and carefully clip into the inner corners without cutting through the stitching.
Turn the entire cross-shaped piece right side out through the opening. Use a blunt turning tool to gently push out each corner and straighten the edges.
Press the piece thoroughly, folding the raw edges of the turning opening inward so they align neatly with the stitched perimeter.
Step 6: Finish the edges and attach the buttons
Topstitch approximately 3–5 mm (1/8–3/16 inch) from the outer edge, securing the turning opening and creating a clean, reinforced finish.
Lay the cross-shaped piece flat with the lining facing upward. Lift the four side panels to form the basket walls. Bring neighboring corners together and identify the locations where the fabric loops can fasten around the buttons.
Mark the matching button positions while the basket is temporarily assembled. Sew the four buttons securely onto the exterior fabric, checking that each loop reaches its button comfortably without pulling or distorting the basket.
Once all four buttons are attached, fasten the loops around them to create the finished square basket.
Creative Decorating Ideas and Practical Uses for Fabric Christmas Baskets
One of the greatest advantages of this Handmade Christmas Fabric Basket is its ability to blend into many different decorative styles. The basic construction is simple enough to allow countless fabric combinations, making it an excellent project for personal gifts, craft fairs, or seasonal home decorations.
For a classic holiday appearance, combine deep red fabric with green gingham, small white snowflakes, or traditional holly patterns. Wooden buttons and green fabric loops complete the rustic Christmas aesthetic.
If you prefer a more elegant style, try ivory cotton decorated with delicate gold stars. Pair it with a champagne-colored lining and cream fabric loops for a sophisticated basket suitable for Christmas dinner tables.
Vintage Christmas fabric is another wonderful choice. Prints inspired by traditional holiday postcards, nostalgic Christmas ornaments, or old-fashioned botanical illustrations can give the basket a beautiful heirloom appearance.
The finished baskets can be used to display lightweight Christmas ornaments, wrapped candies, small handmade decorations, sewing accessories, or individually packaged treats. They also make attractive containers for presenting small gifts to friends and family.
For sewing enthusiasts, a Fabric Basket Organizer can hold sewing clips, measuring tapes, small thread spools, and other frequently used supplies. Create several matching baskets to organize your sewing table while maintaining a coordinated decorative theme.
You can also use this project as a reusable alternative to disposable gift packaging. Fill the basket with handmade soaps, small fabric ornaments, or other thoughtful presents. The recipient can continue using the basket long after the holiday season has ended.
Expert Sewing Tips for a Professional Fabric Basket Finish
Although this Beginner-Friendly Fabric Basket Pattern uses relatively simple construction techniques, several small details can significantly improve its final appearance. Taking extra care during cutting, stitching, and pressing will help create a basket with evenly shaped walls and neatly finished corners.
First, always prewash cotton fabrics when appropriate, especially if you plan to wash the finished basket. This helps reduce unexpected shrinkage and removes manufacturing finishes that may affect how the fabric behaves.
Second, use a sharp rotary cutter and quilting ruler to create accurate straight edges. The four corner cutouts must match precisely so that the basket panels fold evenly and form a balanced square.
Third, avoid using overly thick interfacing if your sewing machine struggles with bulky layers. The cross-shaped construction already includes several folded areas, and excessive thickness can make the corners difficult to fasten neatly.
Fourth, select a stitch length of approximately 2.5 mm for the main seams. For decorative topstitching, a slightly longer stitch of 3 mm often provides a cleaner, more attractive finish.
Fifth, reinforce the fabric loops by sewing across their raw ends within the seam allowance before attaching the lining. These small fasteners receive repeated tension whenever the basket is assembled or opened.
Finally, press each seam carefully and test the basket’s shape before permanently attaching the buttons. Accurate button placement is essential because uneven positioning can cause the fabric walls to lean or the corners to pull out of alignment.
Another helpful technique is to use contrasting thread for decorative topstitching. White thread on red Christmas fabric can create a charming handmade appearance, while matching red thread provides a more understated finish.
If the basket will be used frequently, consider adding a second row of reinforcement stitches where the loops are attached. This extra stitching increases durability without significantly changing the design.
For gifting, you can create coordinated sets of two or three baskets in complementary sizes. Smaller baskets work beautifully for candy or sewing notions, while larger versions can be used for lightweight craft materials or tabletop decorations.
Frequently Asked Questions About the Christmas Fabric Basket Pattern
Is this Christmas fabric basket suitable for beginners?
Yes. This project is suitable for confident beginners who know how to sew straight seams, pivot around corners, and attach buttons. The flat cross-shaped construction makes assembly easier than sewing a basket from separate fabric panels.
What is the best fabric for making a Christmas basket?
Quilting cotton is one of the best choices because it is easy to cut, sew, press, and stabilize. Medium-weight cotton can also work well, especially when paired with a suitable lining.
Can I make the basket without interfacing?
Yes. The basket can be made from two layers of cotton fabric without interfacing, but the walls may be softer and less structured. Fusible interfacing is recommended when you want the basket to maintain a crisp shape.
Can I increase the size of the pattern?
Absolutely. To make a larger basket, increase the overall square dimensions and adjust the corner cutouts proportionally. For example, a 44 × 44 cm square with 10 × 10 cm corner cutouts creates a larger cross-shaped pattern with taller side panels.
Can I wash the finished fabric basket?
Most baskets made entirely from washable cotton, compatible interfacing, and washable buttons can be gently hand-washed. Always check the care recommendations for the fabrics and stabilizers you use, and reshape the basket while it dries.
Can I use the basket for food gifts?
Yes, but wrapped or packaged food items are recommended. If using the basket for candies, cookies, or chocolates, place them in food-safe packaging before putting them inside the fabric container.
How long does it take to sew one basket?
Depending on your experience, one basket may take approximately 45–90 minutes, including cutting, ironing, sewing, and attaching the buttons. Once you become familiar with the construction, making additional baskets is usually faster.
Conclusion
The DIY Christmas Fabric Basket Pattern is a delightful sewing project that combines creativity, functionality, and timeless holiday charm. Its clever cross-shaped construction, contrasting fabric lining, and decorative button closures make it an attractive accessory for Christmas decorating, organizing, and gift-giving.
With basic sewing tools, a few pieces of cotton fabric, and simple finishing techniques, you can create a beautiful handmade basket that reflects your favorite colors and holiday traditions. Whether you choose classic red and green Christmas prints, soft vintage florals, or elegant neutral fabrics, each version can have its own personality.
This Easy Christmas Fabric Basket Sewing Tutorial is also a wonderful way to use leftover quilting fabric and turn small materials into meaningful handmade gifts. Create one for your home, sew a matching collection for your holiday table, or prepare several as special presents for friends and family.