The Crochet Poinsettia Flower Pattern is a wonderful way to bring the beauty of traditional Christmas flowers into your home using yarn, a crochet hook, and a little creativity. With its layered petals, textured center, and festive appearance, a crocheted poinsettia can become a charming decoration for the holiday season
. Whether you are an experienced crocheter or a beginner looking for a rewarding seasonal project, this handmade flower offers an enjoyable opportunity to practice basic stitches while creating something beautiful and useful.
One of the most appealing features of the Crochet Poinsettia Flower Pattern is its versatility. You can use the finished flower to decorate Christmas trees, wreaths, gift packages, table arrangements, napkin rings, hair accessories, and handmade cards. Traditional red petals paired with green leaves create a classic holiday look, while white, cream, burgundy, pink, and gold combinations offer fresh alternatives. By changing the yarn colors, flower size, and number of layers, you can personalize every poinsettia to match your decorating style.
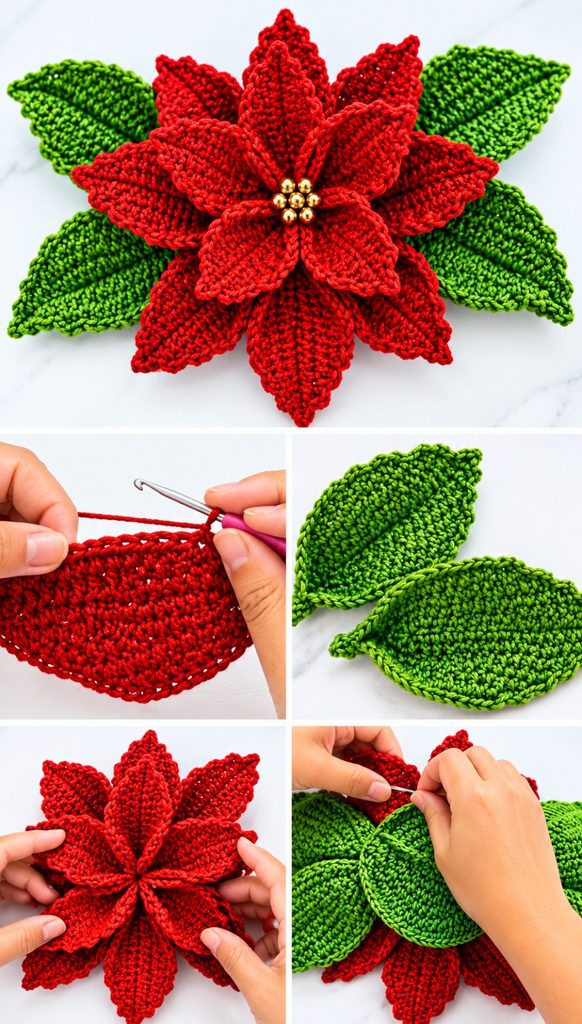
Another reason to try this crochet poinsettia flower is that it can be adapted to different skill levels and available materials. Beginners can start with simple petals and leaves, while more experienced makers can experiment with dimensional shapes, decorative centers, and multiple layers. The project is also a practical way to use leftover yarn from previous crafts. In this guide, you will learn how to choose suitable supplies, understand the basic construction of the flower, create the petals and leaves, assemble the finished decoration, and explore useful ideas for incorporating your handmade poinsettia into Christmas projects.
Materials and Basic Techniques for a Crochet Poinsettia Flower Pattern
Before beginning your Crochet Poinsettia Flower Pattern, gather the materials you need. Having everything ready makes the process more enjoyable and helps you maintain consistent stitches throughout the project. You will generally need red yarn for the main petals, green yarn for the leaves, and a small amount of yellow or gold yarn for the center. You can also choose white, cream, or burgundy yarn if you prefer a different color palette.
A smooth, medium-weight yarn is a convenient choice for a decorative poinsettia because it makes the stitches easy to see. Cotton yarn produces a defined texture and holds its shape well, while acrylic yarn is lightweight, affordable, and available in many colors. For a delicate flower, you can choose a finer yarn and a smaller hook. Always check the yarn label for recommended hook sizes, and remember that the best choice depends on the texture and firmness you want for your finished flower.
Your crochet hook should suit the yarn and your personal tension. A hook that is too large may create loose petals that do not hold their shape, while a hook that is too small can make the fabric stiff and difficult to work with. For many medium-weight yarns, a hook in the approximately 3.5 mm to 5 mm range is a reasonable starting point. However, check the yarn recommendations and make a small sample before beginning the complete flower.
You should also prepare scissors, a yarn needle, and stitch markers if you find them helpful. The scissors will be used to cut the yarn, while the yarn needle allows you to weave in the ends neatly. Stitch markers can help identify the beginning of a round or keep track of the center when working in a circular shape. If you plan to attach the flower to a wreath or another decoration, prepare a suitable method of attachment before assembling the finished piece.
Understanding basic crochet stitches will make this Christmas crochet flower pattern easier to follow. Common stitches include the chain stitch, slip stitch, single crochet, half double crochet, and double crochet. These stitches create different heights and textures, allowing you to shape petals that are narrow at the base and wider toward the outer edge. If you are unfamiliar with any stitch, practice it on a small swatch before working on the flower itself.
The most important technique is maintaining consistent tension. Try to make each petal similar in size, especially when you want a balanced, symmetrical flower. Count your stitches carefully and compare the petals as you work. If one petal becomes noticeably larger than the others, you can adjust it before assembly. A little patience at this stage will help your Crochet Poinsettia Flower Pattern look polished and professional, even if you are making your first decorative flower.
Step-by-Step Instructions for Crocheting the Petals and Leave
To begin your Crochet Poinsettia Flower Pattern, create a small center using yellow or gold yarn. Make a magic ring, or chain a few stitches and join them into a small circle with a slip stitch. Work several single crochet stitches into the ring, keeping the center compact. Close the ring carefully if you used the magic-ring method, and leave a manageable yarn tail for finishing. This center will provide the foundation for attaching the petals.
Next, switch to red yarn to begin the first layer of petals. Attach the yarn to the center with a slip stitch, then chain a few stitches to establish the starting height. Work a combination of taller and shorter stitches into the same base area to create a rounded, pointed, or slightly elongated petal shape. A simple petal can include single crochet stitches near the base, half double crochet stitches through the middle, and double crochet stitches toward the widest part.
To complete each petal, work back toward the base with shorter stitches or slip stitches, depending on the shape you prefer. Secure the base with a slip stitch before beginning the next petal. Repeat the process around the center until you have created the desired number of petals. Five or six petals can form a simple flower, while a larger number can create a fuller appearance. The exact count depends on the stitch pattern and the size of the center.
For a more realistic crochet poinsettia flower, make a second layer of petals behind the first. You can create this layer with a slightly darker red, burgundy, or another coordinating shade. Attach the yarn to the back of the center or to a separate small foundation ring. Position the second layer so that its petals appear between the petals of the first layer rather than directly behind them. This arrangement gives the flower more depth and creates the appearance of overlapping bracts.
Now crochet the green leaves. Begin with a small chain, then work along one side of the chain using a combination of single crochet, half double crochet, and double crochet stitches. At the tip, place several stitches into the same chain space to create a pointed end. Continue down the opposite side of the foundation chain with matching stitches. Finish with a slip stitch at the base. For a longer leaf, add more chain stitches; for a broader leaf, use taller stitches or increase the number of stitches around the tip.
Make three to five green leaves, depending on the size and fullness of your flower. Arrange them behind the red petals so that their pointed ends extend outward. You can also create a central vein by working slip stitches along the surface of each leaf, provided your yarn and stitch structure allow it. Before weaving in all the ends, lay the flower flat and check that the petals and leaves are evenly distributed. Adjusting the arrangement now makes the final assembly much easier.
Assembly, Finishing Touches, and Creative Decoration Ideas
Once the petals and leaves are complete, it is time to assemble your Crochet Poinsettia Flower Pattern. Position the first layer of petals around the yellow center, making sure the flower looks balanced from every angle. Attach the petals securely with a yarn needle or by joining them with slip stitches. Avoid pulling the yarn too tightly, as excessive tension can cause the center to pucker and prevent the petals from spreading naturally.
Place the second layer behind the first if you have made a layered flower. Turn the flower over and use the yarn tails to secure the layers together. Take small, even stitches through the base of the petals rather than stitching through the visible outer sections. This helps preserve the shape of the petals and keeps the attachment points hidden. After checking the front of the flower, trim only the excess yarn once the ends have been woven in securely.
Attach the green leaves to the back of the flower, distributing them evenly around the base. You can position the leaves directly beneath the petals or angle them outward to create a fuller silhouette. If the flower will be used as a Christmas tree ornament, consider adding a crocheted loop or a small length of ribbon. For wreaths and table arrangements, you can sew the flower onto a fabric backing or attach it to a suitable decorative base.
Blocking can help improve the appearance of your finished flower. For yarn that tolerates gentle wet blocking, lightly dampen the flower, arrange the petals and leaves into the desired shape, and allow it to dry completely. Follow the yarn manufacturer’s care instructions before using heat or steam, because some synthetic fibers can be damaged by high temperatures. Blocking is optional, but it can help the petals lie more evenly and make the finished decoration look tidier.
You can personalize your handmade crochet poinsettia with small details. A few yellow French knots made with embroidery thread, tiny crocheted buds, or carefully sewn beads can create an attractive center. If you choose beads or other small embellishments, make sure they are securely attached and suitable for the intended use. For decorations that may be handled by young children or pets, avoid loose small pieces and choose a simpler, securely finished design.
There are many ways to use the completed flower during the holiday season. Sew several poinsettias onto a festive cushion cover, arrange them around a handmade wreath, or attach one to the front of a gift bag. Smaller flowers can decorate greeting cards and napkin rings, while larger versions can become decorative accents for table settings. You can also combine red poinsettias with evergreen-inspired crochet leaves to create a coordinated Christmas display. Choosing a consistent palette across your projects helps create a warm, handmade holiday atmosphere.
Troubleshooting, Care Tips, and Frequently Asked Questions
When making a Crochet Poinsettia Flower Pattern, one common challenge is creating petals that curl too much or refuse to lie flat. This can happen when the stitches are too tight, the hook is too small, or the petal shape contains too many stitches in a limited space. Try relaxing your tension, using a slightly larger hook, or reducing the number of stitches near the base. Small adjustments can make a significant difference without requiring you to restart the entire flower.
Another common issue is uneven petal sizing. If the flower looks unbalanced, compare the stitch counts and shapes of your petals. Using the same sequence of stitches for every petal can help produce a consistent result. If you want a natural appearance, slight variations can be attractive, but large differences may make the flower look lopsided. Count each petal as you work and check the arrangement before sewing the pieces together.
If your flower looks flat, consider adding another layer of petals or using a slightly thicker yarn for the outer layer. You can also shape the petals gently with your fingers after finishing. Avoid pulling the center too tightly, because that can draw all the petals inward. If the flower is intended for a wreath or another arrangement, a small amount of additional structure behind the flower can help it maintain its shape without changing the visible crochet stitches.
How long does it take to crochet a poinsettia flower? The time depends on the yarn, flower size, number of layers, and your experience. A simple flower may take less than an hour once you understand the stitch sequence, while a more elaborate version with several layers and detailed leaves can take longer. Beginners may need additional time to practice the stitches and assemble the pieces neatly. Working at a comfortable pace is more important than finishing quickly.
Is the Crochet Poinsettia Flower Pattern suitable for beginners? Yes, a simplified version is suitable for beginners who know basic crochet stitches. Start with a small center, a single layer of petals, and a few simple leaves. Once you are comfortable with the construction, experiment with additional layers and decorative details. Choosing a smooth yarn and a light, easy-to-handle hook can make it easier to see your stitches and correct mistakes.
What is the best yarn for a crochet poinsettia flower? Cotton and acrylic yarn are both useful choices. Cotton provides stitch definition and a natural texture, while acrylic offers many color options and is often budget-friendly. The ideal yarn depends on whether you want a firm flower for a wreath, a soft decoration for a gift, or a lightweight ornament. Always consider the yarn’s care instructions and choose a hook that works well with its thickness.
Can I make a poinsettia flower in colors other than red? Absolutely. Red is traditional, but white, cream, blush pink, burgundy, and deep purple can create beautiful alternatives. You can also combine two shades in different petal layers or use green leaves with a pale flower for a softer look. For a modern holiday decoration, consider a neutral color scheme with a contrasting center. The basic construction remains the same regardless of the colors you choose.
How can I make my crochet poinsettia look fuller? Create two or three layers of petals and offset the placement of each layer. Use a slightly different shade for the inner or outer petals, and add enough leaves to frame the flower without hiding the petals. You can also vary the petal length slightly to create a more natural silhouette. Make sure the layers are attached securely at the center so that the flower holds its shape during use.
How do I attach a crochet poinsettia to a wreath or Christmas tree? For a wreath, sew the flower onto a fabric backing or secure it to a suitable decorative base. For a Christmas tree ornament, add a sturdy crocheted loop or ribbon at the back. The best attachment method depends on the materials used for the wreath or tree decoration. Check that the flower is firmly secured before hanging it, especially if the decoration will be moved or handled frequently.
How should I clean and store a crocheted poinsettia? Follow the care instructions for the yarn you selected. Many small crochet decorations can be spot-cleaned gently with a damp cloth, while some yarns may tolerate careful handwashing. Avoid wringing the flower or pulling on its petals. Let it dry completely before storage, reshape the petals if necessary, and keep it in a clean, dry container away from moisture and excessive pressure.
Can I sell flowers made using this crochet pattern? You can generally sell your own finished handmade creations, but you should check any specific pattern or design license if you are following instructions created by someone else. The original construction and written instructions may have separate copyright protections. If you intend to sell your work, create original photographs and descriptions of your finished products, accurately describe the materials, and avoid claiming that your design is exclusively yours if it is based on another maker’s protected pattern.