The Chicken Quilt Pattern is a charming and playful quilting project featuring rows of adorable chicken-inspired blocks surrounded by simple fabric backgrounds. This design is a wonderful way to combine patterned cotton fabrics, neutral backgrounds, and small appliqué details to create a cheerful quilt for the kitchen, farmhouse-style home, bedroom, or as a handmade gift.
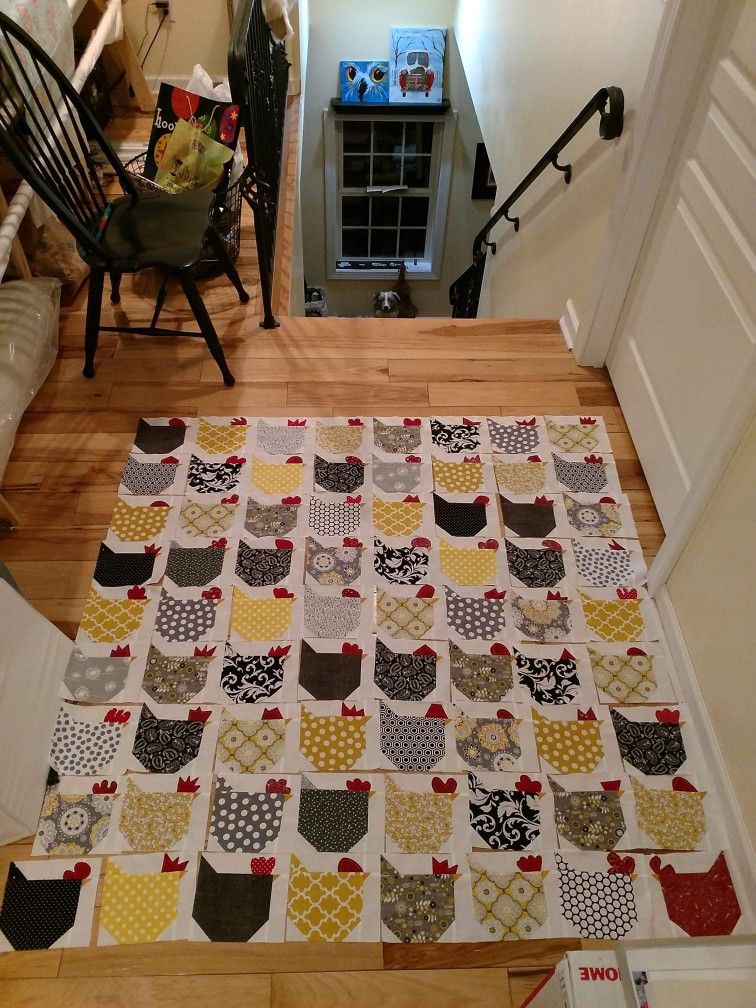
This quilt design is especially appealing because each block can be made with different fabrics while keeping the same basic shape. You can use polka dots, florals, geometric prints, solids, or scraps from your fabric collection. The combination of cream, yellow, gray, black, brown, and red shown in the example creates a beautiful country-inspired appearance, but you can easily choose your own color palette.
Whether you are an experienced quilter or learning how to make your first Chicken Quilt Pattern, this project can be adapted to different sizes. You can make a small wall hanging, table topper, baby quilt, lap quilt, or a larger bed-size quilt simply by changing the number of blocks.
Materials Needed
For this Chicken Quilt Pattern, you will need the following materials:
- Cotton quilting fabric for the chicken bodies
- Cream, white, or light-colored fabric for the background
- Small pieces of red fabric for the chicken combs
- Small pieces of red fabric for the wattles
- Dark fabric for optional chicken details
- Rotary cutter
- Self-healing cutting mat
- Quilting ruler
- Fabric scissors
- Sewing machine
- Cotton sewing thread
- Pins or quilting clips
- Fabric marking pen or pencil
- Iron and ironing board
- Quilt batting
- Backing fabric
- Binding fabric
- Hand-sewing needle
- Optional: fusible web for appliqué details
- Optional: walking foot for quilting
Choosing Your Fabric
Fabric selection is one of the most enjoyable parts of making this quilt. The example uses a mixture of neutral, yellow, gray, black, brown, and red fabrics. This creates a warm farmhouse look while allowing every chicken block to have its own personality.
For the background, choose a light fabric such as ivory, cream, beige, or white. A neutral background helps the patterned chicken bodies stand out clearly.
For the chicken bodies, consider using fabrics with small-scale patterns. Polka dots, tiny flowers, geometric prints, gingham, and simple decorative motifs work particularly well.
Red fabric is perfect for the comb and wattle because it gives the chickens a recognizable and playful appearance. If you want a softer look, you can replace bright red with burgundy, coral, pink, or rust.
When possible, choose fabrics with similar weights. Quilting cotton is recommended because it is easy to cut, sew, press, and quilt.
Preparing the Chicken Quilt Blocks
Before cutting your fabric, decide how large you want each finished block to be. A simple option is to make approximately 10-inch finished blocks, but you can make the blocks larger or smaller according to your project.
For a larger quilt, make multiple blocks and arrange them in rows. For example, a 5-by-6 arrangement creates 30 blocks, while a 6-by-7 arrangement creates 42 blocks.
Always remember that your cutting measurements should include the seam allowance. A common quilting seam allowance is 1/4 inch.
Create a paper template for the main chicken body if you want all of your blocks to have exactly the same shape. This makes cutting multiple blocks much easier.
Step 1: Cut the Background Fabric
Begin by cutting the light background fabric for each block.
The background pieces should be large enough to surround the chicken body while leaving room for the decorative comb and wattle.
If you are making a 10-inch finished block, you can begin with a slightly larger unfinished block and trim it to the correct size after assembling the pieces.
Cut enough background pieces for the number of chickens you want to include in your quilt.
Press the fabric before cutting. Smooth fabric will give you more accurate measurements and cleaner seams.
Step 2: Cut the Chicken Body
Choose your patterned fabrics for the chicken bodies.
You can make every chicken different, as shown in the example, or repeat the same fabrics throughout the quilt. Using different fabrics is an excellent way to use quilting scraps.
Cut the main chicken body shape from each selected fabric.
The chicken body can be created as a simple rounded or shield-like shape with a wider lower section and a slightly narrower upper section. The shape does not need to be complicated.
For beginners, making a paper template first is highly recommended. Place the template on the wrong side of your fabric, trace around it, and cut carefully.
Make sure you cut the same number of chicken bodies as your background blocks.
Step 3: Create the Chicken Comb
The small red comb is one of the details that makes this quilt instantly recognizable.
Cut small pieces of red fabric for the comb. The comb can have two or three rounded points.
You can create a simple paper template and use it for every block.
There are two easy ways to attach the comb.
The first method is appliqué. Apply fusible web to the back of the red fabric, cut out the shape, position it on the chicken, and press it according to the manufacturer’s instructions. You can then stitch around the edge using a straight stitch, zigzag stitch, or decorative stitch.
The second method is to sew the comb into the seam while constructing the block. This creates a neat integrated finish.
Step 4: Add the Chicken Wattle
The wattle is the small red detail underneath the chicken’s head.
Cut a small red piece for each chicken and position it near the upper portion of the body.
Because these pieces are very small, fusible appliqué is often the easiest technique for beginners.
Place the wattle carefully, press it into position, and stitch around the edges.
Keep the placement consistent from block to block, or intentionally vary it slightly for a more playful appearance.
Step 5: Assemble the Chicken
Place the chicken body on the background fabric and check the positioning before sewing.
The chicken should be centered within the block, with enough background visible around all sides.
If you are using appliqué, fuse the chicken body and decorative pieces into position according to the instructions for your fusible web.
Stitch around the chicken body using your preferred technique.
A simple straight stitch gives the quilt a clean traditional appearance. A narrow zigzag stitch works particularly well around curved appliqué edges because it helps prevent the fabric from fraying.
Take your time when sewing around curves. Slow stitching will give you much better results.
Step 6: Add Decorative Details
Once the main chicken body is attached, you can add additional details.
Small black circles or embroidered stitches can be used for the eyes. You can also embroider a tiny beak using yellow or orange thread.
If you want a more detailed Chicken Quilt Pattern, add small embroidered feathers, wings, or decorative stitching.
However, you do not need many details. The simple silhouette and colorful fabrics already create a beautiful chicken design.
For a farmhouse quilt, simple details often look better than overly complicated embellishments.
Step 7: Square Up Each Block
After completing the appliqué and stitching, press each block carefully from the back.
Use your quilting ruler to square the block.
This step is extremely important because accurately sized blocks will make the final quilt much easier to assemble.
If one block is slightly larger than another, trim it carefully to the same unfinished size.
Avoid trimming away too much fabric because you need to preserve the seam allowance.
Step 8: Arrange the Chicken Blocks
Now comes one of the most enjoyable parts of the project: arranging your chickens.
Place all of your completed blocks on a large floor, design wall, or table.
Move the blocks around until you are happy with the arrangement.
Try not to place fabrics with very similar colors directly next to each other. Spreading the colors throughout the quilt creates better visual balance.
For example, if you have several yellow chicken bodies, distribute them across different rows rather than placing them all together.
The example has a charming scrappy appearance because each chicken is slightly different.
Step 9: Sew the Blocks Into Rows
Once you have decided on your arrangement, begin sewing the blocks together.
Place two blocks right sides together.
Align the edges carefully and sew with a 1/4-inch seam allowance.
Press the seam according to your preferred quilting method.
Continue joining blocks until you have completed the first row.
Repeat the process for all remaining rows.
Keep the blocks in their original arrangement as you work so that the color distribution remains consistent.
Step 10: Join the Rows
After completing all of the individual rows, it is time to join them together.
Place the first and second rows right sides together.
Match the seams carefully. Use pins or clips at the intersections to prevent the fabric from shifting.
Sew the rows together using a 1/4-inch seam allowance.
Press the seam.
Continue adding each row until the entire quilt top has been assembled.
Take your time at this stage. Accurate seam matching will make the finished quilt look much more professional.
Step 11: Press the Finished Quilt Top
When all the rows have been joined, give the entire quilt top a final pressing.
Use a warm iron appropriate for your fabric.
Press from the back whenever possible, especially if you have appliqué details.
Check the quilt carefully for loose threads, uneven seams, or areas that need additional stitching.
A well-pressed quilt top will make the next steps much easier.
Step 12: Prepare the Quilt Backing
Choose a fabric for the backing that complements the colors of your chicken blocks.
A simple cream, beige, gray, or farmhouse-style print works beautifully.
The backing should be larger than the quilt top on all sides so that you have enough fabric for quilting.
If your quilt is particularly large, you may need to join two or more pieces of fabric to create the backing.
Press the backing before assembling the quilt sandwich.
Step 13: Make the Quilt Sandwich
Place the backing fabric on a flat surface with the wrong side facing upward.
Add the quilt batting on top.
Finally, place the finished chicken quilt top on the batting with the right side facing upward.
Smooth all three layers carefully.
Make sure there are no wrinkles or folds underneath the quilt top.
Secure the layers using safety pins, quilting clips, or temporary basting spray.
Step 14: Quilt the Layers
You can quilt this project by machine or by hand.
For a beginner-friendly finish, straight-line quilting is a great choice.
You can quilt along the seams between the blocks or create simple horizontal and vertical lines.
Another option is to stitch around the chicken appliqué shapes. This helps emphasize the individual chickens and adds texture.
If you are using a domestic sewing machine, a walking foot can make quilting multiple layers much easier.
Do not rush this step. Start in the center of the quilt and gradually work toward the outside edges.
Step 15: Trim the Quilt
After quilting, trim the edges of the quilt.
Use a rotary cutter and quilting ruler to create straight edges.
Make sure the quilt top, batting, and backing are even around the perimeter.
If you plan to use a traditional binding, leave a clean and straight edge around the entire quilt.
Step 16: Make the Binding
Cut strips of fabric for the binding.
The binding can be made from a coordinating solid fabric or one of the prints used in the quilt.
Join the strips together until you have enough binding to go around the entire quilt.
Fold and press the binding according to your preferred method.
Sew the binding to the front of the quilt, then fold it over to the back and hand-stitch it into place.
Take special care around the corners.
Step 17: Finish Your Chicken Quilt
After attaching the binding, inspect the entire quilt.
Trim any loose threads and check that the binding is securely stitched.
Give the quilt a final pressing.
Your Chicken Quilt Pattern is now complete and ready to display or use.
This charming quilt can be used as a lap quilt, wall decoration, table accent, kitchen decoration, baby quilt, or handmade gift.
Chicken Quilt Pattern Size Ideas
One of the best things about this pattern is how easily it can be customized.
For a small project, make just four chicken blocks and arrange them in a 2-by-2 layout. This is perfect for a wall hanging or table topper.
For a lap quilt, try a 4-by-5 or 5-by-6 block arrangement.
For a larger bed quilt, continue adding rows until you reach your desired size.
You can also make individual chicken blocks and combine them with plain blocks to create a more open quilt design.
Color Ideas for Your Chicken Quilt
The traditional farmhouse palette shown in the example is only one possibility.
For a bright and cheerful quilt, try yellow, orange, turquoise, red, and white.
For a country-style quilt, use cream, brown, mustard, burgundy, olive green, and gray.
For a modern quilt, use black, white, gray, and one bright accent color.
For a Valentine’s-inspired quilt, use cream, pink, red, and burgundy.
For a Christmas quilt, try cream, green, red, and gold.
You can also make a completely scrappy quilt using leftover fabrics from previous sewing and quilting projects.
Helpful Tips for Beginners
Always measure twice and cut once. Accurate cutting is one of the most important parts of successful quilting.
Use a consistent 1/4-inch seam allowance throughout the project.
Press your seams as you go instead of waiting until the entire block is finished.
When working with small appliqué pieces, fusible web can make the process much easier.
If you are new to quilting, start with a small wall hanging or table runner before attempting a large bed-size quilt.
Keep your fabrics organized by block so you do not accidentally change the arrangement.
Most importantly, do not worry if every block is not absolutely perfect. Handmade quilts have character, and small variations are part of their charm.
Creative Ways to Customize the Chicken Quilt
There are many ways to personalize this Chicken Quilt Pattern.
You can add embroidered names underneath individual chickens, making the quilt a wonderful personalized gift.
You can also use different fabrics for each chicken to represent different family members.
Another fun idea is to add small appliqué flowers, leaves, stars, hearts, or farm-themed elements between the blocks.
For a farmhouse kitchen, make a smaller version and use it as a table runner.
You can also transform individual chicken blocks into pillows, pot holders, placemats, or decorative wall hangings.
Final Thoughts
The Chicken Quilt Pattern is a fun combination of patchwork, appliqué, colorful fabrics, and traditional quilting techniques. Its simple chicken shapes make it approachable for beginners, while the endless fabric combinations give experienced quilters plenty of opportunities to create something unique.
The beauty of this quilt comes from the combination of different fabrics and the repetition of the charming chicken motif. Whether you choose a coordinated color palette or a completely scrappy design, the finished quilt will have a warm handmade character.
Gather your favorite quilting cottons, choose your colors, and start creating your own Chicken Quilt Pattern. It is a wonderful project for using fabric scraps, practicing appliqué, and creating a cheerful handmade piece that can be enjoyed for years.
Start Your Journey to a Healthier Relationship Today