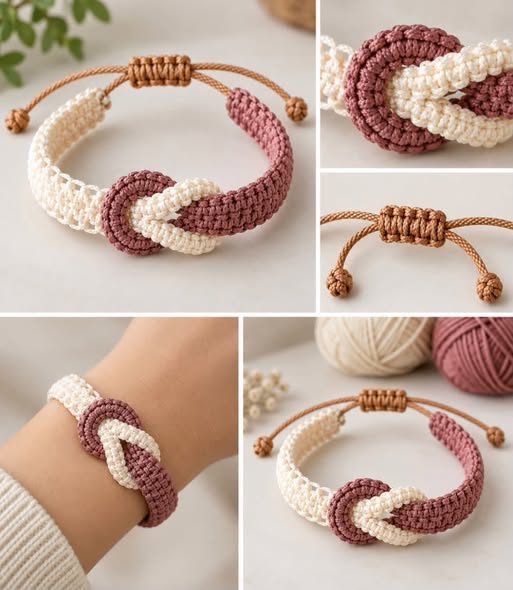
The Crochet Infinity Bracelet Pattern is a charming handmade accessory that brings together a simple crochet technique and a meaningful symbol. The infinity shape is often associated with everlasting friendship, love, connection, and unlimited possibilities, making this bracelet a lovely project to create for yourself or someone special.
This design features two crochet sections that come together to form an elegant infinity-inspired centerpiece. Using two complementary colors gives the bracelet a modern and eye-catching appearance while keeping the project relatively simple to make.
One of the best things about making a crochet bracelet is the ability to personalize nearly every part of the design. You can select your favorite colors, experiment with different types of crochet thread, change the size of the centerpiece, or use another type of adjustable fastening.
In this tutorial, you will find an easy-to-follow guide for making your own Crochet Infinity Bracelet. The instructions explain the materials, basic techniques, bracelet construction, finishing process, and several ways to customize the final piece.
Materials You Will Need
Before starting your Crochet Infinity Bracelet Pattern, prepare all of your supplies. Working with your materials ready will make the project easier and help you maintain consistent results.
For the crochet portion, choose a lightweight cotton yarn or crochet thread. Two different colors are recommended because the contrast helps highlight the intertwined infinity design. A combination such as cream and blue creates a soft appearance, but you can choose any colors that match your personal style.
You will also need a small crochet hook suitable for your chosen thread or yarn. A hook around 2.0 mm to 3.0 mm can be a good starting point, although you should always follow the recommended hook size for your particular material.
For the adjustable fastening, prepare a durable jewelry cord. Waxed cotton cord, nylon cord, or braided jewelry cord can all work well. The cord should be strong enough to withstand regular movement while remaining comfortable around the wrist.
Additional supplies include:
- Crochet hook
- Lightweight cotton yarn or crochet thread
- Two coordinating colors
- Strong bracelet cord
- Yarn or tapestry needle
- Small scissors
- Measuring tape
- Optional beads or decorative elements
The main crochet stitches are simple. You should be comfortable with the chain stitch, single crochet, and slip stitch. Basic sewing skills will also be useful when joining and reinforcing the infinity centerpiece.
Keeping your stitches even is especially important for a small accessory like this. Consistent tension will help the crochet pieces look neat and make the finished bracelet more comfortable to wear.
How to Make the Infinity Center
The infinity centerpiece is the main decorative element of this bracelet. It is created from two narrow crochet pieces that are shaped and connected to create the characteristic intertwined appearance.
Begin with your first color and make a foundation chain. The number of chains will depend on the size you want for your bracelet and the thickness of your yarn. For a delicate bracelet, keep the strip relatively narrow.
Work single crochet stitches across the foundation chain. Continue working back and forth until you have a narrow, flexible strip with an even appearance.
Fasten off and repeat the process using your second color. Try to make both strips approximately the same length and width. Matching dimensions will make the finished infinity design more balanced.
Once both crochet strips are ready, gently curve each one into a loop. Avoid making the loops too tight because they need enough flexibility to overlap and create the infinity shape.
Place the two loops together so that they cross through one another. Adjust their position until the center resembles an infinity symbol.
When you are happy with the arrangement, use a tapestry needle and matching thread to secure the overlapping sections. Make several small stitches through the back of the crochet pieces so the connection is strong but the stitches are not easily visible from the front.
Take a moment to shape the centerpiece with your fingers. Smooth, rounded curves will give the motif a cleaner and more finished appearance.
Making the Bracelet Straps
After completing the centerpiece, you can begin working on the sections that connect the infinity motif to the wrist.
Attach the appropriate yarn to one side of the centerpiece. Work narrow rows of single crochet to create the first bracelet strap.
Continue until the strap reaches the length needed for your wrist. It is a good idea to measure your wrist as you work instead of relying only on a predetermined number of rows.
Keep in mind that the adjustable cord will provide additional room, so the crochet section does not necessarily need to form the entire circumference of the wrist.
Repeat the process on the opposite side of the infinity motif. You can use the same color for a monochromatic bracelet or switch colors to create a two-tone design.
As you crochet, periodically place the bracelet around your wrist to check the proportions. The centerpiece should sit comfortably without pulling or twisting.
Once the straps have reached the desired length, fasten off and weave the loose yarn tails securely into the back of the crochet fabric.
For additional strength, reinforce the areas where the straps meet the infinity centerpiece. These connection points experience the most movement when the bracelet is worn.
Adding the Adjustable Fastening
An adjustable closure makes this bracelet practical because it allows the wearer to loosen or tighten it easily.
Cut two pieces of strong cord that are long enough to create the fastening system and leave comfortable ends for adjustment.
Attach the cords to the ends of the crochet bracelet. Make sure the attachment points are secure and that the cords can move naturally without damaging the crochet fabric.
A sliding knot closure is an excellent option for this project. It allows the bracelet to expand when it is being put on and tighten comfortably around the wrist.
To create the sliding closure, overlap the cords and use one cord to form several neat wraps around the other section. Pull the wraps firmly enough to hold their position while still allowing the closure to slide.
Test the mechanism several times before trimming the ends. The bracelet should open and close smoothly without the knot becoming excessively tight.
You can leave the cord ends simple or decorate them with small beads, crochet-covered elements, or additional knots.
Once everything is secure, trim any excess material while leaving enough cord for comfortable adjustment.
Creative Ways to Customize Your Bracelet
There are many ways to make your Crochet Infinity Bracelet Pattern unique. Changing only the colors can completely transform the appearance of the finished accessory.
For a classic look, try combinations such as white and beige, navy and cream, black and gray, or soft pastel shades.
If you prefer something more colorful, combine bright shades such as pink, turquoise, yellow, purple, or coral. A multicolor version can also make a fun handmade accessory for children or teenagers.
You can also experiment with metallic crochet thread. Gold, silver, or copper-colored thread can create a more sophisticated bracelet for parties, celebrations, or special occasions.
The size of the infinity centerpiece can be changed as well. Making longer crochet strips will produce larger loops, while shorter strips create a smaller and more delicate motif.
Another option is to add beads. Small beads can be incorporated into the crochet rows or attached to the ends of the adjustable cords.
You can even use the same infinity motif to create other handmade accessories. Matching necklaces, anklets, keychains, bag charms, and friendship bracelets can all be designed using similar techniques.
Tips for a Professional Finish
Small finishing details can make a significant difference in the appearance of a handmade bracelet.
First, make sure your crochet tension remains consistent. Uneven stitches can cause one side of the bracelet to look different from the other.
Second, take time to hide all yarn tails. Use a tapestry needle to weave the ends through several stitches on the back of the work before trimming them.
The infinity centerpiece should also be firmly secured. Since this part of the bracelet moves frequently, reinforcing the crossing point will help prevent the design from becoming loose.
Before wearing the finished bracelet, gently pull on the straps and closure to test their strength. If anything feels loose, reinforce it before regular use.
Finally, check the bracelet from both the front and back. Remove any visible loose fibers and make small adjustments to the shape of the infinity motif if necessary.
Frequently Asked Questions
Is this crochet bracelet suitable for beginners?
Yes. The crochet portion uses basic stitches, making this a suitable project for someone who already knows fundamental crochet techniques. The most challenging part may be shaping and securing the infinity centerpiece.
What type of yarn should I use?
Lightweight cotton yarn or crochet thread is a good choice. Cotton is durable, holds its shape well, and produces clearly defined stitches.
How much time is needed to make the bracelet?
The amount of time varies according to your crochet experience, yarn thickness, and the size of the design. A simple version can generally be completed within a few hours.
Can I change the bracelet size?
Yes. Measure your wrist before beginning and adjust the length of the crochet straps accordingly. You can also modify the length of the closure cords.
What can I use instead of a sliding knot?
You can replace the sliding knot with a button-and-loop closure, lobster clasp, toggle closure, or another jewelry fastening system that suits your design.
Can I use different colors?
Absolutely. Color is one of the easiest ways to personalize this bracelet. Two contrasting colors emphasize the infinity motif, while similar shades create a more subtle effect.
Can handmade bracelets made from this tutorial be sold?
If you create your own handmade bracelet, you may generally sell the physical item you make. However, always check the licensing or copyright terms if you are following a specific designer’s original pattern or instructions.
How can I make the bracelet stronger?
Use durable crochet thread, reinforce the center connection, weave in all yarn ends carefully, and choose a strong cord for the adjustable closure.
Final Thoughts
The Crochet Infinity Bracelet Pattern is a simple and creative way to turn basic crochet techniques into a meaningful handmade accessory. Its intertwined design gives the bracelet a distinctive appearance, while the adjustable closure makes it practical for everyday wear.
The project can also be adapted for many occasions. Make one in a friend’s favorite colors as a thoughtful gift, create matching bracelets for family members, or experiment with elegant metallic shades for a special event.
Once you understand the basic construction, you can easily change the dimensions, colors, yarn types, and finishing details. This makes the infinity bracelet more than just a single crochet project—it can become a starting point for creating an entire collection of personalized handmade accessories.
Whether you are new to crochet or have been crafting for years, this project is a fun opportunity to practice small-scale crochet while creating something beautiful, useful, and personal.
Start Your Journey to a Healthier Relationship Today