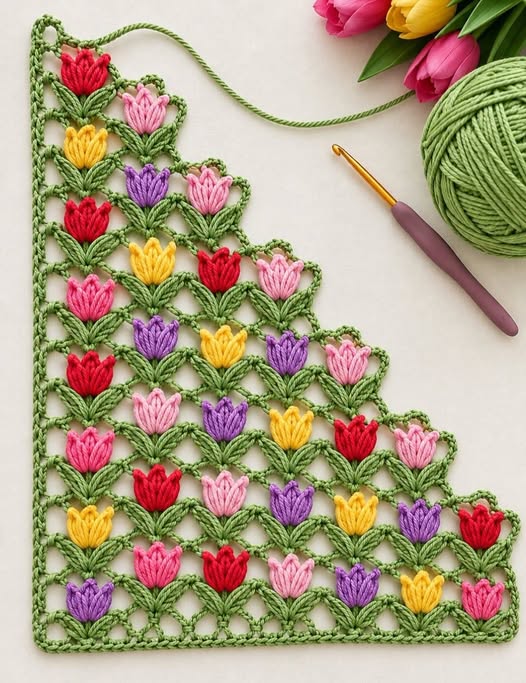
Crochet Tulip Lace Pattern is a beautiful way to combine open lacework, dimensional flowers, and decorative leaves in one crochet design. Inspired by the photographed sample, this pattern creates rows of colorful tulip-shaped flowers surrounded by green stems and leaf-like stitches.
The open spaces between the motifs keep the fabric light and airy, while the raised petals provide texture and visual interest. This type of crochet flower lace can be adapted for decorative runners, table coverings, curtain panels, scarves, shawls, or other handmade projects. Although the finished fabric looks intricate, it becomes much easier to understand when the construction is divided into the foundation, leaves, flowers, connecting chains, and finishing border.
The main term, Crochet Tulip Lace Pattern, describes a crochet lace design in which tulip-inspired floral motifs are incorporated directly into an openwork background. The photograph shows the flowers arranged diagonally rather than in rigid horizontal lines, which gives the piece a flowing garden-like appearance. Green yarn forms most of the structural fabric, including the foundation edge, chains, arches, stems, and pointed leaves. Contrasting yarn is then used for the colorful tulips. Red, pink, yellow, and purple are excellent choices, but the colors can easily be changed. A successful version depends more on consistent tension and repeated motif placement than on using exactly the same colors shown in the inspiration image.
For this tutorial, the instructions use standard U.S. crochet terminology. The main abbreviations are ch (chain), sl st (slip stitch), sc (single crochet), hdc (half double crochet), dc (double crochet), tr (treble crochet), yo (yarn over), sp (space), st/sts (stitch/stitches), and rep (repeat). Because the photograph does not provide an original written pattern or stitch counts, the instructions below are a practical interpretation designed to reproduce its overall appearance rather than a claim of an exact original pattern. Make a small swatch first, especially if you plan to create a large project. The modular nature of the design makes it possible to adjust the number of tulips and lace repeats after you understand the basic construction.
Materials, Crochet Abbreviations, and the Foundation
Choose a smooth medium-weight yarn if you are making the Crochet Tulip Lace Pattern for the first time. A smooth yarn makes individual stitches easier to recognize and helps beginners see exactly where the hook should be inserted. Use green for the structural lace and several contrasting colors for the flowers. A crochet hook around 4.0–5.0 mm can be a practical starting range for medium-weight yarn, but always match the hook to your chosen yarn and desired drape. You will also need scissors, a yarn needle, and optional stitch markers.
Before beginning, practice the basic stitches. Ch means chain: yarn over and pull the yarn through the loop already on your hook. Sl st means slip stitch: insert the hook into the designated stitch, yarn over, and pull through both the stitch and the loop on the hook. Sc means single crochet: insert the hook, yarn over, pull up a loop, yarn over again, and pull through both loops. These simple stitches create the connecting structure of the lace.
The taller stitches help form the leaves and petals. For a dc, yarn over, insert the hook into the indicated space, yarn over and pull up a loop, then yarn over and pull through two loops twice. For a tr, yarn over twice before inserting the hook, pull up a loop, and work the loops off two at a time. Taller stitches naturally produce the elongated shapes needed for the pointed leaves and upright tulip petals.
Begin with green yarn and make a foundation chain long enough for the desired width of your project. For a practice swatch, ch 37 is a manageable starting point. This count is intended as a learning swatch rather than a fixed requirement. Add or remove complete motif repeats once you understand how much space each flower-and-leaf unit occupies. Work the foundation loosely because a tight chain can pull the lower edge inward.
For the first structural row, ch 1, turn, sc in the second ch from hook and across. This produces a stable lower edge. For a more decorative border similar to the inspiration, the next row can alternate short solid sections with chain spaces: ch 1, turn, sc in next 3 sts, ch 5, skip 3 sts, sc in next 3 sts; rep across. Adjust the final repeat as necessary so the edge remains flat.
The next stage establishes the open framework. Turn and work toward the center of each chain arch. A useful repeat is sl st to the center of the next ch-5 sp, ch 5, sc in the next ch-5 sp. These chain loops create the open diamonds visible around the flowers. Do not pull the chains tightly. The lace should remain flexible enough for the leaf clusters and tulips to sit naturally between the connecting arches.
How to Crochet the Green Leaves and Open Lace
The characteristic green V shapes are one of the most important features of this Crochet Tulip Lace Pattern. Each V can be interpreted as a pair of elongated leaf clusters worked from a shared base. To begin a leaf pair, work to the center of the appropriate chain space and anchor with sc. The two leaves will spread outward from this point, while the flower will eventually sit between or just above them.
For the first leaf, try ch 2, 3 dc in the same base space, ch 2, sl st in the top of the last dc to create a small pointed tip. If you want a longer, more dramatic leaf like the photograph, substitute treble crochet: ch 3, 3 tr in the same space, ch 2, sl st in the top of the last tr. The taller stitches produce a narrow leaf that points diagonally toward the next lace arch.
Return to the shared base with a slip stitch and create the second leaf in the opposite direction. Work ch 3, 3 tr in the same base, ch 2, sl st in the top of the last tr, then anchor the leaf into the neighboring chain space with a slip stitch or single crochet. The result should resemble a green V. Keep the base compact because the colored tulip will be positioned immediately above this area.
After completing a leaf pair, make the open connecting arch. A practical sequence is ch 5, sc in the next structural space, ch 5, followed by the next leaf pair. These arches create the diamond-shaped negative spaces visible throughout the sample. If the lace begins to pucker, increase the connecting chain to ch 6. If it becomes too loose or floppy, reduce it to ch 4. Yarn thickness and individual tension can significantly affect the correct chain length.
The diagonal arrangement is created by offsetting the motifs on alternating rows. Instead of placing the next row’s flower directly above the previous flower, position it above a neighboring chain arch. Think of the fabric as a repeating grid of diamonds. One row contains tulips at the lower points of selected diamonds, while the following row shifts the flowers approximately half a repeat. This staggered construction creates the garden-like appearance seen in the image.
Continue repeating leaf pair → chain arch → anchor → chain arch → leaf pair across the row. On the following row, work into the chain spaces rather than trying to crochet directly through the flower petals. This distinction is important: the green lace should carry the structural load of the project. The colorful petals remain decorative elements, which prevents them from being stretched out of shape when the finished fabric is blocked or used.
Step-by-Step Tulip Flowers and Color Changes
The colorful flower is the focal point of the Crochet Tulip Lace Pattern. A simple dimensional tulip can be made with a cluster of tall stitches emerging from the center of the green leaf pair. Attach the flower color with a sl st at the central base. Leave a yarn tail long enough to weave securely into the back of the motif. Begin with ch 3, which raises the working yarn to approximately the height of a double crochet.
To make the first outer petal, work a tall cluster into the same flower base. One useful formula is [yo, insert hook in base, yo, pull up loop, yo, pull through 2 loops] 3 times, yo and pull through all remaining loops. This forms a 3-dc cluster (3-dc-cl). Finish with ch 1 to close and define the petal. A cluster keeps several tall stitches joined at the top, creating the raised petal texture seen in the photographed tulips.
For the center petal, make it slightly taller. Work a 3-tr cluster by wrapping the yarn twice before beginning each partial treble crochet. Complete three partial treble stitches into the same base, then yarn over and draw through the remaining loops. Add ch 1 at the top. The additional height makes the center rise above the outer petals and creates the recognizable tulip silhouette.
Make the third petal as a mirror of the first: work another 3-dc-cl into the flower base and close it with ch 1. You should now have three upright sections—two outer petals and one taller central petal. If you prefer the fuller appearance shown in the image, add two narrow accent petals between these three main clusters. Small 2-dc clusters or individual treble stitches work well for this purpose.
Once the flower is complete, sl st into the green base, fasten off the flower yarn, and return to green. Continue the structural lace by anchoring into the next chain space and forming another set of leaves and arches. Changing colors flower by flower creates the playful arrangement shown in the inspiration. Red, bright pink, pale pink, yellow, and purple can be distributed irregularly so the finished piece looks lively rather than overly repetitive.
Repeat the motif across successive rows using the basic sequence green leaf pair + colored tulip + green connecting arches. For the next row, offset the flowers so that each tulip falls between two flowers from the previous row. Continue in this manner until the piece reaches your desired height. Remember that the photographed sample is best treated as visual inspiration; your stitch count may need small adjustments depending on yarn weight, hook size, tension, and finished dimensions.
Building the Full Lace Panel, Border, and Finishing
After several rows, the logic of the Crochet Tulip Lace Pattern becomes much easier to recognize. Each flower occupies a point within an open diamond network, and the leaves visually connect neighboring motifs. When beginning a new row, first identify the chain arches from the previous row. These spaces are your structural attachment points. Working consistently into them keeps the flowers aligned and prevents the panel from twisting.
For a repeating row, begin with the required turning chains, move to the first structural space with slip stitches if necessary, and create the first chain arch. Work the leaf pair at the next flower position, change to the chosen flower color, crochet the three-petal tulip, fasten off that color, and resume with green. Continue with ch 5, sc in next sp, ch 5, then form the next leaves and flower. Maintain approximately the same chain tension throughout.
At the sides, avoid forcing a complete motif into insufficient space. Instead, use partial chain arches anchored into the side edge. For example, work ch 3, sc into the edge, rather than a full ch-5 arch. This produces a straighter side. The inspiration image has a defined green perimeter, so clean edges are especially useful if you want the final project to have the same framed appearance.
Once the main lace panel is finished, add a simple green border. Work sc evenly around all four sides, placing approximately one single crochet into each foundation stitch and enough stitches along the row ends to keep the fabric flat. At each corner, use (sc, ch 2, sc) in the same corner space. On a second round, you can work another round of sc or use sl st, ch 3, skip 2 sts repeatedly for a delicate looped edge.
Weave every yarn tail into stitches of the matching color. This matters particularly with the tulips because numerous color changes can create many loose ends. Thread each tail onto a yarn needle, pass it through several stitches on the wrong side, reverse direction once, and trim carefully. Avoid pulling the tails too tightly because that can distort the flower clusters. A neat back makes the project more suitable for pieces where both sides may be visible.
Finally, block the finished crochet tulip lace gently. Shape the lace so the chain arches become even diamonds and the leaves form clean V shapes. Arrange each tulip with the center petal upright and the outer petals opening slightly outward. Follow the care recommendations for your particular yarn when deciding whether to wet-block, steam cautiously, or use another suitable blocking method. Proper blocking transforms the individual stitches into a more uniform floral lace fabric.
FAQ – Frequently Asked Questions About the Crochet Tulip Lace Pattern
Is the Crochet Tulip Lace Pattern suitable for beginners?
Yes, especially for an adventurous beginner who already understands chains, slip stitches, single crochet, double crochet, and treble crochet. The design looks complicated mainly because many motifs are repeated together. Practice one green leaf pair and one tulip separately before attempting an entire panel.
What does “ch” mean in this crochet pattern?
Ch means chain stitch in U.S. crochet terminology. Yarn over and pull the yarn through the loop currently on the hook. Chains are particularly important in this project because they form the open arches between the leaves and flowers.
What is a crochet cluster?
A cluster stitch combines several partially completed stitches into one top. Instead of completing each double or treble crochet individually, leave the final loops on the hook. After making all the partial stitches, yarn over and pull through the remaining loops. This creates a thick, dimensional petal.
What yarn works best for crochet tulip lace?
A smooth yarn with clear stitch definition is usually easiest. Cotton and cotton-blend yarns can provide excellent definition for decorative lace, while other fibers may provide additional softness and drape. Beginners may find very fuzzy yarn difficult because the individual stitches and chain spaces are harder to identify.
Can I make every tulip the same color?
Absolutely. A monochromatic arrangement can create an elegant result. You could make all flowers red, pink, yellow, purple, or white while keeping the leaves and framework green. Using several flower colors, however, emphasizes the garden effect seen in the photographed inspiration.
How can I make the lace wider?
Add complete motif repeats to your starting foundation rather than adding random stitches. Make a small sample first and measure the width of one complete repeat. You can then calculate approximately how many repeats are necessary for your desired finished width.
Why is my crochet lace curling?
Curling often indicates that the chain arches are too short, the foundation is too tight, or the tension varies significantly between the solid clusters and open chains. Try increasing an arch from ch 5 to ch 6, use a slightly larger hook for the foundation, or consciously relax your chain stitches.
How do I keep the tulips evenly spaced?
Use the green chain spaces as fixed landmarks. Each tulip should be positioned at the same point within its repeat. Stitch markers can help while learning the pattern. Count the chain arches between flowers periodically instead of relying entirely on visual placement.
Can this pattern be used for a scarf or shawl?
Yes. The open structure is naturally suited to lightweight decorative accessories. For a scarf, work fewer repeats across and continue for additional rows. For a shawl or wrap, increase the width. Choose a softer yarn if the project will be worn against the skin.
How do I make the tulip petals more dimensional?
Increase the number of partial stitches in each cluster or use slightly taller stitches for the center petal. For example, outer petals can use double-crochet clusters while the center uses a treble-crochet cluster. Avoid making every cluster excessively large, as heavy petals may pull the open lace out of shape.
What should I do if my flowers lean to one side?
Check the tension of the green leaf pairs and connecting chains. Uneven structural stitches can pull the flower base sideways. Also make sure that the two outer petals contain the same number and type of stitches. Gentle blocking can correct minor leaning after the project is complete.
Can I change the size of the flowers without changing the entire pattern?
Yes. Smaller tulips can be made with two-stitch clusters, while fuller flowers can use three- or four-stitch clusters. Keep in mind that larger petals need more room inside each lace opening, so you may also need to lengthen the surrounding chain arches.
How do I read the repeated instructions?
When an instruction says rep, it means repeat. For example, [ch 5, sc in next sp] rep across means to make five chains, single crochet into the next designated space, and continue repeating those two actions across the row.
What is the best way to handle all the flower-color yarn ends?
Fasten off each flower securely and weave the tail into the back of stitches of the same color. Working over short tails can help in some sections, but securely weaving them afterward generally provides a cleaner result for dimensional motifs. Do not simply cut the yarn close to the knot.
Does my finished project have to look exactly like the photograph?
No. The image provides a useful visual model for the floral arrangement, but handmade crochet naturally varies with yarn, hook size, tension, stitch interpretation, and personal choices. The goal is to reproduce the essential combination of tulip crochet motifs, pointed green leaves, and open diamond lace while creating a piece that works for your intended project.
Conclusion
Start Your Journey to a Healthier Relationship Today
The Crochet Tulip Lace Pattern combines a surprisingly manageable group of techniques to create an elaborate floral fabric. You learned how to establish a green foundation, build open chain arches, form paired pointed leaves, crochet dimensional tulip petals with cluster stitches, offset the motifs to create diagonal movement, and finish the entire panel with a neat border. The most important stitches are ch, sl st, sc, dc, tr, and the crochet cluster stitch, so practicing these techniques individually can make the complete pattern much easier to follow.
The key to a successful result is consistency rather than speed. Keep the green chain arches similar in size, position each leaf pair carefully, maintain even tension in the petals, and check the alignment after every row. Once one full repeat feels comfortable, the same construction can be expanded into a much larger piece. The combination of colorful flowers and airy green lace gives this design plenty of room for creative customization.
You can also personalize the Crochet Tulip Lace Pattern through yarn colors, flower placement, motif size, border style, and overall dimensions. A multicolored arrangement creates a cheerful spring garden, while one flower color can produce a more coordinated and understated design. Either approach preserves the distinctive tulip-and-leaf structure that makes this lace so recognizable.
If you try this pattern, leave your sincere opinion about the tutorial and the finished design. Suggestions are also welcome—especially ideas for different color combinations, borders, yarn choices, or projects that could be made with this crochet flower lace pattern. Sharing what worked well and what you would change can inspire new variations of this charming Crochet Tulip Lace Pattern.