Crochet Easy Heart Coaster Pattern is a charming crochet project that combines a recognizable heart shape with the cozy texture of classic granny-style stitches. The design shown in the inspiration photo uses several coordinated shades of blue with soft cream accents, creating beautiful bands of color from the center toward the outer edge.
Because the construction grows gradually from the middle, this project is an enjoyable way to practice chains, double crochet stitches, clusters, increases, spaces, shaping, and edging. Once you understand how the two upper curves and pointed bottom are formed, you can easily customize the coaster with your own favorite color palette.
One of the most appealing things about this Crochet Easy Heart Coaster Pattern is that it can look detailed without requiring complicated crochet techniques. The visual interest comes primarily from repeating groups of stitches and strategically placing increases to transform a small center into a balanced heart. Beginners who already know the basic chain (ch), slip stitch (sl st), single crochet (sc), and double crochet (dc) can use this project to improve stitch placement and tension. More experienced crocheters can enjoy experimenting with colors, yarn weights, borders, and finished sizes. The result can be used as a coaster, decorative mat, table accent, small appliqué, or handmade gift.
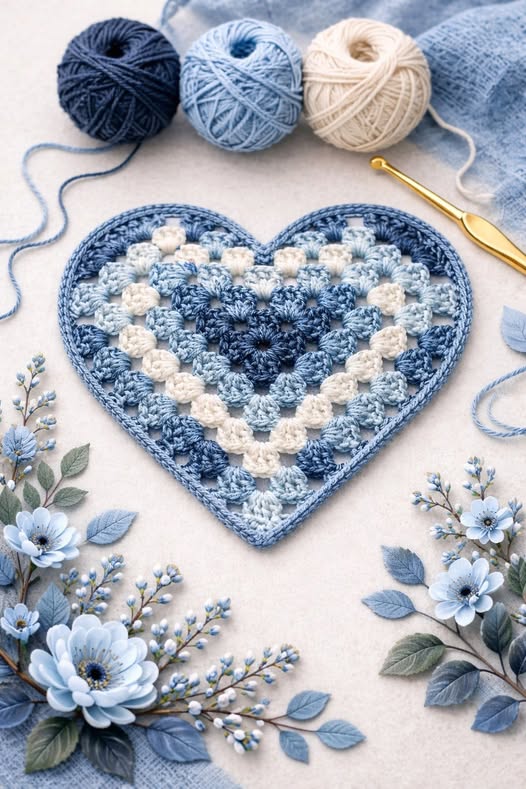
The heart in the photo also demonstrates how color placement can completely transform a simple crochet motif. Dark blue creates definition near the center, lighter blues provide contrast, and cream stitches produce a delicate highlight before the final blue border. You do not need to reproduce those exact colors. A crochet heart coaster can be worked in one solid shade, alternating colors, scraps of coordinating yarn, pastels, neutrals, or seasonal combinations. The instructions below use standard U.S. crochet terminology and explain the important abbreviations so that the pattern remains approachable even if you are still becoming familiar with written crochet instructions.
Materials, Crochet Abbreviations, and Preparation
For this Crochet Easy Heart Coaster Pattern, choose a smooth cotton or cotton-blend yarn that gives the stitches enough structure to maintain the heart shape. Medium or lightweight yarn works particularly well for table accessories. Select a crochet hook appropriate for your yarn; approximately 3.5 mm to 4.5 mm is a practical range for many cotton yarns. You will also need scissors and a yarn needle for weaving in the ends. Stitch markers are optional but can make it easier to identify important shaping points.
The main abbreviation is ch, meaning chain. To make a chain, place a slip knot on your hook, yarn over, and pull the yarn through the loop already on the hook. Chains are used to begin the motif and create spaces between stitch groups. When instructions say ch 2, for example, simply make two chain stitches. Keeping these chains relaxed rather than extremely tight will help the following round sit naturally.
Another important abbreviation is dc, which means double crochet in U.S. terminology. Yarn over once, insert the hook into the designated stitch or chain space, yarn over and pull up a loop. You should now have three loops on the hook. Yarn over and pull through two loops, then yarn over again and pull through the remaining two loops. Groups of double crochet stitches create most of the textured body of this heart.
You will also encounter sl st, or slip stitch. Insert the hook into the indicated stitch, yarn over, and pull the yarn directly through both the stitch and the loop already on the hook. Slip stitches are useful for joining rounds without adding much height. Sc means single crochet: insert the hook, yarn over, pull up a loop, yarn over again, and pull through both loops. Single crochet can be used in the final border when a compact finish is desired.
A cluster in this pattern refers to a group of double crochet stitches worked into the same space, similar to the construction used in granny motifs. A basic cluster can be written as 3 dc in the same space. These groups are separated by chains or shaping stitches. As the heart becomes larger, clusters are added around the perimeter while increases are concentrated in specific locations to maintain the upper curves and lower point.
Before beginning, decide on your color arrangement. For a look inspired by the photo, prepare dark blue, medium blue, pale blue, and cream. You could begin with the darkest shade and gradually introduce lighter colors before returning to blue for the border. Make a small tension sample if necessary. A coaster should lie reasonably flat, so if your crochet curls severely, try a slightly larger hook; if the stitches appear loose and unstable, try a smaller hook.
Step-by-Step Crochet Heart Center and First Rounds
Begin the Crochet Easy Heart Coaster Pattern with your first color. Make a magic ring or, if you prefer a beginner-friendly alternative, ch 4 and sl st into the first ch to create a small ring. The center opening should remain fairly small because this becomes the middle of the heart. Chain 3 to establish the height of the first round; this beginning chain can count as the first double crochet.
Work groups of dc stitches into the center ring. A practical approach is to establish several small clusters separated by ch-1 spaces. Instead of trying to make a perfect heart immediately, think of this first section as the foundation from which the heart will grow. Keep the stitches evenly tensioned and arrange them around the ring as you work. Join the round with a sl st.
On the next round, work primarily into the chain spaces rather than into individual stitches. Place 3 dc into a space, ch 1, and continue toward the next space. This creates the recognizable granny-style texture seen in the inspiration image. Near the upper portion of the motif, leave enough room for additional stitches because these locations will eventually form the two rounded lobes of the heart.
Now establish the bottom point. At the space that will become the lowest part of the heart, work an increase such as 3 dc, ch 2, 3 dc into the same space. The extra stitches and chains force the crochet to change direction, creating a visible point. Mark this ch-2 space if necessary. During later rounds, you will continue making a similar increase at this location so that the bottom remains pointed instead of becoming rounded.
The top requires different shaping. Imagine a vertical center line running from the indentation between the upper lobes to the bottom point. On each side of this center line, add extra clusters to encourage the fabric to curve outward. Around the center-top area itself, use shorter stitches or slip stitches when appropriate. This contrast between increased outer curves and a restrained center creates the characteristic heart indentation.
Continue around the motif with 3-dc clusters and chains. Join with a slip stitch and inspect the shape before moving forward. Do not worry if the heart is still small or slightly angular. Granny-style motifs become more recognizable as additional rounds are added. Gently spread the piece with your fingers to see where each curve naturally wants to form. This simple check can help you identify whether an increase has accidentally been missed.
Building the Heart Shape, Color Changes, and Granny Clusters
For the next stage of the Crochet Easy Heart Coaster Pattern, change to another shade if desired. Complete the final yarn-over of the previous stitch with the new color or fasten off and join the new yarn in a convenient chain space. When changing colors, leave tails long enough to weave securely into the back later. This creates cleaner transitions and helps prevent the ends from loosening with use.
Work 3 dc into each regular ch-1 space, placing ch 1 between groups when necessary. At the bottom point, work another increase into the marked space. A typical sequence is 3 dc, ch 2, 3 dc in that point. Keeping the increase centered round after round creates a crisp V-shaped lower section. If the point begins shifting sideways, recount your clusters and verify that you have identified the correct central space.
As you approach the first upper lobe, increase more generously than along the straight sides. You might work an additional cluster into a larger chain space or place several taller stitches around the outer curve. The purpose is not simply to add stitches everywhere; the increases should be concentrated where the fabric needs to expand. Mirror the same treatment on the opposite lobe so that both sides remain approximately equal.
The heart indentation deserves special attention. Too many tall stitches in the center top can eliminate the dip and turn the motif into an oval. When you reach this location, reduce the height using sc, sl st, or a compact group according to the developing shape. Then begin increasing again as you move into the second lobe. Crochet shaping is visual as well as mathematical, so regularly place the motif on a flat surface to evaluate its symmetry.
To reproduce the striped appearance of the photo, alternate shades between rounds. For example, use dark blue near the center, medium blue for the next section, pale blue afterward, and cream as a contrasting decorative round. Return to blue near the outer rounds. Repetition of a color used earlier helps make the design feel intentional rather than random. Scrap yarn can also be incorporated as long as the yarns have reasonably similar thickness.
Continue repeating these principles until your crochet heart coaster reaches the desired size. Each new round contains more clusters because the perimeter is becoming larger. Maintain the bottom-point increase, carefully expand both upper lobes, and preserve the indentation between them. If the fabric starts becoming wavy, you may be adding too many stitches. If it curls upward like a bowl, additional increases may be needed.
Finishing the Border, Blocking, Care, and Creative Variations
The border gives the Crochet Easy Heart Coaster Pattern its finished appearance. Choose one of the colors already present in the motif to visually connect the edging with the center. The inspiration image uses a medium blue border, which frames the lighter stitches effectively. Join the border yarn at an inconspicuous location and work around the complete perimeter while preserving all three essential features: the two rounded lobes, the center indentation, and the bottom point.
A straightforward border can be created with sc stitches. Work approximately one single crochet into each stitch and suitable chain space, adding extra stitches around the broad upper curves whenever necessary. At the bottom point, work sc, ch 1, sc or 3 sc into the point space. Either option helps maintain the sharp turn. Avoid pulling the border tightly because a tight edging can cause the finished heart to cup.
When working through the upper indentation, reduce unnecessary increases. One or two carefully placed sl sts or sc stitches can emphasize the dip. Then continue evenly around the second curve. Compare both sides before fastening off. Perfect mathematical symmetry is not essential for a handmade coaster, but balanced stitch placement will make the final project look much cleaner.
Fasten off by cutting the yarn while leaving a manageable tail and pulling the tail through the final loop. Thread each yarn end onto a yarn needle and weave it back and forth through several stitches on the wrong side. Change direction at least once before trimming the excess yarn. Secure finishing is especially important for coasters because they are frequently moved, handled, and washed.
Blocking can dramatically improve the finished heart. For suitable washable yarn, lightly dampen the coaster, gently shape it on a flat surface, and adjust the two lobes and lower point until they look balanced. Allow it to dry completely without disturbing it. Always follow the care recommendations for the yarn you selected. Cotton generally provides excellent stitch definition and is a practical choice for reusable table accessories.
Once you understand the basic Crochet Easy Heart Coaster Pattern, there are many ways to personalize it. Make several matching hearts for a coordinated table set, create smaller versions for appliqués, or continue adding rounds to produce a larger decorative mat. You can experiment with monochromatic blues, pink and cream, red and white, rainbow scraps, earthy neutrals, or contrasting colors. The fundamental shaping method remains the same even when the appearance changes completely.
Frequently Asked Questions About the Crochet Easy Heart Coaster Pattern
Is the Crochet Easy Heart Coaster Pattern suitable for beginners?
Yes. It is particularly suitable for beginners who already understand a few fundamental stitches. Practice ch, sl st, sc, and dc before starting if these techniques are completely new to you. The main challenge is not the individual stitches but learning where to place increases so that the motif develops into a heart.
What does dc mean in a U.S. crochet pattern?
Dc means double crochet. Yarn over, insert your hook into the designated stitch or space, yarn over and pull up a loop, yarn over and pull through two loops, then yarn over and pull through the final two loops. Remember that U.S. and U.K. crochet terminology differs, so these instructions specifically use U.S. terms.
What does 3 dc mean?
It means to make three double crochet stitches. When the instructions specify 3 dc in the same space, all three stitches are inserted into that single chain space. Together they create the familiar cluster appearance associated with granny-style crochet.
How do I keep the bottom of the heart pointed?
Place an increase consistently at the central bottom space. Working something like 3 dc, ch 2, 3 dc into that location creates enough expansion for the work to turn sharply. Continue placing the point increase in the corresponding space during subsequent rounds.
How do I create the indentation at the top?
The indentation is formed by limiting stitch height and expansion at the upper center while adding more stitches around the two neighboring lobes. Short single crochet or slip stitches can help deepen the dip. Avoid adding large clusters directly into the center indentation unless your particular stitch count requires them.
Why is my crochet heart curling?
Curling often indicates that the perimeter does not contain enough room to expand. Check whether you missed an increase, especially around the upper lobes or bottom point. Very tight tension can produce a similar effect. Moving up slightly in hook size can help if your stitches are consistently tight.
Why is my coaster becoming wavy?
A wavy edge usually indicates excessive increases or loose tension. Review the last round and check whether you accidentally worked multiple clusters into ordinary spaces. Not every space requires an increase. The strongest shaping should remain concentrated around the lobes and bottom point.
What yarn is best for crochet coasters?
Cotton yarn is a popular option because it offers clear stitch definition, good structure, and practical washability. Check the yarn manufacturer’s care instructions before using the finished piece with warm beverages or washing it.
Can I make this heart using only one color?
Absolutely. A solid-color version makes the stitch structure especially visible and eliminates most color changes. The multicolored approach shown in the inspiration project is decorative rather than essential to the construction.
How can I make a larger crochet heart?
Continue adding rounds using the established pattern logic. Work clusters across regular sections, maintain increases around the upper lobes, preserve the top indentation, and increase at the bottom point. As the piece grows, lay it flat after every round to check whether the number of increases is still appropriate.
Can leftover yarn be used for this project?
Yes. This is an excellent project for small quantities of coordinating yarn. Try to use yarns with similar fiber characteristics and thickness so the individual rounds maintain consistent tension and texture.
Should I block the finished coaster?
Blocking is highly recommended, especially for a granny-style heart. It can smooth minor irregularities, sharpen the lower point, define the upper indentation, and make both lobes look more balanced. Use a blocking method appropriate for your yarn fiber.
How can I make both sides of the heart symmetrical?
Count the stitch groups on the first half and repeat approximately the same placement on the second half. Stitch markers can identify the bottom point, center indentation, and major shaping spaces. These reference points make it much easier to notice an accidental missing or additional cluster.
Can I use this pattern for something other than a coaster?
Yes. Depending on the yarn weight and number of rounds, the same concept can become a heart appliqué, decorative table mat, wall decoration, garland element, gift embellishment, or larger crochet motif. Adjust the size and finishing method according to the intended purpose.
What is the most important part of shaping this pattern?
Think of the heart as having three shaping zones: the left upper lobe, right upper lobe, and bottom point, with a fourth reference area at the top indentation. The lobes require enough expansion to remain rounded, the bottom needs a concentrated increase to stay pointed, and the indentation needs controlled stitch height. Keeping those areas distinct makes the heart shape much easier to maintain.
The Crochet Easy Heart Coaster Pattern is a rewarding way to practice fundamental U.S. crochet stitches while learning how strategic increases can turn a simple granny-style motif into a recognizable heart. Throughout this project, you learned how to create the center, work 3-dc clusters, use chain spaces, shape the two rounded lobes, maintain the upper indentation, form a defined bottom point, introduce contrasting colors, and finish everything with a neat border.
You can now use the same techniques to experiment with different sizes and color combinations. A single solid shade creates a clean minimalist result, while alternating blues and cream can reproduce the soft layered character of the inspiration photo. Most importantly, check the shape as you crochet rather than waiting until the final round. Small adjustments to increases and tension are much easier to make while the project is still developing.
After completing your Crochet Easy Heart Coaster Pattern, I would love to know your sincere opinion about the project. Which color combination would you choose, and would you make it as a coaster, appliqué, or larger decorative heart? Feel free to leave your suggestions and ideas for variations that could make this heart pattern even more creative and useful.