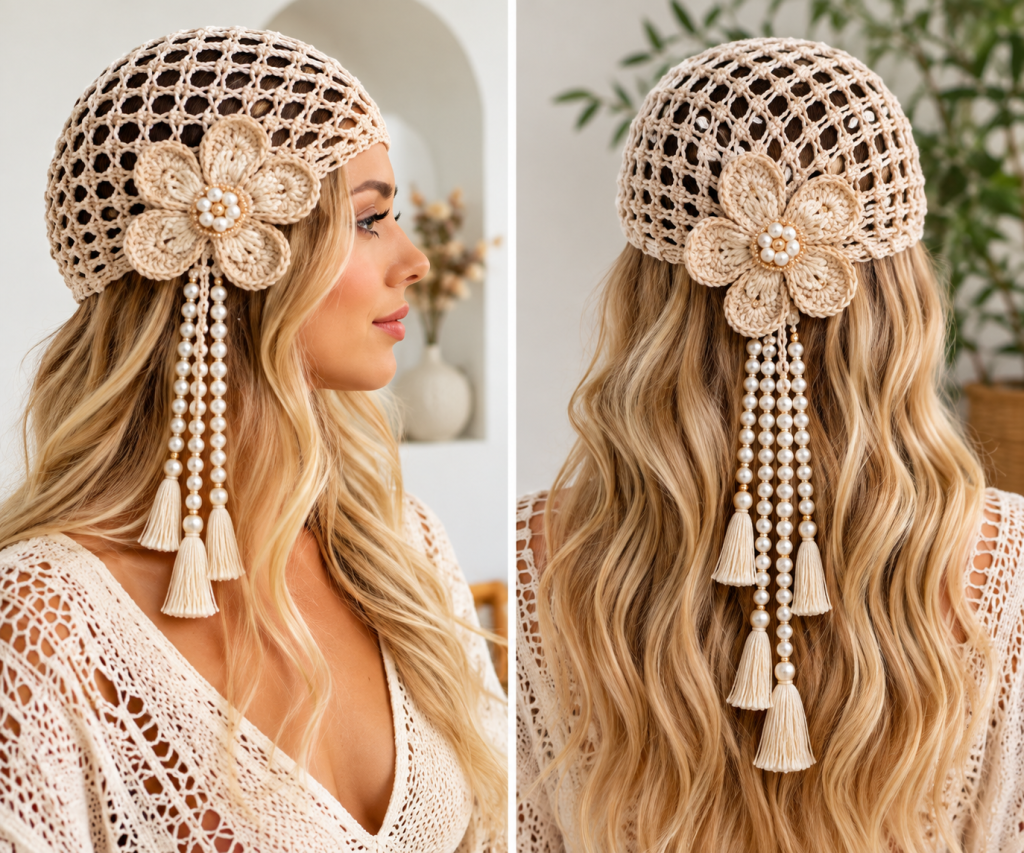
The Crochet Headpiece Pattern is a beautiful way to combine traditional crochet techniques with a romantic, bohemian style that feels both delicate and elegant. Inspired by an open-mesh crochet cap decorated with a dimensional flower, pearls, and soft tassels, this project can be customized for weddings, summer celebrations, festivals, photo sessions, or simply as a handmade fashion accessory. The structure is light enough to sit comfortably over the hair without feeling like a heavy winter hat, while the open crochet stitches create a lace-like texture that allows the hairstyle underneath to remain visible. One of the most attractive features of this design is that the basic construction does not require complicated shaping once the crocheter understands how to increase the crown correctly. The decorative flower can also be made separately, allowing beginners to practice the main headpiece before working on the embellishment. Throughout this tutorial, the term Crochet headpiece Pattern refers to the complete combination of the crocheted mesh base, decorative flower, optional pearl strands, tassels, fitting, and finishing techniques.
A handmade crochet headpiece is different from a traditional beanie because its main purpose is decorative rather than providing warmth. Instead of using dense rows of single crochet or half double crochet, this design relies mainly on chains, slip stitches, and double crochet stitches to create an airy mesh. That open construction is especially useful when the finished accessory will be worn over long or styled hair, because it provides flexibility without covering the entire hairstyle. The neutral cream shade shown in the inspiration gives the project an elegant natural appearance, but ivory, soft beige, blush, white, champagne, light gold, or even brighter colors may be used depending on the occasion. Cotton yarn is particularly attractive for this style because it gives the stitches definition and helps the flower maintain its shape. The design can also be simplified by leaving off the pearls and tassels, or made more decorative by adding additional bead strands around the flower.
Another advantage of this Crochet Headpiece Pattern is that the finished size can be adjusted while you work instead of depending on only one fixed measurement. For an average adult head, a circumference of approximately 21–23 inches (53–58 cm) is a useful starting range, although the exact size should always be checked before completing the final rounds. Because the mesh stretches, the headpiece should usually be slightly smaller than the actual head measurement so that it stays comfortably in place. A project measuring approximately 20–21 inches (51–53 cm) around the lower edge may stretch beautifully for many adult sizes, depending on the yarn and crochet tension. The depth from the center crown to the lower edge can be approximately 7–8 inches (18–20 cm), but this measurement is also easy to customize. By understanding the stitch structure, measurements, flower construction, and finishing methods explained below, you can create a personalized crochet headpiece that looks polished and professionally finished.
Materials, Crochet Terms, Gauge, and Planning the Headpiece
For this project, choose a lightweight cotton or cotton-blend yarn that produces clean, defined stitches. A fingering, sport, or light DK-weight yarn can work well depending on how delicate you want the mesh to appear. Approximately 100–150 yards (91–137 m) should generally be enough for the base and flower, although extra yarn may be required if you add several long decorative cords or tassels. A crochet hook around 3.0–3.5 mm is a practical starting point for lightweight yarn, but always choose the hook that gives you a flexible fabric without making the mesh too loose.
This tutorial uses standard U.S. crochet terms. The abbreviation ch means chain, sl st means slip stitch, sc means single crochet, hdc means half double crochet, and dc means double crochet. The term ch-sp means chain space, which becomes extremely important in this pattern because many stitches are worked into the spaces instead of directly into individual stitches. A magic ring can be used to begin the crown neatly, although a short chain joined into a ring is also suitable if that method feels more comfortable.
Gauge is more flexible for this accessory than for a fitted sweater, but it should not be completely ignored. Make a small mesh sample using the same chain spaces and double crochet stitches planned for the headpiece. The sample should stretch gently without becoming stiff, and the openings should remain relatively even. If the fabric feels hard, increase the hook size slightly; if it looks floppy or the holes become excessively large, try a smaller hook.
To measure for your Crochet headpiece Pattern, wrap a soft measuring tape around the part of the head where you want the lower edge to rest. Measure horizontally above the ears and around the back of the head without pulling the tape tightly. Subtract approximately 0.5–1 inch (1.3–2.5 cm) from that measurement for a comfortable fitted result, remembering that cotton crochet may relax slightly after wearing.
The mesh design is created by gradually expanding from the center crown. In the first rounds, increases are necessary because the project must grow into a flat circle before curving naturally around the head. Later rounds contain fewer increases, which changes the shape from a flat circle into a soft cap. Understanding this progression is more important than memorizing an exact stitch count because yarn thickness, hook size, and individual tension can all affect the final dimensions.
Before beginning, decide where the decorative flower will sit. A flower positioned slightly above one ear creates the asymmetrical appearance seen in many bohemian and bridal crochet headpiece designs. If you plan to add pearl strands, prepare lightweight craft pearls or beads with openings large enough for your chosen thread or cord. Decorative elements should be sewn securely, and for accessories intended for small children, loose beads and similar small components should be avoided because they can present a choking hazard.
Step-by-Step Crochet Mesh Base for the Headpiece
Begin the crown with a magic ring. Chain 3 to represent the first double crochet, then work approximately 11 double crochet stitches into the ring, giving you 12 stitch positions when the beginning chain is counted. Join with a slip stitch to the top of the beginning chain. Pull the center closed carefully. This small circular beginning forms the center of the crochet headpiece and should lie reasonably flat before you continue.
For the second round, begin introducing chain spaces. Chain 3, work a double crochet into the same general area, then chain 2. Continue by working 2 double crochet stitches into the next stitch, chain 2, and repeat around. Join with a slip stitch. These repeated groups increase the diameter while beginning the open lace effect. Do not pull the chain spaces too tightly because the finished project needs flexibility.
In the next round, work primarily into the chain spaces rather than directly into every stitch. Slip stitch to reach the first chain space if necessary, then chain 3 and work additional double crochet stitches into that space. Chain 3 and move to the next chain space. Continue working groups separated by chains all the way around. If the circle begins curling upward too early, add a little more space or increase slightly more often; if the circle becomes heavily ruffled, reduce the number of increases.
Continue expanding the crown until the flat section measures approximately 5.5–6.5 inches (14–16.5 cm) across for many adult sizes. At this stage, begin reducing the frequency of increases. A simple mesh round may consist of one double crochet or a small double crochet group worked into each previous chain space, followed by chain 3 or chain 4. This creates the characteristic net-like appearance of the Crochet Headpiece Pattern while allowing the sides to begin curving downward.
After the crown reaches the desired diameter, crochet several rounds without increasing. Work one consistent mesh section into each corresponding chain space around. As the rounds continue, periodically try the headpiece on or measure from the center crown downward. Most adult versions will need approximately 7–8 inches (18–20 cm) of total depth, although someone who prefers more hair coverage can continue for another round or two.
Finish the mesh portion with a slightly firmer lower edge. One attractive option is to work a round of single crochet while placing several single crochets into each chain space. Another option is a simple pattern of single crochet followed by short chain spaces if you want the edge to remain visibly lacy. The lower edge should stretch enough to pass over the head but should not feel loose. Fasten off, leaving a tail long enough to weave securely through several nearby stitches.
Creating the Crochet Flower and Decorative Details
The flower is one of the strongest visual features of this Crochet headpiece Pattern, and it can be made separately before being attached. Begin with a magic ring and work a small circle of single crochet stitches. For example, work 6 single crochet stitches into the ring and join. In the next round, increase evenly by working 2 single crochet stitches into each stitch. This creates a stable center that can support several large petals.
To create each petal, chain approximately 6–8 stitches, depending on the size you want. Beginning in the second chain from the hook, work stitches of increasing height such as single crochet, half double crochet, double crochet, and several double crochet stitches toward the center of the petal. Work back down with half double crochet and single crochet as needed. Slip stitch into the flower center before beginning the next petal. Repeat the process until you have five or six petals arranged evenly around the center.
For thicker, more dimensional petals similar to those used on statement crochet headpieces, work around both sides of the foundation chain. After completing stitches along one side of the chain, rotate the work and crochet along the opposite side. This produces an oval-shaped petal with a clearly defined outer edge. You can also work a final round of single crochet around each petal if you want extra structure and a more polished outline.
Block the completed flower gently before attaching embellishments. Lightly dampen it, arrange the petals in the desired shape, and allow it to dry completely on a flat surface. Cotton yarn responds particularly well to this process. Blocking helps the flower look symmetrical and prevents the petals from folding inward when sewn onto the open mesh fabric.
For the flower center, you may keep the design entirely crocheted by adding a small circular crochet center, or you can attach decorative beads or faux pearls. If using beads, sew them individually with strong thread rather than relying on glue alone. Create a cluster in the center and check the back frequently to make sure the stitches are secure. The decorative center should enhance the flower without making it excessively heavy.
Long pearl strands and tassels can be attached beneath the flower for an elegant bohemian effect. Crochet narrow cords using chains and slip stitches, or use strong jewelry thread for lightweight beads. Make strands in different lengths, such as approximately 6, 8, and 10 inches (15, 20, and 25 cm), to create movement. Add small handmade yarn tassels to the ends if desired. Keeping the strands slightly different in length gives the finished Crochet Headpiece Pattern a graceful layered appearance.
Assembly, Fit Adjustments, Finishing, and Styling Tips
Place the finished mesh base on a mannequin head or gently try it on before attaching the flower. Determine which side looks most flattering and mark the location with a removable stitch marker. The flower usually looks balanced when positioned above or slightly behind the ear instead of directly at the front. Remove the headpiece before sewing so you can work carefully and avoid accidentally catching hair.
Thread a yarn needle with matching yarn and sew the flower through its center and several points around the base of the petals. Because the crochet mesh contains large openings, do not attach the entire flower to only one chain space. Spread the sewing stitches across several nearby mesh intersections. This distributes the weight and reduces pulling or distortion in the crochet headpiece.
Attach the pearl strands beneath the flower after the flower itself feels secure. Place the heaviest strand closest to a strong crochet intersection rather than attaching it only to the outer edge of a petal. Sew through the attachment point several times and knot the thread securely on the inside. When the headpiece is held upright, the decorative strands should hang naturally without pulling the flower downward.
If the finished Crochet Headpiece Pattern feels too loose, there are several simple adjustments. You can weave thin elastic through the final round, work an additional round of single crochet with a slightly smaller hook, or add a discreet crocheted drawstring. If the accessory feels too tight, carefully remove the final edging and repeat it with a larger hook or fewer decreases. Small adjustments usually make a significant difference because the mesh itself already has natural flexibility.
Weave all remaining yarn ends carefully through several stitches in different directions. Trim the yarn only after confirming that the ends will not loosen. If tassels were added, comb the yarn strands gently with your fingers and trim the ends so they appear even. You may also lightly steam or wet block the completed accessory, but avoid applying strong heat directly to synthetic yarn, artificial pearls, or decorative components.
The completed crochet headpiece can be styled over loose waves, braids, a low bun, or partially pinned hair. Neutral shades create a soft bridal or vintage appearance, while colorful yarn can transform the same pattern into a festival or summer accessory. Because the base pattern is relatively simple, it is also easy to personalize: make the flower smaller, add several miniature flowers, remove the beads, change the tassel length, or use contrasting colors. The goal is to keep the mesh comfortable and balanced while allowing the decorative details to express your preferred style.
FAQ About the Crochet Headpiece Pattern
What yarn is best for a Crochet Headpiece Pattern?
Lightweight cotton or a cotton-blend yarn is an excellent choice because it creates clearly defined stitches while remaining breathable. Sport-weight and lightweight DK yarns are especially practical. If you want a very delicate lace appearance, fingering-weight cotton can also work beautifully, although it may require more rounds to reach the desired size.
What crochet hook size should I use?
A hook between approximately 3.0 and 3.5 mm works well with many lightweight cotton yarns. However, the yarn label and your individual crochet tension should influence the final choice. The goal is to create an open mesh that feels flexible but still has enough stability to support the flower and decorative details.
How do I make the crochet headpiece fit different head sizes?
Measure the head circumference first and adjust the diameter of the crown before working the straight mesh rounds. For smaller sizes, stop increasing sooner. For larger sizes, add another controlled increase round before continuing without increases. Always remember that an open crochet mesh usually stretches during wear.
Can beginners make this crochet headpiece?
Yes. A beginner who already understands chains, slip stitches, single crochet, and double crochet can work through this project successfully. The most important skill is recognizing chain spaces and maintaining an even mesh. The decorative flower may require more patience, but it can be practiced separately before it is attached.
Can I make the pattern without beads or pearls?
Absolutely. The Crochet headpiece Pattern works well as a completely crocheted accessory. Replace the pearl center with a small crocheted circle or button-like crochet motif, and make the hanging decorations from chain cords and yarn tassels. This creates a softer and lighter finished accessory.
How can I keep the flower from falling forward?
Attach the flower to several mesh intersections rather than sewing it to only one stitch. Using lightweight yarn for the flower also helps. If the flower contains beads, distribute them evenly and avoid using unnecessarily heavy decorations.
How many petals should the flower have?
Five or six petals generally provide a balanced shape for this style. Five petals create a classic floral appearance, while six can create a fuller design. You can also experiment with two layers of smaller petals if you want a more dimensional flower.
Can this headpiece be used for a wedding?
Yes. An ivory, champagne, cream, or white crochet headpiece can complement a bohemian, rustic, beach, or handmade wedding style. Pearl accents can add an elegant appearance, while an all-crochet version produces a softer and more natural result.
How do I prevent the mesh from becoming wavy?
Waviness usually means there are too many increases. Reduce the number of added stitches or use shorter chain spaces. If the crown curls tightly instead, it may need additional increases. Keeping the early crown flat is the easiest way to achieve an even shape.
Should I block the finished headpiece?
Blocking is recommended, especially when using cotton. It helps open the mesh, smooth the crown, and shape the flower petals. Use gentle wet blocking and allow the project to dry naturally in the desired shape.
Conclusion
This Crochet Headpiece Pattern combines a lightweight mesh base, dimensional crochet flower, optional pearl decorations, hanging cords, and tassels to create an elegant handmade accessory that can be adapted for many different styles. The main construction begins at the crown, expands into a circular shape, and then continues without increases to form the sides. By measuring carefully and checking the fit as you crochet, you can customize the design for different adult head sizes without completely changing the pattern.
You also learned how chains, double crochet stitches, chain spaces, single crochet edging, crochet petals, blocking, and secure assembly contribute to the finished project. The decorative details are completely customizable, which means the same basic pattern can become a simple summer head covering, a romantic bridal accessory, or a colorful bohemian statement piece. Choosing suitable yarn and keeping the embellishments lightweight will help the finished headpiece remain comfortable.
Most importantly, take your time with the fitting and finishing stages. A beautiful crochet accessory depends not only on decorative stitches but also on secure seams, neatly woven ends, balanced embellishments, and comfortable measurements. Once you understand the basic construction, you can create many variations of this crochet headpiece using different flowers, colors, beads, tassels, and mesh patterns.