The Crochet Headpiece Pattern is a beautiful way to transform simple crochet stitches into a delicate wearable accessory with a romantic, bohemian look. Inspired by the open lattice structure and dangling floral details visible in the reference image, this project combines chains, small joining stitches, decorative picots, and optional flowers or beads.
The finished headpiece can be worn over loose hair for festivals, handmade photo sessions, summer celebrations, costume styling, or simply as an artistic crochet accessory. One of its greatest advantages is that the construction can be customized to fit different head sizes without changing the overall appearance.
Although the finished crochet headpiece looks intricate, the basic construction is surprisingly approachable. Instead of creating a solid fabric, you will build an airy crochet net around the crown of the head. Repeated chain spaces create the diamond-shaped openings, while carefully positioned joining points keep the structure balanced.
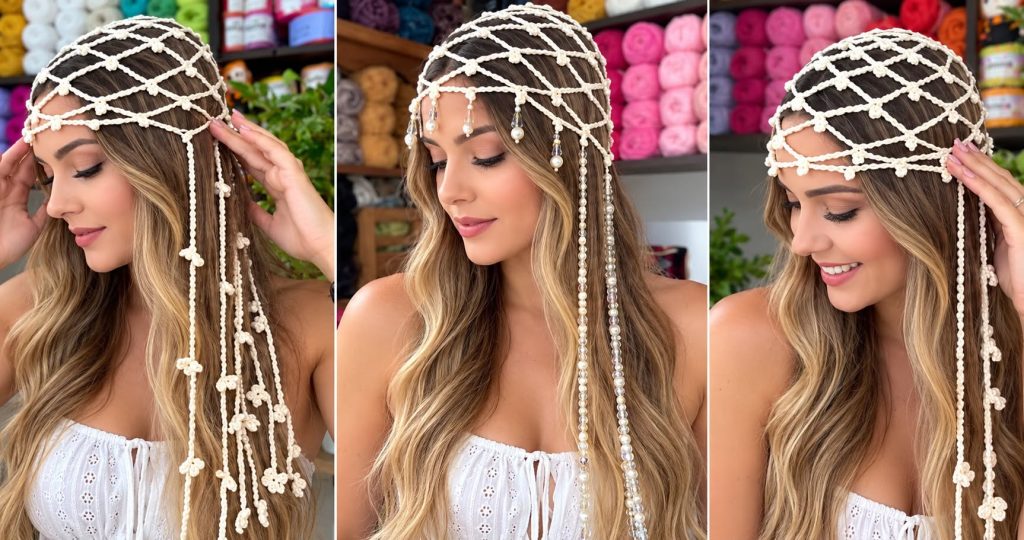
Decorative strands can then be attached around the sides and back. These hanging cords may remain simple, end in tiny crochet flowers, or be decorated with lightweight beads and faux pearls for a more elegant interpretation.
This tutorial uses standard US crochet terminology and focuses on recreating the general handmade style shown in the reference rather than requiring an exact commercial pattern. Because everyone’s head circumference and preferred fit are slightly different, measurements are more useful than relying only on fixed stitch counts. The essential techniques include ch (chain), sl st (slip stitch), sc (single crochet), dc (double crochet), picot, chain spaces, joining, and simple flower construction. Once these techniques are understood, the Crochet Headpiece Pattern becomes a flexible project that encourages creativity while still following a clear step-by-step structure.
1. Materials, Crochet Abbreviations, and Preparing the Headpiece
For this Crochet Headpiece Pattern, choose a lightweight cotton crochet thread or fine cotton yarn. A cream, ivory, natural white, or soft beige shade gives the accessory the delicate appearance seen in the inspiration photo. Crochet thread between approximately size 3 and size 10 can work well, depending on how fine you want the finished netting to look. A smooth cotton fiber is particularly useful because it helps the small decorative details remain clearly defined.
Select a crochet hook appropriate for your thread. For fine cotton, a hook around 1.75 mm to 2.75 mm is a useful starting range, but always check the yarn label and your personal tension. You will also need scissors, a yarn needle, stitch markers, and a flexible measuring tape. Optional materials include small faux pearls, lightweight beads, transparent sewing thread, and tiny jewelry findings if you want a more embellished version.
The main abbreviations are ch = chain, sl st = slip stitch, sc = single crochet, dc = double crochet, st = stitch, sp = space, and rep = repeat. A picot can be made by chaining 3 and slip stitching into the first chain. Picots are useful because they create the tiny knot-like or floral-looking accents at the intersections of the crochet net.
Begin by measuring around the head approximately where you want the lower edge of the headpiece to sit. Do not pull the measuring tape tightly. For a comfortable handmade accessory, the foundation should rest gently rather than compressing the head. Write down this measurement because it will determine the circumference of the first band. Crochet also stretches slightly, so checking the fit during construction is important.
Create a foundation chain long enough to comfortably circle the head. Keep the chain relaxed and avoid making it tighter than your normal crochet tension. Before joining, place the chain around the head or around a similarly sized form and confirm the fit. Make sure the chain is not twisted, then sl st into the first ch to form a ring. This becomes the lower foundation band of the crochet headpiece.
For a slightly stronger edge, work 1 sc into each ch around, then join with a sl st. Alternatively, you can keep the foundation chain exposed for an especially delicate appearance. The important goal is to create a flexible circular base from which the diamond mesh will grow upward toward the crown.
2. Building the Diamond Crochet Mesh Step by Step
The characteristic feature of this Crochet Headpiece Pattern is the open diamond mesh. Rather than working traditional solid rounds, you will create repeated arches made primarily from chains. When these arches are joined to the centers of the previous round, they naturally form a net structure. Consistent chain tension is especially important because irregular chains can make some diamonds noticeably larger than others.
Start the first mesh round by attaching your yarn to the foundation band. Ch 1, sc in the same point, ch 8, skip approximately 5 foundation stitches, sc in the next stitch. Continue with ch 8, skip the same number of stitches, sc in the next stitch around the entire foundation. You may need to adjust the number of skipped stitches slightly so the spaces are distributed evenly. Join at the beginning with a slip stitch.
For the second mesh round, move with slip stitches until you reach approximately the center of the first ch-8 space. Work sc into the chain space, ch 8, sc into the center of the next ch-8 space. Continue around. Connecting each new arch to the middle of the previous arch shifts the intersections and begins forming recognizable diamonds.
Repeat the same principle for additional rounds: sc in the center of the next chain space, ch 8, sc in the center of the following chain space. Depending on head size and how far over the crown you want the piece to extend, approximately five to eight mesh rounds may be suitable. Try the work on frequently instead of depending entirely on a predetermined number of rounds.
To imitate the tiny decorative intersections visible in the inspiration, add a small picot at selected joining points. For example: sc into the chain space, ch 3, sl st into the first ch of the ch-3, ch 8, then continue to the next intersection. Another option is to make a miniature cluster using several short chains. Keep these details small so they decorate the lattice without making the headpiece heavy.
As the mesh approaches the upper crown, the circumference needs to become smaller. Begin decreasing by occasionally joining two neighboring spaces into one section or shortening selected arches from ch 8 to ch 6. Make these reductions gradually and distribute them evenly around the head. Continue until the opening at the top is small enough to close neatly. Draw the remaining points together with the working yarn or finish with a tiny circular crochet motif.
3. Making the Hanging Cords, Tiny Flowers, and Pearl Details
The hanging strands give this Crochet Headpiece Pattern much of its distinctive personality. They can be positioned around the temples, behind the ears, or toward the back of the head. The reference design uses strands of different lengths, which creates a soft cascading effect instead of a rigid line. This asymmetry is useful because it makes the handmade accessory appear more organic.
To make a basic hanging cord, join the yarn to the lower foundation band and ch 40–70, depending on the desired length. Turn and work sl st loosely into each chain if you want a thicker cord, or simply leave the chain unworked for a very fine strand. Fasten off securely. Repeat several times, varying the number of chains so that neighboring strands finish at different heights.
Small decorative knots can be added along a cord while crocheting. One simple sequence is ch 10, picot, ch 10, picot, continuing until the strand reaches the required length. To make a picot, ch 3 and sl st into the first of those 3 chains. These little bumps resemble tiny buds and echo the decorative intersections across the crown.
For a simple crochet flower, begin with ch 4 and join with sl st to form a ring. Into the ring work: (sc, ch 3, 2 dc, ch 3, sc). This forms one small petal. Repeat the sequence four or five times around the ring. Fasten off and weave in the tail. The result is a lightweight flower that can be attached to the ends of selected hanging cords.
Another tiny floral option is even simpler. Make a magic ring and repeat [ch 3, dc, ch 3, sl st into ring] 5 times. Pull the ring closed and secure the yarn. Because these flowers are small, you can scatter several along the cords without overwhelming the headpiece. For a more subtle design, use only one flower at the end of each strand.
Pearls and beads are completely optional. If you choose to use them, select lightweight pieces so they do not pull the crochet mesh out of shape. Sew a pearl into the center of a tiny flower, attach one at the bottom of a hanging strand, or create separate beaded strands between the crocheted cords. Secure every embellishment carefully, especially when the accessory will be worn for several hours.
4. Finishing, Fitting, Styling, and Customizing the Pattern
Once the main construction is finished, carefully weave every yarn tail through several stitches using a yarn needle. Fine crochet thread can sometimes work loose if ends are trimmed immediately after weaving, so pass each tail in more than one direction before cutting away the excess. Inspect all attachment points where hanging cords and flowers meet the foundation band.
Try on the completed crochet headpiece and look at it from the front, sides, and back. The diamond lattice should sit gently against the hair without pulling strongly toward one side. If one section appears loose, a nearly invisible securing stitch can help stabilize it. If a hanging strand feels too long, shorten it rather than tying a bulky knot near the end.
Light blocking can make the crochet mesh pattern look cleaner and more professional. Depending on the fiber, gently dampen the piece and arrange the diamonds evenly on a suitable blocking surface. Avoid excessive stretching. The goal is simply to straighten the chain spaces and encourage consistent geometry. Always follow the care recommendations appropriate for the yarn you selected.
Customization is one of the most enjoyable parts of this pattern. A natural ivory version creates a soft bohemian style, while white can produce a brighter bridal-inspired appearance. Pastel pink, lavender, sage green, pale blue, or golden beige can completely change the personality of the project. You can also crochet the crown in one shade and make the tiny flowers in coordinating colors.
The mesh itself can also be modified. Use ch 6 spaces for smaller diamonds or ch 10 spaces for a more dramatic open lattice. Smaller spaces generally provide greater stability, whereas longer chains create a softer and more flowing appearance. When changing the chain count, make a small sample first because the adjustment affects both the size and flexibility of the headpiece.
Finally, remember that handmade wearables should prioritize comfort as much as appearance. Keep embellishments smooth where they contact the hair or skin, secure beads carefully, and avoid overly tight foundation bands. With thoughtful finishing, this Crochet Headpiece Pattern can become a reusable accessory that combines traditional crochet techniques with a modern, decorative style.
FAQ About the Crochet Headpiece Pattern
Is the Crochet Headpiece Pattern suitable for beginners?
Yes, especially for beginners who already know how to make chains, single crochet, double crochet, and slip stitches. The design looks elaborate primarily because the mesh repeats across the entire crown. Once the first two mesh rounds are understood, the remaining construction follows the same basic logic.
What yarn is best for a crochet headpiece?
Fine cotton thread or lightweight cotton yarn is usually an excellent choice because it provides stitch definition without excessive bulk. The exact thickness depends on the desired result. Fine thread creates an elegant lace-like headpiece, while slightly thicker yarn produces a more visible bohemian crochet accessory.
How do I make the headpiece fit different head sizes?
Measure the intended wearer before beginning. Make the foundation chain according to the actual head circumference and test it before joining. The number of mesh sections can then be distributed around that circumference. This measurement-based approach is generally more reliable than using one fixed stitch count for everyone.
How do I create the diamond shape?
The diamonds are produced by connecting chain arches to the centers of the chain spaces from the previous round. Each round shifts the joining position relative to the round below it. As several rounds accumulate, those staggered arches visually form the diamond crochet mesh.
Can I use shorter chain spaces?
Absolutely. If ch 8 produces openings that are larger than you prefer, experiment with ch 6 or ch 7. A different yarn thickness or hook size may also require adjustments. Consistency is more important than using one exact number.
How many hanging strands should I make?
There is no mandatory number. Six to twelve strands distributed around the sides and back can create a decorative effect, but a minimalist version may use only two or four. Start with fewer strands and add more after trying on the headpiece.
Can I add pearls to the Crochet Headpiece Pattern?
Yes. Small faux pearls can be sewn onto the flowers, mesh intersections, or hanging cords. They may also be strung separately and attached beside the crochet strands. Use lightweight embellishments and secure them firmly.
How can I keep the crochet net symmetrical?
Count the chain spaces in every round and mark important positions with stitch markers. When decreasing near the crown, distribute reductions around the entire circumference rather than placing them all in one area. Blocking afterward can also improve the appearance of slightly uneven diamonds.
Can this pattern be made without flowers?
Yes. The flowers are decorative rather than structural. You can replace them with simple picots, small knots, beads, tassels, or plain chain ends. A version consisting only of the diamond lattice and simple cords can look beautifully minimalist.
What if the crown becomes too loose?
Begin decreasing slightly earlier. Shorten some chain spaces or reduce the number of arches gradually as you move toward the top. Avoid making all decreases in one round because sudden reductions can cause puckering.
Can I make the hanging strands different lengths?
Yes, and varying the lengths often improves the cascading appearance. For example, neighboring cords could contain 45, 55, 65, and 50 chains rather than all being identical. Test the strands while wearing the headpiece because hair length also affects how the finished cords appear.
How long does a Crochet Headpiece Pattern take to complete?
The time varies according to crochet speed, thread thickness, and the amount of decoration. The basic mesh can be relatively quick because much of it consists of chain stitches. Tiny flowers, individual strands, pearls, and detailed finishing usually require more time than the crown itself.
How should the finished headpiece be stored?
Lay it flat or loosely arranged in a clean storage box so the cords do not become tangled. Avoid placing heavy objects on top of the crochet flowers or beads. If the piece becomes slightly distorted, gentle reshaping or appropriate blocking can restore the mesh.
Can I adapt this into a simpler version?
Certainly. Make the foundation band, work several rounds of diamond mesh, close the crown, and add only two long side cords. This preserves the essential character of the Crochet Headpiece Pattern while significantly reducing the amount of decorative work.
Why are my diamond spaces uneven?
Uneven tension is the most common reason. Try to keep every chain stitch similar in size and place each joining stitch near the true center of the previous chain space. Counting chains carefully will also prevent accidental variations.
Conclusion
The Crochet Headpiece Pattern demonstrates how basic crochet techniques can create an accessory that appears detailed and sophisticated. Starting with a measured foundation band, you learned how to build a repeating diamond crochet mesh, gradually shape it around the crown, and close the upper section without losing the delicate openwork appearance.
You also learned how to make decorative hanging chains, picots, miniature crochet flowers, and optional pearl details. These elements allow the same basic pattern to produce many different styles, from a simple bohemian head covering to a more elaborate headpiece with cascading decorations.
Most importantly, this project is designed to be adaptable. Adjust the foundation circumference, chain-space size, number of mesh rounds, cord lengths, colors, flowers, and embellishments according to your own creative vision. Taking measurements and checking the fit as you crochet will usually produce a better result than relying on rigid stitch counts.
If you make your own version of this Crochet Headpiece Pattern, leave your sincere opinion about the tutorial and share your suggestions. Which version would you create: classic ivory, colorful bohemian, floral, or decorated with pearls? Your ideas can inspire even more creative variations of this beautiful crochet project.