Chicken Egg Basket Tutorial is a charming quilting and sewing project that transforms cotton fabric, batting, and a few simple pattern pieces into a decorative chicken-shaped basket designed to hold eggs or other lightweight household items. Inspired by traditional farmhouse sewing, this project combines quilted fabric construction, curved seams, appliqué-style details, and dimensional shaping to create a useful centerpiece with plenty of handmade character.
The design is especially appealing because the chicken itself becomes the basket. A softly structured body forms the container, while the raised head, large red comb, yellow beak, red wattle, decorative wing, and curved tail create the recognizable silhouette. The open center provides room for eggs, fabric decorations, wrapped treats, or other lightweight objects. Red-and-white floral fabrics give the project a classic country appearance, although the same Chicken Egg Basket Pattern can easily be adapted to farmhouse neutrals, spring colors, gingham, or scrap fabrics.
This tutorial uses approximate dimensions inspired by the proportions shown in the project. Because a dimensional fabric basket can be enlarged or reduced easily, the measurements do not have to be followed perfectly. What matters most is creating two symmetrical body panels, adding enough batting or stabilizer to support the basket, and keeping the curved opening smooth. With careful cutting and an accurate ¼-inch (6 mm) seam allowance, this project can become an attractive addition to a kitchen, breakfast table, Easter display, or handmade gift collection.
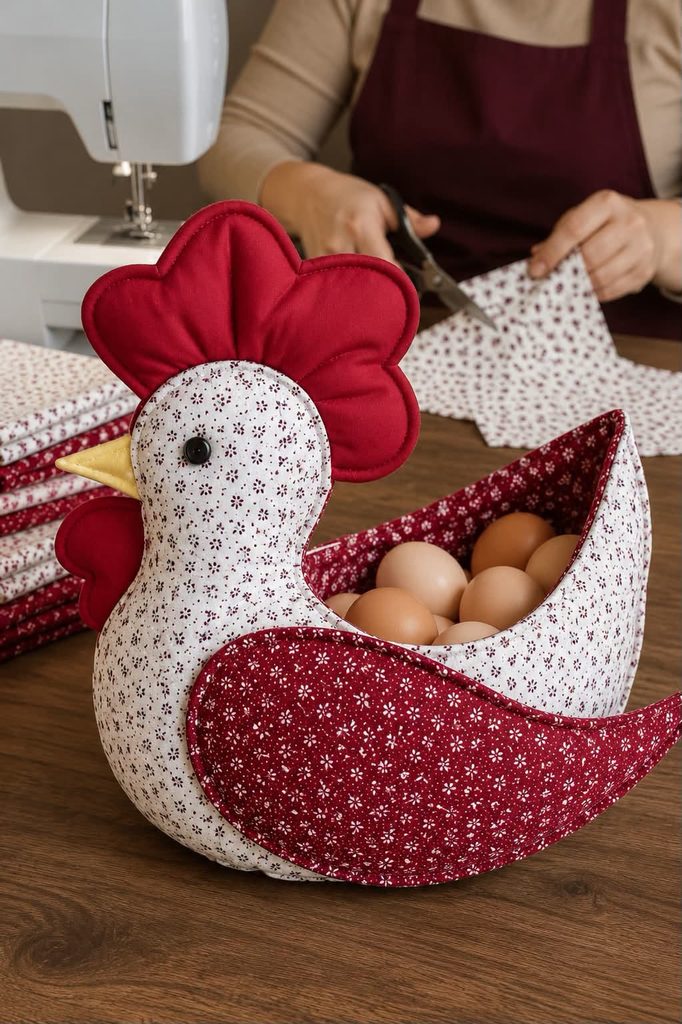
Materials and Measurements for the Chicken Egg Basket Tutorial
For the main body, choose a medium-weight 100% cotton quilting fabric. A cream or white fabric with a small red floral print creates the traditional appearance shown in the inspiration. Approximately ½ yard (46 cm) should provide enough fabric for the exterior pieces of a medium basket.
Choose approximately ¼ yard (23 cm) of contrasting red fabric for the wings, comb, wattle, and decorative accents. Small-scale prints work particularly well because the pattern remains visible on the smaller pieces.
You will also need a small scrap of yellow or golden cotton for the beak. Approximately 4 × 4 inches (10 × 10 cm) is more than enough.
For the lining, prepare approximately ½ yard (46 cm) of coordinating cotton. The interior can match the red wing fabric to create an attractive contrast when viewed from above.
To give the basket structure, use cotton batting, fusible fleece, or a combination of batting and medium-weight interfacing. The finished chicken should be flexible enough to feel quilted but firm enough to remain upright when empty.
For an approximate finished basket measuring 12–14 inches (30–36 cm) long, 7–8 inches (18–20 cm) wide, and about 11–12 inches (28–30 cm) high at the comb, prepare two mirrored main chicken body pieces.
The body pattern should include the breast, belly, neck, back, and upward-curving tail as one continuous silhouette. Leave a deep curved opening along the upper back. This opening eventually becomes the egg compartment.
Cut two exterior body pieces, two lining pieces, and two matching batting or stabilizer pieces.
For each wing, create a long teardrop shape approximately 9 inches (23 cm) long and 4½ inches (11.5 cm) wide at its fullest point. Cut two red fabric pieces and one thin batting piece for each wing if you want a padded appearance.
The large comb can be approximately 7 × 5 inches (18 × 13 cm) overall and divided into three rounded lobes. The wattle can be approximately 3½ × 3 inches (9 × 7.5 cm).
Cut the beak as a small elongated diamond or triangle. When folded, it should project approximately 2–2½ inches (5–6.5 cm) from the chicken’s face.
For the eye, use a securely sewn dark button for a purely decorative household basket, or create the eye with embroidery for a softer finish. Avoid loose small components if the finished item could be handled by young children.
Basic supplies include quilting cotton, batting or fusible fleece, coordinating thread, fabric scissors, rotary cutter, cutting mat, pins or clips, marking pen, iron, sewing machine, hand-sewing needle, and a quilting ruler.
Cutting, Quilting, and Preparing the Chicken Pieces
Begin the Chicken Egg Basket Tutorial by drawing the main chicken silhouette on paper. The bottom should be broad and gently rounded so the basket can sit securely on a flat surface.
Extend the front upward into the neck and rounded head. At the back, create a graceful rising tail rather than a straight vertical edge.
The most important area is the upper body opening. Draw a generous U-shaped curve from behind the neck toward the tail. This opening should be large enough to reach comfortably into the finished basket.
Add your seam allowance to the pattern before cutting.
Fold the exterior fabric right sides together and cut two mirrored body pieces at the same time. Repeat with the lining and batting.
Fuse or baste the batting to the wrong side of each exterior piece.
At this stage, you can add machine quilting to the body. Simple parallel lines, gentle curves, crosshatching, or free-motion quilting all work well.
Keep the quilting relatively light. Excessively dense quilting may make the body stiff and difficult to turn along the curved areas.
Next, prepare the wings.
Layer the red wing fabric with batting and stitch around the outer edge. Turn the wing right side out if using a traditional turned construction, or finish the raw edge with narrow binding.
Press carefully.
Topstitch approximately ⅛ inch (3 mm) from the wing edge. This creates the clean outlined appearance seen in professionally finished fabric baskets.
Position one wing on each side of the chicken. The rounded end should begin near the lower breast, while the pointed portion extends toward the tail.
Before permanently attaching the wings, temporarily pin the body together and check the placement from both sides.
Once satisfied, topstitch the wings securely to the exterior body panels. Leave the outer portion slightly dimensional if you want a softer, more sculptural appearance.
Prepare the comb using two red pieces placed right sides together over thin batting.
Sew around the three rounded lobes, leaving the lower edge open.
Clip the seam allowance around the curves without cutting through the stitching. Turn right side out and press gently.
Topstitch around the comb.
Repeat the same technique for the red wattle.
For the beak, sew two yellow pieces together, turn them right side out, and press. A tiny amount of batting can be inserted if you prefer a fuller beak.
Prepare the eye before assembling the body because it is much easier to sew while the panel is still flat.
For an embroidered eye, create a small filled satin-stitch circle or securely work several rounds of dark thread.
Sewing and Shaping the Chicken Egg Basket
Place the exterior body pieces together with right sides facing.
Position the comb between the layers at the top of the head, with its raw edge aligned with the body’s raw edge and the decorative portion pointing inward.
Position the beak in the same manner along the front of the face.
Insert the wattle below the beak.
Pin or baste these pieces carefully.
Sew around the head and front body using a ¼-inch (6 mm) seam allowance, making sure the comb, beak, and wattle remain correctly positioned.
Continue stitching around the lower body and tail where appropriate, but leave the basket opening accessible according to your chosen lining method.
Clip concave curves and notch convex curves. These small cuts allow the fabric to spread correctly when turned.
Pay particular attention to the neck and tail because these areas contain some of the strongest curves.
Construct the lining in the same basic manner.
To create greater capacity inside the basket, add a gusset between the two body panels.
A gusset approximately 4 inches (10 cm) wide can run around the lower belly from the lower breast toward the tail. This transforms two flat chicken silhouettes into a spacious three-dimensional basket.
Cut one exterior gusset, one lining gusset, and corresponding stabilizer.
Pin the gusset to the first exterior side, matching the centers first.
Work gradually around the curve rather than stretching the fabric.
Sew the first side.
Then attach the second body panel to the opposite side of the gusset.
Turn the exterior structure right side out temporarily and inspect the shape.
The chicken should now stand with a rounded body and an open upper compartment.
Construct the lining using the same gusset dimensions.
Place the lining inside the exterior with the wrong sides together.
Match the upper curved opening carefully.
Finish this opening with bias binding approximately 2¼ inches (5.7 cm) wide.
Bias-cut fabric is strongly recommended because it bends much more easily around the deep curves of the chicken’s back.
Sew the binding around the entire opening.
Fold it over the raw edge and finish it neatly on the lining side.
Topstitch slowly around the opening, keeping the stitching even.
The binding does more than hide the raw edge. It also reinforces the rim so the basket maintains its shape while eggs are added and removed.
After completing the opening, gently steam and shape the body with your hands.
Do not crush the comb or wing while pressing.
Finishing, Decorating, and Using Your Quilted Chicken Basket
Once the basic Chicken Egg Basket Pattern is assembled, inspect the bottom. The basket should sit reasonably flat without tipping forward.
If additional stability is required, create a removable base insert from heavy interfacing or template plastic covered with fabric.
Measure the interior bottom and cut the insert slightly smaller.
Cover it with matching fabric and place it inside the basket.
This optional base is particularly helpful when the basket will hold several eggs.
For a more distinctly quilted appearance, add decorative stitching to the wing.
You might quilt several curved lines that resemble feathers or use simple echo quilting following the teardrop shape.
The main body can also receive additional decorative stitching, but avoid stitching through the lining after assembly unless that effect is intentional.
Check every seam around the basket opening.
Because this area receives frequent handling, reinforce any sections that appear loose.
Trim visible threads.
If the comb appears too flat, lightly manipulate the batting inside each rounded lobe.
The same can be done with the wing and wattle.
A small amount of polyester stuffing may be added to the comb before its lower edge is enclosed if you prefer a fuller three-dimensional appearance.
Color Variations
The classic combination of deep red and cream creates a warm country-kitchen appearance.
For spring, try pale yellow, sage green, pink, and cream.
For a modern farmhouse version, combine black gingham with ivory cotton.
For autumn, use rust, mustard, olive, and brown.
You can also make a completely scrappy quilted chicken basket, using a different fabric for each wing, comb, lining, and body section.
Suggested Finished Sizes
A small decorative basket can measure approximately 9 × 5 × 8 inches (23 × 13 × 20 cm).
A medium basket can measure approximately 12 × 7 × 11 inches (30 × 18 × 28 cm).
A larger centerpiece can measure approximately 15 × 9 × 13 inches (38 × 23 × 33 cm).
When resizing, enlarge or reduce all pattern pieces by the same percentage so the proportions remain consistent.
Important Practical Note
Although this project makes an adorable egg basket, fabric does not provide the same protection as a rigid container. Carry fresh eggs gently and avoid overfilling the basket.
If the basket will regularly hold food, select washable materials and follow the care instructions for every fabric, batting, stabilizer, and embellishment used in the project.
For purely decorative use, the basket can also hold fabric eggs, wrapped candy, napkins, sewing notions, yarn scraps, or seasonal decorations.
FAQ About the Chicken Egg Basket Tutorial
Is the Chicken Egg Basket Tutorial suitable for beginners?
A confident beginner can make it, although sewing the curved body, inserting the gusset, and applying bias binding require patience. Practicing curved seams on scrap fabric first can help.
What fabric is best for a chicken egg basket?
Medium-weight quilting cotton is an excellent choice because it is easy to sew, available in many prints, and works well with batting and interfacing.
Does the basket need batting?
Yes, batting or fusible fleece is recommended. Without internal structure, the chicken may collapse instead of maintaining its dimensional shape.
What seam allowance should I use?
This tutorial uses a consistent ¼-inch (6 mm) seam allowance unless your personal pattern specifies otherwise.
How large should the basket opening be?
For a medium basket, aim for an opening roughly 7–9 inches (18–23 cm) long. The exact measurement depends on the overall chicken size.
Why should I use bias binding around the opening?
Bias binding stretches slightly and follows curves better than straight-grain strips, making it ideal for the curved back opening.
Can the wings be quilted?
Yes. Light quilting adds dimension and helps the wings coordinate visually with the main body.
Can I make the chicken from fabric scraps?
Definitely. This is an excellent scrap fabric sewing project, especially for the comb, wing, beak, and lining.
How do I make the chicken stand upright?
Use adequate stabilizer, create a sufficiently wide gusset, keep the bottom relatively flat, and consider adding a removable firm base insert.
Can I wash the finished basket?
That depends on the materials used. Prewashing cotton fabric and choosing washable batting and stabilizer will make care easier. Decorative buttons and rigid inserts may need to be removed or protected.
Can I enlarge the Chicken Egg Basket Pattern?
Yes. Enlarge every pattern piece by the same percentage, including the body, wing, comb, beak, wattle, gusset, and lining.
What can I put inside besides eggs?
The finished basket can hold lightweight sewing supplies, fabric eggs, wrapped treats, napkins, small fabric scraps, or seasonal decorations.
Can I make several chickens in different colors?
Yes. A coordinated group using red, yellow, blue, green, or floral fabrics can create an attractive farmhouse or spring display.
How can I make the basket look more professional?
Accurate cutting, consistent seams, smooth bias binding, careful clipping of curves, coordinated topstitching, and thorough pressing make the biggest difference.
Conclusion
The Chicken Egg Basket Tutorial turns traditional quilting materials into a cheerful three-dimensional project that is both decorative and useful. Its combination of a softly structured body, large quilted wing, curved tail, dimensional comb, contrasting beak, and spacious center gives the finished chicken much more character than an ordinary fabric basket.
PATTERN VIDEO:
The construction becomes easier when the project is divided into stages. First prepare and stabilize the exterior panels, then create the quilted wings and facial details, construct the three-dimensional body with a gusset, add the lining, and finally finish the curved opening with bias binding. Working carefully through those steps produces a sturdy shape without requiring complicated quilting techniques.
Fabric choice can completely transform the design. Red and cream create the classic country style shown in the inspiration, while gingham can make it more rustic, pastels can turn it into an Easter centerpiece, and colorful scraps can produce a playful scrap quilt chicken basket. The same pattern can also be scaled to create anything from a small decorative chicken to a larger table centerpiece.
Most importantly, the Chicken Egg Basket Tutorial offers a creative way to combine practical sewing with decorative quilting. Whether filled with eggs for a breakfast table, seasonal decorations for a farmhouse display, or small sewing supplies in a craft room, the finished chicken is a distinctive handmade project that showcases both fabric and quilting skills.