Crochet Bag Easy Pattern – Step-by-Step Tutorial
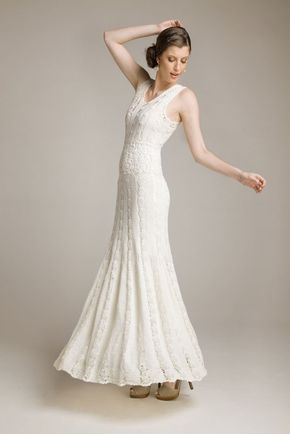
The “White Flowers” crochet dress is a stunning piece that combines elegance with a touch of handmade charm.
Perfect for summer occasions or as a unique addition to your wardrobe, this dress is sure to turn heads. In this tutorial, we’ll guide you through the process of creating your own “White Flowers” crochet dress, from selecting materials to the final stitches.
Crocheting your own dress not only allows you to customize the fit and design but also gives you the satisfaction of wearing something made with your own hands.
This tutorial is designed for crocheters of all levels, so whether you’re a beginner or an experienced crafter, you’ll find this project rewarding.
Before we dive into the step-by-step instructions, let’s talk about the materials and tools you’ll need.
Choosing the right yarn and crochet hook is crucial for achieving the best results.
For the “White Flowers” dress, we recommend using a soft, lightweight cotton yarn in a bright white color to emphasize the floral patterns.
To start your “White Flowers” crochet dress, gather the following materials: 100% cotton yarn in white, a 3.5 mm crochet hook, a pair of scissors, a yarn needle for weaving in ends, and stitch markers.
The cotton yarn is ideal for its breathability and comfort, making it perfect for a dress worn in warmer weather.
In addition to the basic tools, having a measuring tape and a dress form can be extremely helpful.
These tools will ensure that your dress fits perfectly and allows you to visualize the progress as you crochet.
A notebook and pen might also be useful for jotting down any adjustments or notes as you go along.
It’s important to check your gauge before starting the dress.
Create a small swatch with your chosen yarn and hook, and measure it to ensure that your stitches match the pattern’s specifications.
This step will save you time and frustration later on by ensuring your dress turns out the right size.
Begin your dress by creating a foundation chain that matches the circumference of your bust.
The number of chains will depend on your measurements and gauge.
Once you have your foundation chain, join it in a circle with a slip stitch, making sure not to twist the chain.
For the bodice, you’ll be working in rounds.
Start with a row of single crochet stitches, followed by a row of double crochet stitches.
Continue alternating these rows until the bodice reaches the desired length, usually just below the bust.
Use stitch markers to keep track of the beginning of each round.
As you work on the bodice, regularly check the fit against your measurements or dress form.
This will help you make any necessary adjustments early on.
Remember to weave in the ends as you go to keep your work neat and manageable.
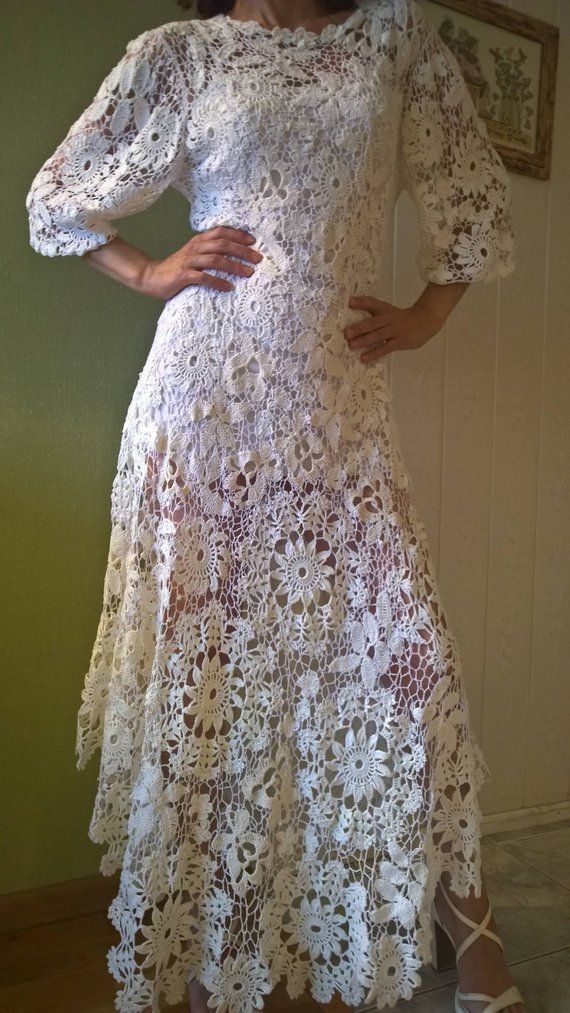
The hallmark of the “White Flowers” dress is its beautiful floral pattern.
To create this, you’ll be using a combination of chain stitches, single crochets, and double crochets to form intricate flower motifs.
Each flower is crocheted separately and then joined together as you progress.
Start by making a series of small flowers.
Each flower begins with a magic ring, followed by a round of single crochets.
The petals are formed with chain stitches and double crochets, creating a delicate, lacy effect.
Once you have a collection of flowers, arrange them in a pleasing pattern and join them using slip stitches.
As you add more flowers, the dress will start to take shape.
This process requires patience and attention to detail, but the result is a stunning, one-of-a-kind garment.
Be sure to lay out your work regularly to ensure the flowers are evenly distributed and the pattern is symmetrical.
With the bodice and floral pattern complete, it’s time to move on to the skirt.
The skirt is worked in rounds, starting from the bottom of the bodice and extending to the desired length.
For a flowing, elegant look, use a combination of double crochet stitches and chain spaces to create a lacy, openwork pattern.
Begin with a row of double crochet stitches around the bottom of the bodice.
From there, alternate rows of double crochets with rows of chain spaces to create the openwork pattern.
This will give the skirt a light, airy feel, perfect for warm weather.
As you work your way down, periodically check the length and fit of the skirt.
Adjust the pattern as needed to ensure a flattering silhouette.
Once you reach the desired length, finish with a row of single crochet stitches to give the hem a neat, polished edge.
After completing the main sections of the dress, it’s time to add the finishing touches.
This includes weaving in any remaining ends, blocking the dress to ensure it holds its shape, and adding any additional embellishments such as ribbons or beads.