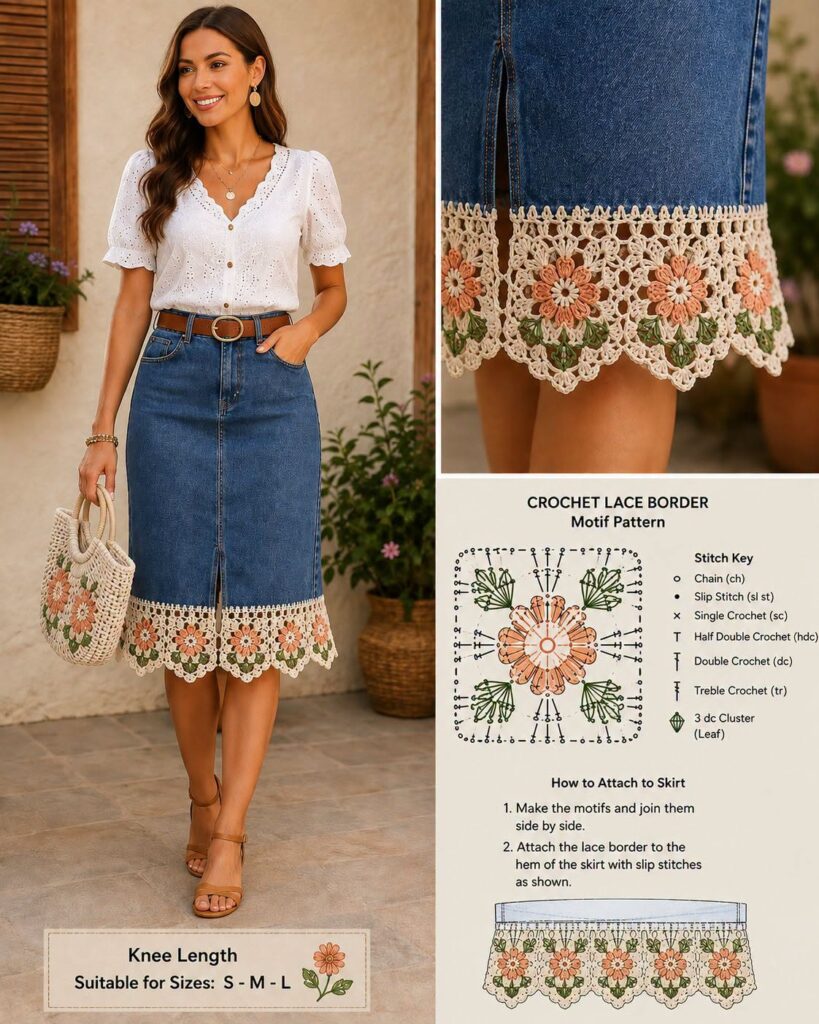
Crochet Lace Border Pattern is a beautiful way to transform a simple garment into a handmade piece with texture, color, and personality. Inspired by the floral crochet edging shown on the denim skirt, this project combines an airy cream lace background with dimensional flowers, green leaf details, and a softly scalloped lower edge. The finished border can be attached to denim skirts, jeans, dresses, table linens, pillowcases, tote bags, and many other fabric projects, making this technique useful far beyond a single garment.
One of the most appealing features of this Crochet Lace Border Pattern is its modular construction. Instead of trying to crochet an entire border in one complicated piece, you can work repeating floral sections and connect them until the lace reaches the required circumference. This method also makes sizing easier because the border can be tested against the garment as you work. Once the motifs fit comfortably around the hem, a simple foundation and attachment row connects the crochet to the fabric.
The design may look intricate, but it is built from familiar U.S. crochet stitches, including chain (ch), slip stitch (sl st), single crochet (sc), half double crochet (hdc), double crochet (dc), treble crochet (tr), and clusters. The flower is the visual focal point, while chains and taller stitches create the open lace framework surrounding it. This tutorial explains the construction as an adaptable interpretation of the photographed design, so you can adjust the number of motifs, colors, width, and attachment method to suit your own garment.
Materials, Measurements, Stitches, and Preparing the Fabric
Choose a smooth crochet thread or lightweight cotton yarn for this crochet lace edging. Size 3 or size 5 crochet thread works well for a delicate border, while fingering-weight cotton creates a slightly more substantial trim. For a design similar to the image, prepare cream or ivory for the main lace, peach or coral for the flower petals, green for the leaves, and a small amount of white or another contrasting shade for the flower centers.
A 1.75–2.5 mm crochet hook is a practical starting range, although your hook should always match the selected thread. You will also need a tapestry needle, scissors, measuring tape, removable stitch markers, sewing needle, strong matching thread, and optionally a washable fabric-marking pen. If working directly into denim, a sharp awl or suitable piercing tool can help create evenly spaced attachment points without forcing a crochet hook through thick fabric.
The main stitches used throughout the Crochet Lace Border Pattern are ch, sl st, sc, hdc, dc, tr, and 3-dc clusters. Chain stitches establish the open framework, single crochet provides stable attachment points, double and treble crochet form the petals and decorative fans, and clusters can be used for the small leaves surrounding each flower.
Before crocheting, measure the entire circumference of the skirt or garment hem. For example, if the finished hem measures 40 inches (101.5 cm) and one completed motif measures approximately 4 inches (10 cm) after blocking, approximately ten motifs will be required. Always make one sample motif first because your individual gauge determines the actual calculation.
For a skirt similar to the inspiration, a finished border of approximately 4–6 inches (10–15 cm) deep creates a noticeable decorative effect without overwhelming the garment. A narrower border can be created simply by reducing the number of upper and lower lace rounds. Likewise, a wider statement border can incorporate additional mesh rows.
Prepare the fabric before attaching any crochet. Wash, dry, and press the garment so that future shrinkage does not distort the lace. If you are shortening a denim skirt or pair of jeans, finish the raw edge neatly first. Mark attachment points approximately 1/4–3/8 inch (0.6–1 cm) apart around the hem, checking that the total number works with your chosen stitch repeat.
How to Crochet the Floral Motifs and Lace Framework
Begin the flower with your center color. Make a magic ring, or ch 4 and join with a slip stitch to form a small ring. Work approximately 12 sc into the ring and join with sl st. The exact number may be adjusted according to the number of petals you want around the flower.
Change to the peach or coral yarn. To create a dimensional petal, work combinations of hdc, dc, tr, dc, and hdc into designated stitches or chain spaces around the center. The taller treble crochet gives each petal its elongated shape, while the shorter stitches taper the petal neatly toward its base.
Repeat the petal sequence evenly around the center. For a full daisy-style flower similar to the photographed border, aim for approximately 10–12 petals. Keep your tension consistent so every petal remains approximately the same length. Fasten off and gently arrange the petals with your fingers.
Join the green yarn behind or between selected petals to create the leaves. A compact 3-dc cluster works nicely: yarn over, begin three double crochet stitches in the same location without completing their final loops individually, then yarn over and pull through all remaining loops. Add chains before and after the cluster to produce a pointed leaf-like form.
The cream lace framework can now be worked around the floral center. Create repeated ch-3, ch-4, or ch-5 spaces, anchoring them around the motif with sc or sl st. At the corners or outer edges, increase the chain spaces or place several taller stitches into one location so the motif remains flat instead of curling inward.
Block the first completed motif before determining how many you need. Measure it from side to side and compare this measurement with the garment circumference. Continue making additional crochet flower motifs until their combined width is approximately equal to the measured hem, allowing for the small amount of width added or removed during joining.
Joining the Motifs and Attaching the Crochet Border to Denim
There are two practical ways to join the motifs. The first is to complete every flower separately and sew them together afterward using the cream yarn and a tapestry needle. This approach is beginner-friendly because you can arrange all of the motifs before committing to their final placement.
The second technique is join-as-you-go crochet. While working the outermost chain spaces of a new motif, replace the center chain of selected arches with a slip stitch into the corresponding arch of the previous motif. Continue crocheting the new motif normally. This creates a flexible connection without a visible sewn seam.
Arrange the joined flowers in one long strip before closing the border into a ring. Check that the flowers face in the same direction and that the connections are not twisted. Wrap the strip around the garment hem to confirm the circumference. If necessary, slightly adjust the final joining spaces rather than stretching the lace excessively.
Once the floral strip fits, crochet a straight foundation along its upper edge. Work combinations such as sc, ch 2, sc into the upper arches. On the following row, use small groups of double crochet and chains to create the rectangular openwork band visible between the denim and flowers in the inspiration.
Now prepare the skirt for attachment. Create evenly spaced holes along the denim hem if you intend to crochet directly into the fabric. Keep them approximately 1/4 inch (0.6 cm) from the finished edge and maintain consistent spacing. Avoid placing holes too close to the edge because denim can fray around heavily stressed areas.
Join the cream yarn at a side seam. Work a foundation of sc or blanket-style attachment stitches around the entire skirt, placing one stitch through each prepared hole. Then connect the upper lace border to this foundation using slip stitches, single crochet, or carefully sewn invisible stitches. Check frequently that neither the denim nor the crochet is being gathered.
Creating the Scalloped Edge, Finishing, and Customizing the Pattern
The lower edge gives this Crochet Lace Border Pattern its romantic character. Once the floral motifs are joined, identify the chain spaces beneath each flower. These spaces become the foundation for the pointed scallops.
A simple scallop can begin with sc in one space, followed by several taller stitches in the center space, such as 2 dc, 2 tr, ch 2, 2 tr, 2 dc, followed by sc in the next anchoring space. The center chain can be converted into a picot for an even more decorative point.
Repeat the scallop underneath every flower. Maintain the same stitch count throughout so the lower border remains balanced. If the lace begins to ruffle excessively, reduce the number of tall stitches. If it pulls inward, add chains or additional stitches to provide more width.
Once the crochet is finished, weave all yarn ends securely into stitches of the same color. Avoid simply knotting and trimming the yarn because a garment border experiences regular movement. Weave each end backward and forward through several stitches before trimming the excess.
Wash or lightly dampen the crochet lace border according to the yarn manufacturer’s care requirements. Shape each flower, leaf, mesh opening, and scallop carefully. Allow the lace to dry completely. Blocking is particularly valuable for this project because it opens the mesh and makes the floral motifs look much more defined.
Color customization can dramatically change the finished appearance. Cream, peach, and green create the soft floral style represented in the image, while white and blue produce a fresh summer look. Burgundy and cream can create an autumn-inspired border, while multiple bright flower colors are ideal for a cheerful bohemian garment.
The same Crochet Lace Border Pattern can also decorate the bottom of cropped jeans, denim shorts, jackets, sleeves, fabric bags, table runners, curtains, pillowcases, and towels. Once you understand the basic flower-and-mesh construction, changing the dimensions becomes relatively straightforward.
FAQ About the Crochet Lace Border Pattern
What skill level is recommended for this Crochet Lace Border Pattern?
This project is best for an advanced beginner or intermediate crocheter. You should be comfortable with chains, single crochet, double crochet, treble crochet, clusters, and working into chain spaces.
What type of yarn works best for crochet lace?
Cotton crochet thread and lightweight cotton yarn are excellent options because they create crisp stitches and clearly defined floral details.
What hook size should I use?
A hook between approximately 1.75 and 2.5 mm works well with many crochet threads and lightweight yarns. Always match the hook to the thread and your desired fabric density.
How wide should a crochet border be on a skirt?
A decorative garment border can be approximately 3–6 inches (7.5–15 cm) deep. The inspiration uses a fairly prominent border, so approximately 4–6 inches provides a similar visual proportion.
How do I calculate how many flower motifs I need?
Measure the garment circumference and divide it by the blocked width of one motif. For example, a 40-inch hem divided by a 4-inch motif gives approximately ten motifs.
Should I block the motifs before joining them?
Blocking at least the first sample motif is strongly recommended because it gives you a more accurate finished measurement.
Can I crochet directly into denim?
Yes, but creating small, evenly spaced holes first is usually easier and produces more consistent stitches. Avoid damaging existing structural seams.
Can I sew the border onto the skirt instead?
Yes. Hand sewing is an excellent alternative, particularly for thick or delicate fabrics that you do not want to pierce repeatedly with a crochet hook.
What is a 3-dc cluster?
A 3-dc cluster consists of three partially completed double crochet stitches worked together and finished with one final yarn-over. It creates a compact raised shape that works beautifully for leaves.
How can I keep the border from becoming wavy?
Check your stitch count and tension. Excess stitches produce ruffling, while too few stitches make the border pull inward.
Can I use only one color?
Absolutely. An all-white or all-cream border creates a traditional lace appearance and can look particularly elegant against blue denim.
How do I make the flowers more dimensional?
Use taller stitches toward the center of each petal and shorter stitches at the edges. Slightly overlapping the petals can also create additional depth.
Can this pattern be added to jeans?
Yes. The floral border works beautifully around the ankles of cropped jeans. Make one separate border for each leg and ensure both have identical numbers of motifs.
Can I use leftover yarn?
Yes, particularly for the flower centers and leaves. Scrap yarn is useful as long as the fibers and thicknesses are reasonably compatible.
Should I attach the crochet before or after blocking?
You can block the motifs before assembly and lightly block the entire border again after attachment. This provides the most controlled finish.
How do I wash a garment with crochet trim?
Follow the care requirements of the most delicate material used. Gentle hand washing and flat drying are often suitable for handmade cotton lace.
Can the flowers be made larger?
Yes. Increase the center circumference, number or height of petal stitches, and surrounding mesh rounds. Remember that larger motifs mean fewer repeats around the garment.
Can I make the border narrower?
Certainly. Eliminate one or more mesh rows and use a smaller final scallop.
What other fabrics work with this border?
Linen, cotton, chambray, lightweight canvas, and many stable woven fabrics can work beautifully with a crochet lace edging.
Can beginners customize the motif?
Yes. Start by changing colors rather than stitch counts. Once you understand how the motif remains flat, you can experiment with different petals, leaves, and outer chain spaces.
Conclusion
The Crochet Lace Border Pattern is an effective way to combine crochet and clothing customization in one creative project. Instead of constructing an entire garment from yarn, you can use handmade lace to transform an existing skirt, pair of jeans, dress, or fabric accessory.
Throughout this tutorial, you learned how to select suitable crochet thread, choose a hook, measure the garment, calculate the approximate number of motifs, and prepare a fabric edge for attachment. These preparation steps are essential for creating a border that looks intentional and fits correctly.
You also learned how the central crochet flower motif can be constructed from basic stitches, how dimensional petals and cluster leaves provide texture, and how chain spaces form the airy cream framework surrounding each flower.
After completing the individual motifs, they can be sewn together or connected with the join-as-you-go method. A straight upper lace section then creates a clean transition between the decorative flowers and the denim garment.
The final scalloped edge completes the romantic look. Careful weaving, blocking, and shaping help reveal every flower, leaf, chain space, and decorative point, giving the finished crochet lace border a polished handmade appearance.