The Crochet Bougainvillea Flower Pattern is a wonderful way to recreate the delicate beauty of tropical flowers using yarn and a crochet hook. With its vibrant pink petals, charming miniature white flowers, and realistic green leaves, this handmade floral arrangement brings a colorful, elegant touch to any room. Inspired by the natural beauty of bougainvillea, this crochet project combines simple stitches with creative shaping techniques to produce a decorative flower that looks impressive without requiring extremely complicated construction.
One of the most attractive features of this crochet flower pattern is its three-dimensional appearance. Unlike flat floral appliqués, these bougainvillea blossoms have beautifully curved, pointed bracts that surround small white flowers at the center. The combination creates a realistic botanical effect that makes the finished project suitable for floral bouquets, handmade gifts, table decorations, and even decorative wall arrangements. The rich pink color contrasts beautifully with the olive-green leaves, making each flower stand out. Although the arrangement looks elaborate, it can be constructed from individual crochet pieces that are assembled into a complete flower.
Whether you are an experienced crocheter or an enthusiastic beginner looking to develop new skills, this crochet bougainvillea tutorial offers an enjoyable opportunity to practice shaping, working in rounds, creating decorative edges, and assembling three-dimensional crochet designs. The project also allows plenty of personalization because you can choose different yarn colors, adjust the dimensions of the flowers, and arrange the petals to create your own handmade botanical collection. Throughout this tutorial, you will learn how to select suitable materials, crochet the individual flower components, create beautiful leaves, and assemble the pieces into a stunning floral decoration.
Materials and Supplies for the Crochet Bougainvillea Flower Pattern
Creating a beautiful crochet bougainvillea flower begins with selecting the right materials. Since this project focuses on delicate details and defined stitches, cotton yarn is particularly suitable. Mercerized cotton produces neat stitch definition and helps the flower bracts retain their shape. For a result similar to the inspiration image, choose a vibrant fuchsia or magenta pink for the larger floral pieces, creamy white for the tiny center flowers, golden yellow for their centers, and olive green for the leaves and stems.
For a medium-sized flower, lightweight cotton yarn works very well. A crochet hook between 2.0 mm and 2.5 mm is recommended for fine cotton yarn, while a slightly larger hook may be necessary when using thicker yarn. The objective is to create firm, closely spaced stitches that provide structure without making the fabric excessively stiff. The ideal hook size depends on your yarn and individual tension, so consider making a small sample before beginning the actual flower.
Materials needed:
- Lightweight cotton yarn in bright pink or fuchsia.
- Olive-green cotton yarn for leaves and stems.
- Cream or white cotton yarn for miniature flowers.
- Small amount of yellow or golden yarn.
- 2.0–2.5 mm crochet hook, adjusted to your yarn.
- Yarn needle for sewing and finishing.
- Sharp embroidery scissors.
- Stitch markers.
- Floral wire for optional structured arrangements.
- Green floral tape for wrapping wired stems.
- Fabric-safe adhesive, optional.
- Polyester stuffing, optional for padded components.
Understanding basic US crochet terminology will make the instructions easier to follow. The main stitches used throughout this pattern are chain (ch), slip stitch (sl st), single crochet (sc), half double crochet (hdc), double crochet (dc), and treble crochet (tr). You will also encounter increases, which involve placing multiple stitches into the same space, and decreases, which bring stitches together to narrow a piece.
The finished size depends on the chosen yarn, hook, and tension. With fine cotton yarn, each triangular pink bract may measure approximately 2.5–3.5 inches (6–9 cm) from its base to its pointed tip. A completed cluster with three bracts can reach approximately 4–5.5 inches (10–14 cm) across. These measurements are estimates rather than fixed requirements, allowing you to scale the flower according to your decorative needs.
Before beginning, organize your yarn colors and prepare a comfortable workspace with adequate lighting. Since the design involves several small components, keeping the finished pieces separated by flower makes assembly much easier. You can also place the crocheted pieces on a flat surface to experiment with their positioning before joining them permanently. This simple preparation helps achieve the balanced, natural appearance that makes the handmade crochet flowers so appealing.
How to Crochet the Pink Bougainvillea Bracts Step by Step
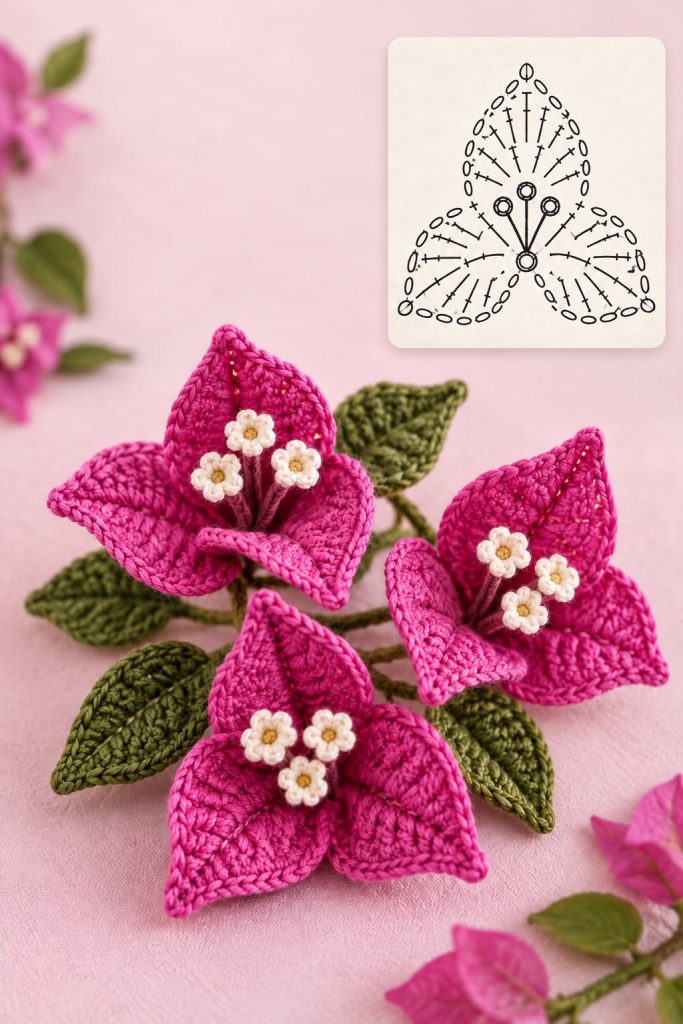
The striking pink portions of a bougainvillea are technically colorful bracts rather than the plant’s true flowers. In this crochet interpretation, they form the three large pointed sections surrounding the miniature flowers. The image features beautifully shaped, slightly curved bracts with textured surfaces and defined borders. To recreate this appearance, we will use a practical triangular construction worked in rows, followed by edging that adds structure and elegance.
Step 1: Create the foundation. Using your pink cotton yarn, make a slip knot and chain 2. Work 2 single crochet stitches into the second chain from the hook. Chain 1 and turn. This creates the narrow tip of the triangular bract. Starting at the point and gradually widening the piece allows you to control its final proportions while maintaining a smooth, natural outline.
Step 2: Increase to form the triangular shape. For Row 2, work 2 sc in each stitch, giving you 4 stitches. Chain 1 and turn. For Row 3, work 2 sc in the first stitch, 1 sc in each of the next 2 stitches, and 2 sc in the last stitch, giving you 6 stitches. Continue this method for subsequent rows by placing 2 sc in the first and last stitch while working 1 sc in each stitch between them. Each completed row adds two stitches, gradually forming a pointed triangle.
Step 3: Build the main body. Continue increasing until the bract reaches your preferred size. For the example dimensions, approximately 14–18 rows may be appropriate, depending on the yarn and hook. For a softer, more flexible bract, alternate occasional rows of single crochet with rows of half double crochet while maintaining the same edge increases. This adds subtle texture and helps the fabric resemble the gentle veins and curves found in natural flowers.
Step 4: Create the decorative border. Once the triangle is complete, do not fasten off immediately. Work single crochet stitches evenly around the entire outer edge, placing additional stitches at the pointed corners as needed to prevent pulling. A neat border provides definition, reinforces the shape, and creates a polished finish. You can use slip stitches in the final edging round to emphasize the beautiful pointed silhouette.
Step 5: Shape the flower components. Make three matching bracts for each bougainvillea cluster. To create a realistic appearance, gently curve each piece with your fingers and position its wider edge toward the center of the flower. The pointed tips should extend outward in three different directions. If your yarn allows wet blocking, lightly dampen the pieces and arrange them into the desired shape, then let them dry completely before assembling.
Step 6: Join the bracts together. Place the three completed pieces so their wider bases overlap slightly in the center. Using matching pink yarn and a yarn needle, sew the bases together with small, secure stitches. Leave the outer portions free so they can curve naturally. The finished foundation should resemble a three-pointed tropical blossom, ready to receive the miniature white flowers. For a bouquet, repeat the process to create several matching crochet bougainvillea blossoms.
Creating the Miniature White Flowers and Realistic Green Leaves
One of the most charming details in this crochet bougainvillea pattern is the cluster of tiny white flowers positioned in the center of each pink blossom. These miniature flowers provide contrast, texture, and an unmistakable botanical character. Although small, they make a significant difference in the overall appearance of the finished piece. Their construction requires only a few basic crochet stitches and a little patience when handling fine yarn.
Step 1: Make the yellow flower center. With golden-yellow yarn, create a magic ring and work 5 single crochet stitches into the ring. Pull the ring closed and join with a slip stitch. Fasten off, leaving a short tail for attaching the next color. This forms a compact center that will remain visible between the surrounding white petals. For a slightly raised effect, you can use a small yarn knot instead of the crocheted center.
Step 2: Crochet the white petals. Attach white or cream yarn to any stitch of the yellow center. In the same stitch, work the following sequence: chain 2, 2 half double crochet, chain 2, and slip stitch. Repeat the sequence in each of the remaining four stitches, creating five rounded petals. Fasten off carefully and weave in any unnecessary ends. The result is a tiny flower with soft, dimensional petals surrounding a golden center.
Step 3: Prepare the flower stems. Crochet a short chain using pink or muted rose yarn, approximately 1–1.5 inches (2.5–4 cm) long, and work slip stitches back along the chain for strength. Make three stems and attach one miniature white flower to each stem. Arrange the stems so the flowers sit at slightly different heights. This creates the natural clustered effect visible in the floral design and prevents the white blossoms from appearing too rigid or symmetrical.
Step 4: Crochet the green leaves. Begin with olive-green yarn and chain 13. Starting in the second chain from the hook, work 1 sc, 1 hdc, 2 dc, 3 tr, 2 dc, 1 hdc, and 2 sc. Work 3 sc into the final chain to turn around the foundation. Continue working along the opposite side of the foundation chain using a similar sequence in reverse, adjusting the stitch placement near the tip to maintain an elongated leaf shape. Join with a slip stitch and fasten off.
Step 5: Add leaf definition. To create a more realistic crochet leaf pattern, work a second round of single crochet around the perimeter. Add a chain stitch at the pointed end if you want a sharper leaf tip. Using a yarn needle and a slightly darker green thread, embroider a central vein from the base toward the tip. You can also make a delicate line of slip stitches along the center for additional texture. Prepare several leaves in different sizes for a more organic arrangement.
Step 6: Shape and prepare for assembly. Gently block the leaves and curve their edges using your fingers. For decorative floral arrangements that require more structure, you may incorporate floral wire into the leaves or stems, making sure all wire ends are safely covered. If the project is intended for children or items that will be frequently handled, avoid exposed wire and small detachable components. The combination of structured leaves and delicate white flowers will give your crochet flower arrangement a realistic finishing touch.
Assembling, Decorating, and Personalizing Your Crochet Bougainvillea
The final assembly is where the individual crochet components become a beautiful three-dimensional floral creation. Taking time to position each bract, flower, and leaf carefully makes a noticeable difference in the finished result. A well-balanced arrangement should look natural, with gentle curves and small variations rather than perfectly identical shapes. The inspiration image demonstrates this beautifully through the positioning of multiple fuchsia flowers and carefully layered olive-green leaves.
Step 1: Position the miniature flowers. Place the three completed white flowers at the center of the pink bract cluster. Their small pink stems should emerge from the central opening and point upward or slightly outward. Secure each stem to the base with a yarn needle, sewing through several stitches to ensure stability. Keep the white flowers visible above the pink foundation so they become the focal point of the blossom.
Step 2: Add volume and dimension. Hold the three pink bracts together and gently bring their lower edges inward to create a cupped shape. This gives the flower more depth and prevents it from looking like a flat decorative motif. Secure the overlapping sections with a few discreet stitches, leaving the pointed outer edges free. Depending on your desired style, the bracts can remain widely opened or curve inward to resemble a partially blooming flower.
Step 3: Construct the main stem. For a decorative spray, create a long foundation chain using green yarn and work slip stitches along its length. You can use this crocheted cord as a soft stem. Alternatively, wrap covered floral wire with green floral tape and attach the crocheted flowers to it. Wired stems are particularly useful for handmade bouquets because they allow you to adjust the direction of each blossom without repeatedly repositioning the sewn components.
Step 4: Attach the leaves. Sew the prepared green leaves along the stem, positioning them behind and between the pink blossoms. Avoid placing all the leaves at exactly the same angle. A few should point outward, while others may curve downward or sit partially behind the flowers. This arrangement imitates natural plant growth and highlights the bright pink petals. Using leaves of slightly different lengths can make the arrangement appear even more realistic.
Step 5: Customize the colors and flower sizes. While vibrant fuchsia pink is a classic choice, bougainvillea-inspired flowers can be made in purple, lavender, coral, soft pink, white, or orange. Combining different shades creates a colorful botanical display. For a romantic arrangement, choose blush pink bracts with cream-colored centers. For a bold tropical decoration, experiment with magenta and purple flowers paired with rich green leaves. Adjusting the number of increase rows also allows you to create smaller or larger blossoms.
Step 6: Finish and display your handmade creation. After assembly, inspect the flower carefully and secure any loose yarn ends. Gently adjust the bracts, stems, and leaves until the arrangement looks balanced. Your completed crochet bougainvillea flower can be displayed in a small vase, incorporated into a wreath, attached to a decorative basket, or used as a handmade embellishment. With proper care, these lovely crochet flowers can remain beautiful for years without watering or seasonal maintenance.
Frequently Asked Questions About the Crochet Bougainvillea Flower Pattern
1. Is the Crochet Bougainvillea Flower Pattern suitable for beginners?
Yes. This project is suitable for confident beginners who already understand basic crochet stitches such as chain, single crochet, half double crochet, and slip stitch. The triangular shaping and assembly require some attention, but the individual techniques are straightforward. Beginners can practice with larger yarn and a comfortable hook before working with finer cotton.
2. What is the best yarn for making realistic crochet bougainvillea flowers?
Lightweight cotton yarn is one of the best choices because it provides excellent stitch definition and holds its shape well. Mercerized cotton is particularly effective for decorative flowers with smooth, defined edges. Acrylic yarn can also be used, although it may create a softer result with less structure.
3. How many pink bracts are needed for one flower?
For the arrangement described in this tutorial, each bougainvillea cluster uses three triangular pink bracts. Three miniature white flowers are then positioned near the center. You can experiment with the spacing and number of components to create different decorative styles.
4. Can I make these crochet flowers without floral wire?
Absolutely. Floral wire is optional. You can create flexible stems using crocheted chains, reinforced crochet cords, or braided yarn. Wire is mainly helpful when you want the flowers and leaves to hold particular positions in a decorative bouquet.
5. How long does it take to crochet one bougainvillea flower?
The time depends on your experience, yarn thickness, and level of detail. A crocheter familiar with shaping techniques may complete one flower cluster in approximately two to four hours, including the small white flowers and assembly. Beginners may need additional time to become comfortable with the construction.
6. Can this crochet flower pattern be used for home decoration?
Yes. These flowers are ideal for handmade bouquets, table centerpieces, wall decorations, wreaths, decorative baskets, and seasonal arrangements. Their vibrant color and three-dimensional appearance make them especially attractive in rooms that benefit from a soft, botanical accent.
7. How do I keep the flower petals from curling too much?
Consistent tension is important when crocheting the triangular bracts. If the edges curl excessively, try using a slightly larger hook or adding a few extra stitches around the corners during the edging round. Light blocking can also help shape the pieces before assembly.
8. Can I wash crochet bougainvillea flowers?
Flowers made entirely from washable yarn can usually be cleaned gently according to the yarn manufacturer’s care instructions. Hand washing in cool water is often the safest option. If your arrangement includes floral wire, adhesives, or other structural materials, spot cleaning may be preferable.
9. How can I make the flowers look more realistic?
Use several shades of pink, shape the bracts into gentle curves, and position the white flowers at different heights. Adding textured olive-green leaves and arranging the blossoms asymmetrically also creates a more natural effect. Paying attention to the center details can significantly improve the overall appearance.
10. Can I use the same pattern to make smaller flowers?
Yes. You can make smaller bracts by working fewer increase rows or using thinner yarn and a smaller hook. For larger flowers, continue increasing the triangular pieces until they reach your desired dimensions. Keep the proportions of the white flowers and leaves consistent with the new size.
11. What is the difference between bougainvillea bracts and flowers?
In real bougainvillea plants, the large colorful structures are modified leaves known as bracts. The actual flowers are much smaller and usually appear near the center. This crochet design recreates that distinctive botanical feature by combining prominent pink bracts with delicate white floral details.
12. Can I turn this pattern into a brooch or hair accessory?
Yes. A single flower cluster can become a beautiful handmade brooch, hair clip, bag decoration, or accessory. For wearable projects, use shorter stems, secure all components firmly, and attach the finished crochet piece to an appropriate accessory backing.
Conclusion
The Crochet Bougainvillea Flower Pattern combines the timeless beauty of handmade crochet with the cheerful elegance of tropical flowers. Its vibrant pink bracts, miniature white blossoms, and detailed green leaves create a decorative arrangement that looks delicate, colorful, and full of personality. By working through the individual components and carefully assembling them, you can transform simple cotton yarn into a beautiful floral display.
Another wonderful aspect of this project is its versatility. Whether you choose to crochet a single flower for a small accessory or create an entire bouquet for your home, the techniques can be adapted to suit different colors, sizes, and decorative purposes. Each finished blossom offers an opportunity to practice shaping, texture, and thoughtful assembly while creating something truly special.
Most importantly, this handmade crochet flower tutorial celebrates the joy of creating lasting beauty with your own hands. With patience, creativity, and a few basic crochet supplies, you can enjoy making a lovely bougainvillea-inspired decoration that brings color and charm to your favorite spaces throughout the year.