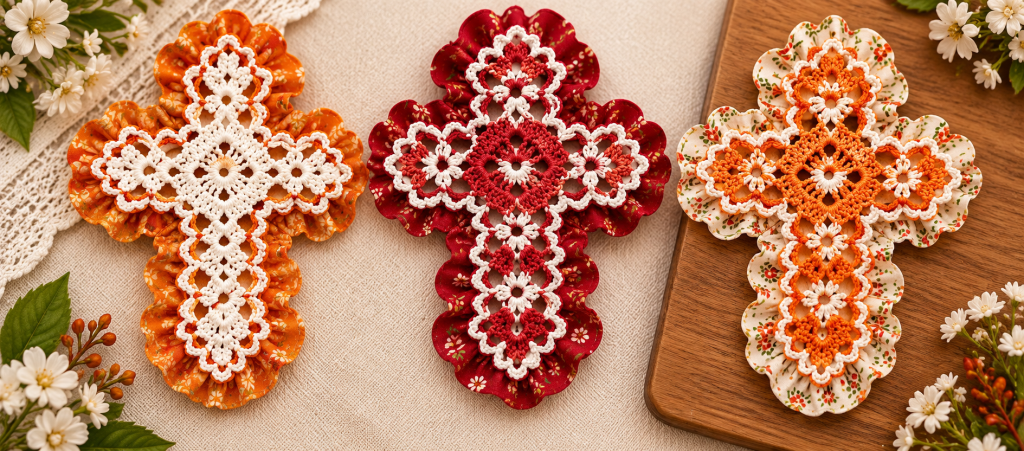
The Crochet Wall Hanging Cross Pattern is a lovely project for anyone who enjoys creating meaningful handmade decorations with yarn. Its decorative cross shape can be displayed on a wall, door, craft room, or special prayer space, and it can also make a thoughtful handmade gift. The design combines floral-inspired crochet details, layered motifs, decorative scallops, and contrasting colors to create an eye-catching finished piece. Using two different shades, such as rich red combined with soft cream, makes the individual stitches and floral elements more noticeable. However, you can easily choose other color combinations to match your personal taste or home décor, including pastel, neutral, vintage, or contemporary palettes. While the finished design may appear elaborate, breaking the project into smaller crochet motifs makes the construction much more manageable.
Before beginning this Crochet Wall Hanging Cross Pattern, it is helpful to understand that the entire piece does not need to be worked as a single continuous design. Instead, the cross can be assembled from several individual flower-inspired motifs. A larger and more detailed motif can be placed in the center, while smaller matching motifs can be used to form the upper, lower, left, and right sections. Once these pieces are arranged and joined, a decorative crochet edging can be worked around the outside to bring the design together and create a neat finished appearance.
Working with separate motifs also gives you greater control over the size and shape of the project. You can arrange the pieces before permanently joining them and make adjustments if necessary. This technique is suitable for crocheters who are familiar with basic stitches such as chain, single crochet, double crochet, and slip stitch. Beginners can work through the project slowly, while more experienced crocheters can experiment with different stitch combinations, yarn weights, and color arrangements. The pattern uses standard U.S. crochet terminology, with the most common abbreviations explained before the construction steps begin.
Choosing the right yarn is also important when making a Crochet Wall Hanging Cross Pattern, because a wall decoration usually benefits from being slightly firm rather than overly soft or stretchy. Cotton yarn is an excellent option because it provides clear stitch definition, keeps floral motifs well shaped, and responds well to blocking. A medium or lightweight cotton yarn can be used depending on how delicate you want the finished cross to appear. For a design similar to the pictured inspiration, combining red crochet yarn with cream or white crochet yarn creates a strong handcrafted effect, especially when a printed fabric backing or additional decorative layer is used. The hook should be suitable for the yarn, but using a hook slightly smaller than you would use for a soft blanket can help create a firmer structure. Always make a small test motif first because yarn thickness, hook size, and personal tension can significantly change the finished measurements.
Materials, Crochet Stitch Key, and Preparation
For this Crochet Wall Hanging Cross Pattern, prepare approximately 100 to 180 grams of your main yarn color and 50 to 100 grams of your contrasting yarn, depending on the yarn weight and final dimensions. You will also need a suitable crochet hook, scissors, a yarn needle, stitch markers, blocking pins, and a flat blocking surface. Optional supplies include fabric for backing, fusible interfacing for extra firmness, a wooden dowel, small hanging loop, or decorative ribbon. Cotton or a cotton-blend yarn is generally ideal for a wall hanging because it provides good definition and does not stretch as easily as some softer fibers. If you plan to use the cross only as a lightweight decorative ornament, finer yarn can create a delicate lace-like result. For a more substantial wall piece, choose a thicker cotton and increase the motif dimensions proportionally.
The first crochet key to understand is ch, meaning chain stitch. To make a chain, yarn over and pull the yarn through the loop already on your hook. Chains are frequently used at the beginning of rounds, between stitch groups, and when forming decorative spaces. The abbreviation sl st means slip stitch, which is made by inserting the hook into the indicated stitch, yarning over, and pulling the yarn through both the stitch and the loop on the hook. Slip stitches are particularly important in this project because most circular flower rounds are closed with a slip stitch. They can also be used to travel across stitches without adding noticeable height. Keeping slip stitches relaxed prevents the motifs from becoming tight or distorted.
The abbreviation sc means single crochet, one of the primary stitches used for joining and edging the cross. Insert the hook into the stitch, yarn over, pull up a loop, yarn over again, and pull through both loops on the hook. Hdc, or half double crochet, is made by yarning over first, inserting the hook, pulling up a loop, yarning over again, and pulling through all three loops. The dc, meaning double crochet, creates more height and is useful for forming petals and larger decorative clusters. To make a double crochet, yarn over, insert the hook, pull up a loop, yarn over and pull through two loops, then yarn over and pull through the remaining two loops. These three basic stitches create most of the shape and texture needed for the pattern.
You may also use tr, meaning treble crochet, when you want longer petals or more dramatic points. Yarn over twice, insert the hook, pull up a loop, then work through two loops at a time until only one loop remains. Another useful term is picot, a small decorative point commonly created by working ch 3 and slip stitching into the first chain. Picots can be placed along the final border to make the cross look more ornamental. The abbreviation rep simply means repeat, while an asterisk such as … indicates a group of instructions that should be repeated. Parentheses are often used to show a stitch group made into the same stitch or space. Learning these crochet keys before beginning will make the written pattern much easier to follow.
Before crocheting the complete cross, make one small practice flower. Start with a magic ring, or alternatively ch 4 and join with a sl st to form a ring. Work 12 sc into the center and close the round. For the next round, create six small petal foundations by repeating ch 3, skip 1 stitch, sl st into the next stitch. This produces six chain spaces. In each chain space, work a simple petal such as (sc, hdc, 3 dc, hdc, sc). The number of double crochets can be adjusted to make the petals wider or narrower. Finish the round with a slip stitch and fasten off if you are changing colors.
Gauge is less strict for a wall decoration than it is for clothing, but consistency remains essential. Try to make each small motif approximately the same diameter, such as around 8 to 10 cm, while the central motif can measure approximately 12 to 15 cm. Exact measurements will depend on yarn and hook size. Lay finished motifs on a flat surface before joining them and check that they create a balanced cross. If one arm appears longer than another, adjust the arrangement before sewing or crocheting anything permanently. This preparation stage saves time and helps ensure that your finished crochet cross wall décor hangs straight.
Step-by-Step Crochet Wall Hanging Cross Pattern
Begin the center of the Crochet Wall Hanging Cross Pattern with the main color. Create a magic ring and ch 1. Work 12 sc into the ring, pull the ring closed, and join with a sl st to the first sc. For Round 2, ch 3, which may count as the first dc, then work 1 dc into the same stitch. Work 2 dc into every stitch around so that the circle expands evenly. Join with a sl st. If the circle begins to cup, loosen your tension slightly; if it becomes excessively wavy, reduce the number of increases. The center should remain flat because it will provide the foundation for the largest flower motif.
For Round 3, change to the contrasting color and create a decorative flower layer. Join the new yarn into any stitch and work ch 3, skip 1 stitch, sl st into the next stitch around. You should create evenly spaced loops. Into each loop work (sc, hdc, 3 dc, hdc, sc) to create rounded petals. For a more open floral appearance, substitute one of the dc stitches with a tr. Keep each petal similar in height and tension. Join the last petal neatly and fasten off the contrasting yarn. This light-colored flower layer will visually separate the center from the deeper main color.
For Round 4, attach the main color behind the petals. Work into the spaces between petals rather than directly over the decorative stitches. Make ch 4 or ch 5 loops behind each petal and secure each loop with a sc between the petals. During the next round, fill each loop with (sc, hdc, 4 dc, hdc, sc). This creates a second, larger layer of petals around the flower. The resulting layered crochet flower motif should look full without becoming bulky. If desired, another contrasting round can be added around the outside using sc stitches and small picots.
Now crochet the smaller motifs for the arms of the cross. A practical layout uses one or two motifs above the center, one motif on each side, and two or three motifs below the center. You can adjust this arrangement depending on the final size you want. Begin each small motif with a magic ring and 12 sc. Create six petal spaces with ch 3 loops, then fill each loop with (sc, hdc, 2 dc, hdc, sc). Add a second color around the flower with ch 3 loops and decorative edging. Repeat the same pattern for every small motif so the project looks coordinated rather than uneven.
Arrange all motifs on a flat surface in the shape of a cross before joining. Place the large motif at the intersection. Position the top motifs directly above it and the lower motifs in a straight vertical line below it. Place one motif to the left and one to the right, making sure both side arms extend approximately the same distance. Pinning the motifs temporarily to a towel or blocking mat can help prevent them from shifting. Join neighboring motifs using a yarn needle and whip stitch, or crochet them together with slip stitches through the back loops. Use the main color if you want the joins to blend into the design.
After all motifs have been joined, crochet around the outside shape to unify the piece. Attach the main color at a convenient outer point and work sc evenly around all edges. When reaching an inward corner, decrease carefully by skipping a stitch or working several stitches together so the border does not bunch. At an outward point, add extra stitches, such as (sc, ch 1, sc) into one space, so the border can turn without pulling. Complete one or two rounds in the main color and then add a contrasting scalloped round. A useful scallop is skip 1 stitch, 5 dc in next stitch, skip 1 stitch, sl st in next stitch. Repeat evenly while adapting the spacing around corners.
Decorative Edging, Blocking, and Customizing the Cross
A decorative border is one of the features that gives the Crochet Wall Hanging Cross Pattern its finished appearance. After the basic sc border is complete, attach the contrasting yarn and work a delicate sequence such as sc, ch 3, sl st into the first chain, sc in the next stitch. This creates tiny picots along the edge. Another option is to make rounded shells using five double crochets between anchoring slip stitches. Avoid overcrowding the edge with too many decorative stitches because excessive increases can cause the cross to ripple. Spread the border stitches evenly and occasionally lay the work flat while crocheting to check the shape.
If you want an appearance similar to a textile appliqué, a fabric backing can be added after the crochet work is completed. Place the blocked crochet cross on a piece of cotton fabric and trace around it, leaving a small allowance. The fabric can be cut slightly smaller than the crochet outline so it remains hidden from the front. Fold the raw edges inward and hand stitch the backing to selected points of the crochet border. A floral red fabric underneath cream and red crochet creates a rich layered effect, while linen or neutral cotton produces a simpler farmhouse appearance. Backing is optional and should be chosen according to your preferred finished style.
Blocking is particularly important for a crochet wall decoration. Gently wet the completed cross or use the blocking method recommended for your yarn fiber. Remove excess water without twisting the crochet. Place it flat on a blocking mat, carefully shape the vertical and horizontal arms, and secure the outer points with rust-resistant blocking pins. Measure the left and right arms so they are symmetrical. Allow the cross to dry completely before removing the pins. Proper blocking opens the flower petals, smooths the border, and helps the crochet wall hanging maintain a clean shape when displayed.
To create a hanging loop, attach yarn near the top center and ch approximately 12 to 20 stitches, depending on how large you want the loop. Slip stitch back into the starting point and fasten off securely. Another option is to attach a small ribbon loop to the back so that it remains invisible from the front. For larger crosses, a hidden dowel or lightweight backing may help keep the project straight. Avoid excessively heavy decorative additions because the extra weight can stretch the crochet over time. If using beads or buttons, attach them securely and consider the wall hanging primarily as decorative craftwork rather than a toy.
Color customization can completely change the character of the Crochet Wall Hanging Cross Pattern. Red and cream create a warm traditional appearance, but white and gold can produce an elegant decorative piece. Blue and white offer a fresh look, while dusty rose and beige can suit vintage interiors. For Christmas décor, deep red, forest green, and cream work particularly well. For spring decoration, consider soft lavender, pale blue, yellow, and ivory. The important principle is to maintain enough contrast between adjacent rounds so the flowers remain visible and the layered construction does not disappear visually.
You can also change the overall dimensions without rewriting the entire pattern. To create a smaller cross, use thinner yarn, a smaller crochet hook, and fewer motifs in the lower arm. To make a larger handmade crochet cross, use thicker yarn or add additional matching motifs vertically and horizontally. Maintain symmetry whenever adding pieces. A simple rule is to expand corresponding areas evenly: if you add a motif to one side, add another motif to the opposite side unless you intentionally want a different shape. Once you understand the basic motif construction, the pattern becomes very flexible and can be adapted for different rooms, occasions, and decorative themes.
Frequently Asked Questions About the Crochet Wall Hanging Cross Pattern
Is the Crochet Wall Hanging Cross Pattern suitable for beginners? Yes, it can be suitable for adventurous beginners who already understand chain stitches, slip stitches, single crochet, half double crochet, and double crochet. The decorative appearance may initially look complicated, but the project is constructed from repeated motifs. Instead of trying to understand the complete cross at once, crochet one flower motif at a time. Practice the central flower first, then make the smaller motifs. Experienced beginners may also find it helpful to use stitch markers at the beginning of every round. The joining and border require patience, but neither uses unusually advanced techniques.
What yarn is best for a crochet wall hanging cross? Cotton yarn is one of the most practical choices because it provides good stitch definition and tends to keep its shape after blocking. Mercerized cotton can create a slightly polished appearance, while ordinary cotton gives a softer handcrafted texture. Cotton blends may also work well. Acrylic yarn can be used, particularly if you already have suitable yarn available, although the finished piece may feel softer. Choose yarn with consistent thickness so the repeated flower motifs remain similar in size. Whatever yarn you select, make one sample motif before crocheting the complete project.
How large should the finished cross be? There is no single required size for the Crochet Wall Hanging Cross Pattern because the final measurement depends on yarn weight, crochet hook, motif count, and personal tension. A medium decorative cross might measure approximately 35 to 50 cm tall and 25 to 35 cm wide, but you can easily make it smaller or larger. Measure the arrangement after completing a few motifs before committing to the final number. For a narrow wall space, reduce the side motifs or use finer yarn. For a statement wall decoration, increase the motif size or add additional motifs while preserving symmetry.
Why does my crochet cross look wavy after adding the border? Waving normally happens when too many stitches are added around the outside edge. If your border begins to ripple, reduce the number of increases or remove some decorative shells. On the other hand, if the cross curls inward or the edge feels tight, you may need additional stitches, especially around outward corners. Crochet borders around irregular shapes require some visual adjustment rather than rigid stitch counting. Keep placing the project flat while working. Blocking can correct minor irregularities, but significant ruffling is usually easier to fix by undoing the problem round and adjusting the stitch distribution.
Can I change the colors or use only one color? Absolutely. The pattern is designed to be customizable. A one-color version can create a sophisticated lace effect, particularly in ivory, beige, white, or another neutral shade. However, using two or more colors helps highlight the layered flower construction. When selecting multiple colors, choose one main color for the body and another contrasting shade for petal edges and borders. You can also use small amounts of leftover yarn for the flower centers. This makes the crochet cross pattern a useful project for creatively using coordinated yarn scraps while still maintaining a consistent overall design.
Conclusion
The Crochet Wall Hanging Cross Pattern combines basic crochet stitches, layered flower motifs, thoughtful joining, decorative edging, and careful blocking to create an eye-catching handmade wall decoration. The most important crochet keys covered in this tutorial include ch, sl st, sc, hdc, dc, tr, picot, and rep, giving you the vocabulary needed to understand each stage of construction.
Start Your Journey to a Healthier Relationship Today
By beginning with the central flower, adding smaller matching motifs, arranging them into a symmetrical cross, joining the pieces, and finishing everything with a structured border, you can create a project that looks detailed while remaining manageable step by step. Colors, yarn weight, motif quantity, fabric backing, and edging can all be customized, allowing every finished cross to have its own character. If you make this pattern, leave your sincere opinion about the tutorial and share your suggestions, favorite color combinations, or ideas for improving future crochet projects.