The Crochet Chicken Coaster Pattern is a charming and practical handmade project that brings a touch of farmhouse personality to your kitchen, dining table, or coffee corner. Inspired by traditional country-style decorations, these adorable chicken-shaped coasters combine creativity, functionality, and the comforting texture of crochet.
Their rounded bodies, decorative scalloped tails, colorful combs, and little yellow beaks make them especially attractive for anyone who enjoys handmade home accessories. Whether you are decorating your own home or preparing a thoughtful gift, this crochet chicken coaster offers a delightful opportunity to turn simple yarn into something useful and beautiful.
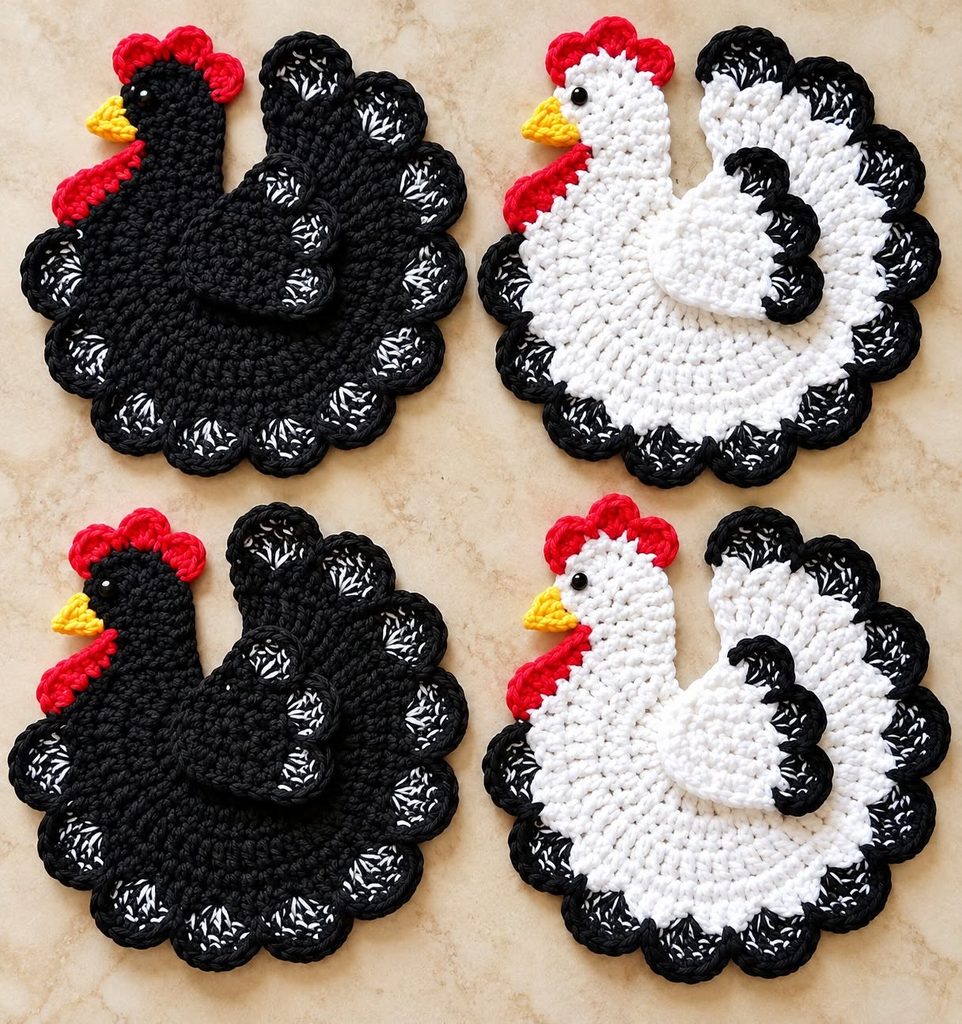
The design is especially appealing because it can be customized with different colors while maintaining its recognizable chicken silhouette.One of the most enjoyable features of this Crochet Chicken Coaster Pattern is its versatility. The chickens shown in the reference image feature contrasting black and white bodies, bright red combs and wattles, yellow beaks, and rounded tail feathers.
These small details give each chicken a cheerful expression and a distinctive handmade appearance. Although the finished design looks detailed, it can be created using familiar US crochet stitches, including single crochet, half double crochet, double crochet, and slip stitches. The project begins with a circular body, followed by a shaped neck and head, decorative tail feathers, and a small raised wing. Each component is assembled carefully to create a coaster that is both decorative and practical. With a little patience, even someone who is still developing their crochet skills can successfully complete this project.
Another reason to try this easy crochet chicken coaster pattern is that it requires relatively little yarn and can be completed without expensive equipment. Cotton yarn is particularly suitable because it creates defined stitches, provides good durability, and is generally easier to wash than many decorative fibers. You can make a single chicken coaster for your favorite mug or create a coordinated set for family gatherings, farmhouse-themed kitchens, spring celebrations, or handmade gifts. The instructions below provide an original, workable interpretation of the pictured design, including a circular body, shaped chicken head, scalloped feather edging, decorative wing, and embroidered finishing details. Since the exact stitch counts cannot be recovered from a photograph alone, the measurements and construction are designed to recreate its overall appearance rather than claim to reproduce an unseen original pattern exactly.
Materials, Crochet Abbreviations, and Preparation
Before starting your Crochet Chicken Coaster Pattern, gather the basic supplies needed to create a durable and attractive finished piece. For the closest resemblance to the photograph, choose black and white cotton yarn for the chicken bodies, red yarn for the comb and wattle, and yellow yarn for the beak. A small amount of contrasting yarn can also be used to add decorative accents to the tail feathers. Medium-weight cotton yarn, commonly classified as worsted weight yarn (Category 4) in the United States, is a practical option. Depending on your yarn tension and hook size, the completed coaster will measure approximately 15–18 cm across the widest part of the body and tail, with the head extending slightly beyond the circular shape.
For this project, you will need approximately 25–35 g of main-color cotton yarn per coaster, small amounts of red and yellow yarn, a 4.0 mm crochet hook, scissors, a yarn needle, stitch markers, and optional black embroidery thread. You may also use a small black bead or safety eye for decoration, but embroidered eyes are preferable for a washable household coaster. Avoid plastic embellishments if the finished item may come into contact with hot cookware. The exact amount of yarn will depend on your gauge, how large you make the tail feathers, and whether you crochet a second decorative layer. Keep a small amount of leftover yarn available for sewing the wing and other details securely into place.
Understanding US crochet terminology will make the instructions easier to follow. The abbreviations used throughout this pattern are: ch = chain, sl st = slip stitch, sc = single crochet, hdc = half double crochet, dc = double crochet, tr = treble crochet, st = stitch, sts = stitches, inc = increase, dec = decrease, BLO = back loop only, RS = right side, and FO = fasten off. An increase means working two stitches into the same stitch, while a decrease joins two stitches together to reduce the stitch count. The instructions use US terminology throughout, so a US single crochet corresponds to a UK double crochet.
The basic magic ring technique is useful for creating the center of the chicken’s rounded body. To make a magic ring, wrap the yarn around your fingers to form a loop, insert the hook into the loop, pull up a working loop, and make a chain to secure it. Work the required stitches into the ring before pulling the yarn tail to close the center. If you prefer not to use a magic ring, chain four stitches and join them with a slip stitch to form a small circle. You can then crochet the first round into the center opening. Both methods are suitable, although the magic ring usually creates a tighter center with a smaller visible hole.
Maintaining consistent crochet tension is important because a coaster should sit as flat as possible on the table. If your stitches are too tight, the circular body may curl upward, while excessively loose stitches can make the coaster floppy or uneven. Work a small practice circle before beginning the final piece. If the circle forms a bowl shape, consider using a slightly larger hook or loosening your tension. If the edges become wavy before the decorative border is added, check the number of increases and consider using a smaller hook. Cotton yarn can vary in thickness between manufacturers, so the hook size should be adjusted according to the actual fabric you produce.
Color selection also plays an important role in the finished farmhouse crochet chicken coaster. A black chicken with red and yellow details creates a bold traditional look, while a white chicken with black scalloped feathers produces a beautiful contrasting design. You can also experiment with cream, brown, beige, mustard, or soft pastel shades for a rustic or spring-inspired collection. To create a coordinated set similar to the reference image, make two black chickens and two white chickens, reversing the main colors while keeping the red combs and yellow beaks consistent. Prepare your yarn colors before starting so that you can work smoothly through each section without unnecessary interruptions.
How to Crochet the Chicken Body and Rounded Base
The foundation of the Crochet Chicken Coaster Pattern is a flat circular body made with double crochet stitches. Begin with the main color of your chosen chicken. Create a magic ring and work Round 1 as follows: ch 3 (counts as the first dc), make 11 dc into the ring, and join with a sl st to the top of the beginning ch-3. You should have 12 stitches. Pull the magic ring closed securely and gently flatten the circle with your fingers. This small center will become the rounded middle of the chicken’s body, where the decorative wing will eventually be attached. Make sure the stitches are evenly distributed around the center before proceeding to the next round.
For Round 2, ch 3, work 1 dc into the same stitch, then make 2 dc in each remaining stitch around. Join with a slip stitch to the top of the starting chain. You should now have 24 stitches. For Round 3, ch 3, make 2 dc in the next stitch, then repeat 1 dc in the next stitch, 2 dc in the following stitch around, treating the beginning ch-3 as the first dc. Join to finish the round, giving you 36 stitches. These increases allow the crochet circle to expand gradually while remaining relatively flat. Count your stitches at the end of every round to avoid irregularities that could affect the finished coaster’s shape.
Continue expanding the body with Round 4 by chaining 3 and working 1 dc in the next stitch, followed by 2 dc in the following stitch. Repeat the sequence of 1 dc in each of the next 2 stitches, then 2 dc in the next stitch, until you reach the end of the round. Join with a slip stitch for a total of 48 stitches. For Round 5, ch 3 and work 1 dc into each of the next 2 stitches, then 2 dc into the following stitch. Repeat 1 dc in each of the next 3 stitches, 2 dc in the next stitch around and join, producing 60 stitches. Your circular base should now be wide enough to accommodate the raised wing and the decorative feather border.
To make the body slightly larger, work Round 6 by chaining 3, making 1 dc into each of the next 3 stitches, and placing 2 dc into the following stitch. Continue repeating 1 dc in each of the next 4 stitches, 2 dc in the next stitch around, then join with a slip stitch. You should have 72 stitches. At this stage, the body will typically measure approximately 11–13 cm in diameter, depending on the yarn and hook. This is an excellent size for a decorative mug coaster because the outer scalloped border will add extra width. If you prefer a smaller chicken, you may stop after Round 5, but you will need to adjust the number of feather groups accordingly.
Now create the scalloped chicken tail feathers, which give this pattern its distinctive appearance. Working around the outer edge of the body, repeat the following sequence: skip 1 stitch, work 7 dc into the next stitch, skip 1 stitch, and make 1 sc into the following stitch. Repeat this four-stitch sequence around the entire 72-stitch circle to create 18 scallops. Join with a slip stitch and fasten off. These rounded groups resemble overlapping feathers and provide the foundation for the decorative tail. For the black chicken, use black yarn for the scallops; for the white chicken, use black yarn to create the contrasting feather tips visible in the reference image. The resulting edge should have an attractive, gently ruffled appearance.
For additional texture, you can outline each scallop using a second round of single crochet stitches. Join your chosen edging yarn at any point along the border and work one sc into each stitch around, placing an extra sc at the top of a scallop only when necessary to keep the fabric flat. If you want to imitate the black-and-white feather details in the photograph, use short white embroidery stitches inside the black scallops after completing the edging. These tiny contrasting marks create the appearance of patterned plumage. Do not add excessive decoration to the underside, as the coaster should remain stable when placed on a flat surface. Once the circular body is complete, set it aside while you prepare the chicken’s neck, head, and other recognizable features.
Creating the Chicken Head, Comb, Beak, and Decorative Wing
The crochet chicken head gives the project its recognizable silhouette and transforms the circular base into a charming farm animal. Using the same main color as the body, begin with ch 9. Starting in the second chain from the hook, work 1 sc in each of the next 8 chains. Ch 1 and turn. For Row 2, work 1 sc into each of the 8 stitches. Continue making 8 sc per row through Row 5 to form the narrow neck. For Row 6, make 2 sc in the first stitch, 1 sc in each of the next 6 stitches, and 2 sc in the final stitch, increasing to 10 stitches. Repeat 10 sc across for Rows 7 and 8, creating a wider area for the chicken’s face and comb.
To round the head, work Row 9 with 1 sc decrease, 6 sc, and another sc decrease, leaving 8 stitches. For Row 10, make 1 decrease, 4 sc, and 1 decrease, leaving 6 stitches. For Row 11, work 1 decrease, 2 sc, and 1 decrease, leaving 4 stitches. Fasten off and weave in the yarn end, leaving a long tail if you plan to sew the head directly to the circular body. The shaped piece should resemble a gently tapered neck with a wider upper section and a softly rounded top. Position the lower end of the neck along the upper-left portion of the circular base, allowing the head to extend above the scalloped edge. Sew it securely using small, nearly invisible stitches along the overlapping area.
The bright red chicken comb is one of the most recognizable decorative details. Attach red yarn to the upper edge of the head. Work a sequence of small rounded bumps by making ch 3, 2 dc into the attachment point, ch 2, sl st into the next available edge stitch and repeat this sequence three times across the top. Adjust the spacing so the comb sits neatly along the rounded head. For the red wattle, join red yarn near the lower front edge of the neck, ch 4, work 2 dc into the same attachment point, ch 2, and secure with a slip stitch. These red details should be visible without overwhelming the chicken’s face. You can also add a short red accent along the front of the neck to resemble the decorative breast detail in the photograph.
The yellow crochet beak is a small but essential finishing feature. With yellow yarn, ch 4 and work 1 sc into the second chain from the hook, 1 hdc into the next chain, and 1 dc into the final chain. Fasten off, leaving a long tail for sewing. This creates a small triangular shape that can be attached to the front of the head with the pointed end facing outward. For a fuller beak, crochet a second identical triangle and sew the two pieces together around the edges before attaching them. Add a small black embroidered eye just above and slightly behind the beak. Use several secure stitches to create a round eye with a tiny white highlight if desired. Keep the eye small so the chicken maintains the sweet expression shown in the reference.
Next, crochet the raised chicken wing, which adds dimension to the finished coaster. With the main color, make a magic ring and work 6 sc into the ring. For Round 2, place 2 sc in each stitch to create 12 stitches. For Round 3, repeat 1 sc, 2 sc in the next stitch around to create 18 stitches. For Round 4, repeat 1 sc in each of the next 2 stitches, 2 sc in the next stitch around, giving you 24 stitches. Fold the circle gently in half to form a semicircular wing. Join the folded edges with single crochet stitches through both layers, adding three small scalloped bumps along the curved edge if you want a more feathered appearance. Fasten off, leaving a long yarn tail for attaching the wing to the body.
To create the wing’s decorative edge, attach contrasting yarn near the rounded side and work small groups of stitches along the curved border. A simple combination of 1 sc, 3 dc, and 1 sc into evenly spaced positions produces attractive feather-like bumps. For the white chicken, use black yarn to outline the wing; for the black chicken, use black yarn with optional white embroidery accents. Place the completed wing over the center of the circular body, with the rounded edge pointing toward the tail feathers and the straighter edge closer to the neck. Sew the wing down along its upper and inner edges, leaving the decorative outer edge slightly raised. This layered construction gives the handmade crochet chicken coaster a three-dimensional appearance while preserving most of the flat surface underneath.
Assembling, Finishing, and Caring for Your Crochet Chicken Coasters
Once all the individual pieces are complete, it is time to assemble the Crochet Chicken Coaster Pattern into its final shape. Lay the circular body on a clean, flat surface with the right side facing upward. Position the neck and head at the upper-left side, overlapping the circular base enough to create a secure connection. The chicken should appear to be facing left, with the rounded tail feathers extending behind it. Use a yarn needle and matching yarn to sew the neck securely to the body. Keep the stitches close together so the attachment remains strong after repeated handling and washing. If necessary, adjust the head slightly before tightening the final stitches to achieve a balanced silhouette.
Attach the raised wing to the center of the chicken’s body, positioning it so the curved feather edge points toward the tail. The wing should cover part of the circular base without hiding the scalloped border. Use a whip stitch or small mattress stitches to secure the upper edge and the section closest to the neck. Leave the rounded outer edge loose enough to create gentle dimension, but not so loose that it catches easily on cups or fingers. Check the placement of the red comb, wattle, yellow beak, and eye before weaving in the remaining yarn ends. Each feature should be securely attached, especially if the coaster will be washed frequently or used as an everyday kitchen accessory.
A final decorative touch is the addition of contrasting feather embroidery. The reference image shows black feather tips with small white markings, creating a striking textured effect. To recreate this detail, thread a yarn needle with a short length of white cotton yarn and make two or three small straight stitches inside selected black scallops. Arrange the stitches in tiny V-shaped or fan-shaped patterns, following the curve of the feather. Repeat the embroidery around the outer border, spacing the markings consistently. On the black chicken, you can use the same white accents to give the feathers extra definition. These details are optional, but they add visual interest and help distinguish the tail feathers from the main body.
Blocking can improve the shape of your crochet chicken coaster and help the circular base lie flatter. Lightly dampen the completed piece with cool or lukewarm water, gently squeeze out excess moisture without twisting, and place it on a clean towel or blocking mat. Carefully arrange the scalloped feathers, neck, comb, and wing into their intended positions. Allow the coaster to dry completely before using it. If you choose to use pins, place them only through the fabric into a suitable blocking surface, and remove them after drying. Avoid stretching the neck or scallops excessively, as this can distort the overall design. Gentle blocking is especially helpful when the coaster has been made with cotton yarn.
For everyday use, cotton crochet coasters are a practical choice because they can absorb small amounts of condensation from cold drinks and provide a decorative resting place for mugs. However, these chicken coasters are best suited to ordinary cups and moderate temperatures rather than direct contact with hot pans or cookware. The raised wing and decorative details also mean that a cup may not sit as evenly as it would on a completely flat coaster, so test the placement with an empty mug before regular use. Avoid placing a mug on the raised head or wing. To clean the coaster, hand wash gently with mild detergent or follow the yarn manufacturer’s washing instructions. Reshape the feathers while damp and allow the piece to air dry fully.
You can also turn this Crochet Chicken Coaster Pattern into a coordinated handmade gift set. Make four or six chickens in complementary colors, such as black and white, cream and brown, or soft farmhouse neutrals. Arrange them in a small basket or tie them together with a cotton ribbon for a thoughtful presentation. The same basic construction can be adapted into seasonal decorations, table accents, or kitchen-themed gifts. If you plan to make several coasters, write down your hook size, yarn brand, and final stitch counts so every chicken remains consistent. Creating a complete collection is a wonderful way to practice crochet techniques while producing attractive, useful accessories that bring warmth and personality to your home.
Frequently Asked Questions About the Crochet Chicken Coaster Pattern
Is the Crochet Chicken Coaster Pattern suitable for beginners?
Yes. This pattern is suitable for adventurous beginners who already understand basic crochet stitches. The circular body uses regular increases, while the head and wing introduce simple shaping techniques. Beginners may find it helpful to practice the magic ring, double crochet increases, and decreases before starting. Working through the instructions one section at a time will make the project easier to complete.
What is the best yarn for making crochet chicken coasters?
Medium-weight cotton yarn is one of the best options because it produces defined stitches and a relatively firm finished fabric. Cotton is also generally easier to clean and more absorbent than many acrylic yarns. Choose a smooth yarn that does not shed excessive fibers, especially if the coaster will be used regularly on a dining table.
How much yarn do I need for one chicken coaster?
Most coasters made with this pattern will require approximately 25–35 g of main-color yarn, plus small quantities of red, yellow, and contrasting yarn. The amount may vary depending on the hook size, yarn thickness, gauge, and number of decorative feathers. If you are making a set, purchasing a full skein of each main color will help maintain consistent results.
How large is the finished crochet chicken coaster?
The rounded body and scalloped feather border typically measure around 15–18 cm across when made with medium-weight yarn and a 4.0 mm hook. The head extends beyond the main circle, so the overall silhouette may be slightly taller. Actual measurements will depend on individual crochet tension and whether you add extra edging rounds.
Can I make the chicken coaster larger or smaller?
Absolutely. For a smaller coaster, use lighter yarn, a smaller hook, or stop the body after an earlier round. For a larger version, use thicker yarn or continue expanding the circular base with evenly spaced increases. If you change the body stitch count, adjust the scalloped border accordingly so the feather groups fit evenly around the edge.
Why is my crochet chicken coaster curling instead of lying flat?
Curling usually occurs when the fabric is too tight or when the circular body does not have enough increases. Check your stitch counts and make sure you have followed the increase sequence correctly. You may also need a slightly larger crochet hook. Gentle blocking after completion can help correct minor unevenness, although it cannot fully compensate for major stitch-count problems.
Can I use acrylic yarn instead of cotton?
You can use acrylic yarn for a decorative chicken coaster, but cotton is generally preferable for functional drink coasters. Acrylic yarn is often less absorbent and can be more sensitive to heat. If you choose acrylic, use the finished chicken mainly as a decorative table accent and avoid placing hot objects directly on it.
How do I keep the chicken’s head and wing securely attached?
Use matching yarn and a sturdy yarn needle to sew the pieces together with small, evenly spaced stitches. Pass the needle through the actual crochet stitches rather than catching only loose surface fibers. Weave the yarn ends back through several stitches to prevent unraveling. A secure attachment is especially important for pieces that will be washed or handled frequently.
Can I sell finished chicken coasters made using this pattern?
Handmade chicken coasters can be attractive items for craft fairs, seasonal markets, and small handmade collections. If you plan to sell finished pieces, use your own photographs and product descriptions, and respect any applicable design, trademark, or pattern-use restrictions. Clear care instructions and accurate material descriptions are also helpful when presenting handmade products to customers.
How can I make a set of chicken coasters that look consistent?
Use the same yarn weight, crochet hook, stitch counts, and assembly method for every coaster. Keep a sample coaster nearby while working on the others, and measure the circular bases before adding the decorative details. You can vary the colors while maintaining the same construction, allowing each chicken to look unique without losing the coordinated appearance of the set.
How should I wash and store my finished crochet chicken coasters?
Follow the care instructions for the yarn you used. For cotton coasters, gentle hand washing with mild detergent is often suitable. After washing, reshape the scalloped feathers and lay the pieces flat to dry. Store them in a clean, dry location away from excessive moisture. Avoid tightly folding the raised wings or decorative combs for long periods, as this can affect their shape.
Can I use this pattern for other chicken-themed decorations?
Yes. The same chicken silhouette can inspire appliqués, decorative kitchen ornaments, spring decorations, or larger farmhouse wall accents. For decorative projects, you can experiment with different yarn textures, colors, and embellishments. If the finished item will no longer be used as a coaster, you have more freedom to add beads, ribbons, or other ornamental details.
Conclusion
The Crochet Chicken Coaster Pattern is a creative and enjoyable project that combines traditional crochet techniques with charming farmhouse-inspired design. Throughout this tutorial, you learned how to prepare your materials, understand essential US crochet abbreviations, create a flat circular body, form decorative scalloped tail feathers, shape the chicken’s head and neck, crochet a colorful comb and beak, and attach a raised wing for added texture.
You also discovered practical techniques for assembling the pieces, adding embroidered feather details, blocking the finished project, and caring for your handmade coasters. By following these steps, you can create beautiful black-and-white chickens inspired by the reference image or experiment with your own color combinations to produce a personalized set.
One of the most rewarding aspects of this easy crochet chicken coaster pattern is the opportunity to transform a few simple materials into something both functional and decorative. Whether you make these chickens for your own kitchen, as a thoughtful handmade gift, or as part of a larger collection of farmhouse crochet accessories, each finished piece reflects the creativity and care involved in handmade crafts.
Now I would love to hear your sincere opinion! Did you enjoy this Crochet Chicken Coaster Pattern? Which color combination would you choose for your chickens? Share your experience, honest feedback, and suggestions for future crochet tutorials in the comments. Your ideas can help inspire new patterns and make our crochet community even more creative and welcoming.