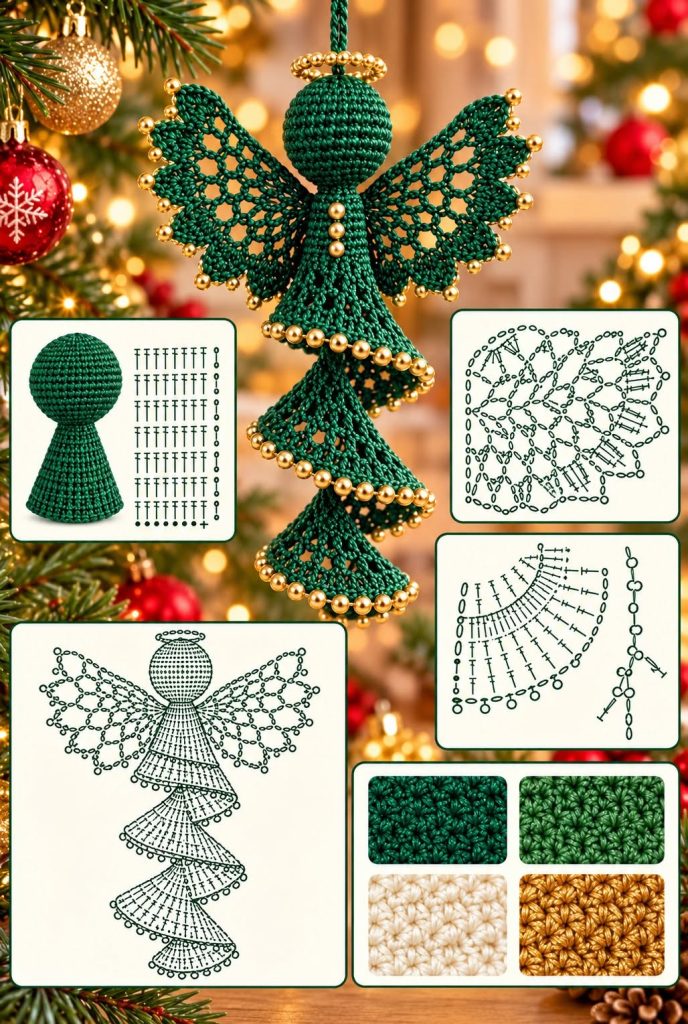
Christmas is a wonderful season for creating handmade decorations that bring warmth, beauty, and personal meaning into our homes. Among the many festive crochet projects, the Crochet Christmas Angel Ornament Pattern stands out for its delicate appearance, graceful wings, and elegant spiral dress. This charming little angel combines traditional crochet techniques with a beautiful decorative design, making it a lovely addition to any Christmas tree. Its rich emerald green color and shimmering golden beads create a sophisticated holiday look that feels both timeless and festive.
One of the most captivating features of this handmade crochet angel is the combination of a rounded amigurumi-style head, delicate openwork wings, and a flowing spiral body. The finished ornament looks intricate, yet it can be created by combining several manageable crochet components. Each section introduces a different technique, allowing crocheters to practice shaping, working in rounds, creating lace patterns, and assembling decorative pieces. Whether you enjoy making Christmas ornaments for your family or creating thoughtful handmade gifts, this project offers plenty of creative possibilities.
The beauty of this crochet Christmas decoration also lies in its versatility. Although emerald green and gold are especially striking, the angel can be made in classic white, soft ivory, burgundy, champagne, or other festive colors.
Small golden beads add sparkle to the wings, halo, and spiral edges, while the openwork stitches give the ornament a light and airy appearance. With patience and attention to detail, you can create a beautiful angel that will become a treasured part of your Christmas collection for years to come.
Materials and Essential Crochet Techniques
Before beginning your Christmas angel crochet pattern, gather your materials and prepare a comfortable workspace. Using the right yarn and hook combination will help your angel maintain its shape while preserving the delicate texture of the lace sections.
For an ornament similar to the illustrated design, choose a firm cotton thread or fine mercerized cotton yarn. Cotton is particularly suitable because it provides clear stitch definition, holds decorative shapes well, and creates a polished finished appearance. A small amount of fabric stiffener may also be helpful when shaping the angel’s wings and spiral dress.
Materials Needed
- Emerald green crochet cotton thread, size 5 or 10
- Crochet hook, approximately 1.5–2.0 mm, adjusted to the thread
- Small golden beads, approximately 3–5 mm
- Polyester fiberfill for the head
- Yarn needle for sewing and finishing
- Small scissors
- Stitch markers
- Measuring tape
- Matching sewing thread for attaching beads
- Fabric stiffener or diluted white craft glue, optional
- A piece of cardboard or a foam blocking board
- Rustproof pins for shaping the wings
- Decorative hanging cord or matching crocheted chain
The approximate finished size is 7–9 inches (18–23 cm) tall, including the spiral dress but excluding the hanging loop. The wings may measure approximately 5–6 inches (13–15 cm) across, depending on the thread, hook, and blocking method.
Advertising..
Discover more
Source Fabrics
thread
yarn
These dimensions are suggested for a similar ornament rather than exact measurements taken from the picture. Crocheters may adjust the finished size by using thicker yarn or a different hook.
Crochet Abbreviations – US Terms
| Abbreviation | Meaning |
|---|---|
| ch | Chain |
| sl st | Slip stitch |
| sc | Single crochet |
| hdc | Half double crochet |
| dc | Double crochet |
| tr | Treble crochet |
| inc | Increase |
| dec | Decrease |
| st | Stitch |
| sts | Stitches |
| MR | Magic ring |
| BLO | Back loop only |
| rep | Repeat |
| sp | Space |
The pattern uses several fundamental techniques, including the magic ring, single crochet increases and decreases, double crochet lace, and chain spaces. Beginners who already understand these basic stitches can approach each section individually before assembling the complete ornament.
The angel is constructed in separate components: a stuffed head, a narrow neck, a decorative upper body, two lace wings, a spiral skirt, and a hanging loop. This modular approach allows each piece to be shaped carefully before it is attached.
How to Crochet the Angel’s Head and Body
The rounded head forms the central feature of the crochet angel ornament. Its smooth texture is created with tightly worked single crochet stitches, similar to traditional amigurumi. Working with consistent tension is important because the head should appear firm and evenly shaped.
Begin by making a magic ring with your green cotton thread. Crochet six single crochet stitches into the ring and pull the center closed. Continue in a spiral, using a stitch marker to identify the beginning of each round.
Step 1: Crochet the Round Head
Follow this suggested round sequence:
Round 1: Work 6 sc into a magic ring. (6 sts)
Round 2: Work 2 sc into each stitch. (12 sts)
Round 3: Repeat 1 sc, inc around. (18 sts)
Round 4: Repeat 2 sc, inc around. (24 sts)
Round 5: Repeat 3 sc, inc around. (30 sts)
Round 6: Repeat 4 sc, inc around. (36 sts)
Rounds 7–12: Work 1 sc in each stitch around. (36 sts)
Round 13: Repeat 4 sc, dec around. (30 sts)
Round 14: Repeat 3 sc, dec around. (24 sts)
Round 15: Repeat 2 sc, dec around. (18 sts)
Begin filling the head with small amounts of polyester fiberfill. Distribute the filling evenly to avoid lumps and maintain a rounded appearance.
Round 16: Repeat 1 sc, dec around. (12 sts)
Round 17: Work 6 decreases. (6 sts)
Fasten off, leaving a long tail. Use the yarn needle to close the remaining opening and secure the thread neatly.
The completed head should be round, firm, and smooth. Avoid overstuffing, as excessive filling can stretch the stitches and distort the shape.
Step 2: Create the Neck
The neck connects the rounded head to the decorative body. It should remain narrow enough to maintain the traditional angel silhouette.
Make a magic ring and work 8 sc into it. Continue crocheting 8 sc around for approximately 5–7 rounds, creating a small cylindrical tube.
Fasten off with a long sewing tail. Position one end of the tube beneath the head and sew it securely into place, keeping the neck centered.
Step 3: Crochet the Upper Body
The angel’s upper body should widen gently from the neck before transitioning into the flowing spiral skirt.
Begin with a magic ring containing 8 sc. Join with a sl st and ch 2.
For the next round, work 2 dc into each stitch around. You will have 16 dc.
In the following round, alternate 1 dc and 2 dc in the next stitch to widen the section to 24 dc.
Continue working one additional round of dc, increasing evenly as needed to create a small cone-shaped upper body.
Attach the upper body to the neck with neat hand stitches. Make sure the seam is secure enough to support the spiral skirt and wings.
For additional sparkle, sew three golden beads vertically down the front of the angel’s body. These create the appearance of small decorative buttons and complement the gold accents on the wings.
Creating the Elegant Spiral Dress and Lace Wings
The spiral crochet dress is one of the most distinctive details of this Christmas angel. Instead of forming a conventional straight skirt, the lower section twists downward in graceful layers, giving the finished ornament an impression of movement.
The decorative wings create an equally beautiful contrast. Their openwork design gives the angel a delicate, airy silhouette, while the golden beads along the edges provide a luxurious finishing touch.
Step 4: Crochet the Spiral Skirt
A practical way to create the spiral effect is to work an expanding crochet strip and allow the increase pattern to form natural ruffles.
Begin with a foundation chain of 55 chains. This creates the approximate length of the spiral section.
Row 1: Work 2 dc into the fourth chain from the hook. Continue working 2 dc into each remaining chain.
Row 2: Ch 3 and turn. Work 2 dc into each stitch across the row.
Row 3: Ch 3 and turn. Work a decorative sequence of 1 dc, ch 1, skip 1 stitch across, adjusting the final repeat as needed.
Row 4: Ch 3 and turn. Work 2 dc into each chain space, creating a textured outer edge.
As the number of stitches increases, the strip will begin curling naturally. Gently arrange the ruffles into a downward spiral.
This is an original construction method for achieving a similar effect; it is not an exact stitch-for-stitch transcription of the chart shown in the image.
For a longer ornament, begin with more foundation chains. For a shorter version, reduce the starting chain to approximately 40–45 stitches.
Once the strip is complete, attach the upper end beneath the angel’s body. Arrange the remaining strip into a graceful downward spiral and secure selected contact points with small, nearly invisible stitches.
Step 5: Add the Decorative Golden Beads
The beautiful gold accents make the emerald green crochet angel especially attractive as a Christmas decoration.
Position small golden beads along the outside edges of the spiral skirt. Space them evenly, following the natural curves of the crocheted fabric.
Use matching sewing thread and a fine needle to stitch each bead securely through the crochet fabric.
A bead may be placed approximately every 0.4–0.6 inches (1–1.5 cm), although the spacing can be adjusted to suit your preferred appearance.
Avoid attaching heavy beads to every stitch because excessive weight may stretch the delicate spiral and change its shape.
Step 6: Crochet the Angel Wings
The wings are created using an openwork crochet technique based on chains, double crochet stitches, and decorative fan-shaped sections.
For the first wing, begin with a foundation chain of 18 stitches.
Row 1: Work 1 dc into the fourth chain from the hook. Continue working dc across the foundation chain.
Row 2: Ch 4 and turn. Skip 1 stitch, work 1 dc into the next stitch, then ch 2. Repeat this sequence across to create open spaces.
Row 3: Ch 4 and turn. Work a decorative shell of 3 dc, ch 2, 3 dc into selected chain spaces, distributing the shells evenly.
Row 4: Work chain arches between the shell groups. Use 3–5 chains for each arch, depending on the desired spacing.
Row 5: Continue expanding the outer edge with larger chain arches and small crochet fans, creating the appearance of soft feather-like points.
Fasten off and leave a long tail for assembly.
Create a second wing using the same construction. For a balanced appearance, shape the second wing as a mirror image during blocking.
These instructions offer a simplified lace-wing design. The photographed ornament uses a more elaborate arrangement of pointed lace motifs, so the substitute wings will have a similar character rather than identical stitch placement.
Step 7: Shape the Wings
The wings should spread outward from the angel’s back, creating a beautiful symmetrical appearance.
Lightly dampen the crocheted wings or apply a small amount of fabric stiffener according to the product instructions.
Place each wing on a foam blocking board and gently stretch the lace openings into the desired shape.
Pin the outer points carefully and leave the pieces undisturbed until completely dry.
Once dry, position the wings behind the neck and upper body. Sew them securely into place using the yarn tails.
The blocking process helps the crochet lace angel wings remain open, clearly displaying the decorative stitch pattern.
Finishing, Decorating, and Displaying Your Christmas Angel
The final details transform the individual crochet components into a complete handmade Christmas angel ornament. Careful assembly is especially important because the head, wings, body, and skirt should remain balanced when the decoration is hanging.
Before attaching the hanging loop, examine the angel from the front and side. Adjust the position of the wings and spiral skirt to create an attractive silhouette.
Step 8: Make the Golden Halo
A golden halo adds a charming traditional touch to the angel’s appearance.
One easy method is to thread small gold beads onto a length of strong jewelry wire and form a circle slightly wider than the head.
Twist the wire ends together, cover any sharp ends, and secure the completed halo above the head.
For a crochet-only alternative, create a short chain, join it into a ring, and work one round of single crochet. Golden beads can then be sewn around its outer edge.
Attach the halo discreetly using matching thread. Make sure it remains centered when the ornament is displayed.
Step 9: Create the Hanging Loop
Using the emerald green thread, crochet a chain approximately 4–5 inches (10–13 cm) long.
Join the ends securely to form a loop and attach it to the top center of the angel’s head.
Use several small reinforcement stitches to ensure the ornament can hang safely without pulling the head out of shape.
Lift the ornament by its loop to check the balance. Adjust the loop attachment point if the angel leans noticeably forward or backward.
Step 10: Final Assembly and Finishing
Examine every connection before finishing the project. Check the head, neck, body, wings, skirt, halo, and decorative beads.
Weave in loose yarn ends with a tapestry needle, passing the thread through several stitches before trimming it.
If the spiral skirt needs additional support, apply a very light coat of suitable fabric stiffener to the edges and arrange the curves while drying.
Keep the rounded head free of stiffener to preserve its smooth, softly filled appearance.
Be especially careful with the decorative beads. Small beads and wire components can present a choking hazard, so the finished angel should be treated as a decoration rather than a children’s toy.
Creative Color Combinations
Although the original emerald green design creates a rich festive appearance, other color combinations can produce equally beautiful ornaments.
Ivory and champagne gold create an elegant, traditional angel suitable for vintage Christmas decorations.
Burgundy and antique gold bring warmth and sophistication, making the ornament an attractive choice for a classic holiday tree.
White and silver create a delicate winter-inspired appearance, especially when combined with pearl-style beads.
Sage green and cream offer a softer, farmhouse-inspired variation that looks beautiful with natural wood ornaments and warm Christmas lights.
For an especially festive result, make a matching collection of angels in different colors and display them together on the same tree.
How to Care for Your Crochet Angel
Store your finished ornament carefully to preserve the lacework and decorative details.
Before packing it away, make sure the crochet fabric is completely dry. Excess moisture can damage the yarn and affect the shape of stiffened wings.
Wrap the ornament loosely in acid-free tissue paper and place it in a sturdy storage box. Avoid placing heavy decorations on top of it.
If the wings become slightly bent during storage, they can often be reshaped with gentle blocking.
Keep the ornament away from open flames, exposed bulbs that become hot, and excessive moisture.
Frequently Asked Questions
Is this crochet Christmas angel suitable for beginners?
This project is best suited to confident beginners or intermediate crocheters. The round head uses simple amigurumi techniques, while the openwork wings and spiral skirt require more attention to stitch placement and shaping.
What type of yarn works best for this ornament?
Fine cotton crochet thread is an excellent choice because it provides clear stitch definition and helps the lace details hold their shape. Mercerized cotton also creates a subtle sheen that looks beautiful with metallic beads.
Can I make the angel without golden beads?
Yes. The beads are decorative rather than structurally necessary. You can leave them off or replace their visual effect with metallic embroidery thread along the edges.
How can I make the spiral dress longer?
Increase the number of chains in the foundation row. A longer foundation produces a longer ruffled strip, although it may also require additional support to maintain its final arrangement.
Why are my crochet wings curling?
Curling may occur because of uneven tension, an unsuitable hook size, or too many stitches in a particular section. Gentle blocking usually helps, but significant curling may require adjusting the number of stitches.
Can this angel be used as a Christmas gift?
Absolutely. Handmade crochet angels make thoughtful gifts for friends, relatives, teachers, and anyone who appreciates traditional crafts. They can also be used as decorative accents on wrapped presents.
How long does it take to crochet one angel?
Depending on experience and the amount of lace detail, a simplified version may require approximately 4–8 hours of active work. Additional time may be needed for blocking and drying.
Can I create a larger Christmas angel?
Yes. Use thicker cotton yarn and a correspondingly larger crochet hook. You may also increase the number of rounds in the head and expand the dimensions of the wings and skirt proportionally.
Conclusion
The Crochet Christmas Angel Ornament Pattern is a lovely way to combine traditional crochet craftsmanship with elegant holiday decorating. Its rounded head, delicate lace wings, shimmering golden details, and distinctive spiral skirt create a unique ornament that can become a treasured part of your seasonal celebrations.
Beyond its decorative appeal, this handmade angel provides an enjoyable opportunity to explore different crochet techniques, experiment with colors, and create something meaningful with your own hands. Each stitch adds personality and charm, making every finished ornament slightly different and wonderfully special.
Whether you choose the rich emerald green and gold combination or create your own festive palette, this beautiful crochet Christmas angel will bring handmade warmth to your Christmas tree. It is a charming project for the holiday season and a delightful keepsake to enjoy year after year.