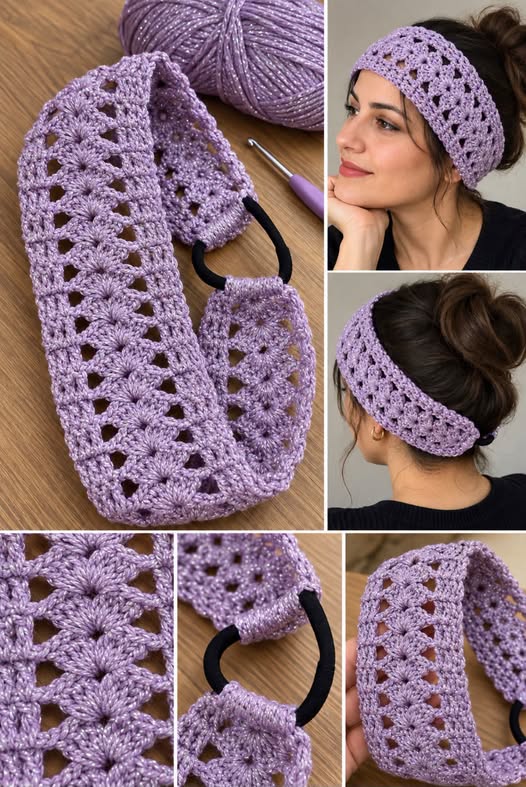
Crochet Headband Pattern is a beautiful way to combine practical hair accessories with decorative crochet texture. The wide lavender headband shown in the reference image has an elegant openwork appearance, repeating fan-like stitches, and a comfortable gathered finish at the back. This type of accessory works especially well because it can hold the hair away from the face while still looking soft and handmade. The design can be worn with loose hair, a ponytail, or a bun, making it useful throughout the year. In this tutorial, the goal is to create a photo-inspired version using familiar U.S. crochet stitches and a repeating lace structure that is approachable for confident beginners and intermediate crocheters. Because yarn thickness, hook size, and individual tension can affect the final measurements, the instructions also explain how to customize the width and circumference instead of depending on one rigid stitch count.
The term Crochet Headband Pattern refers to the complete set of instructions used to crochet a wearable band that fits around the head. A successful pattern explains the yarn, hook, stitches, measurements, construction, finishing, and adjustments needed for a comfortable result. For this particular style, the most important visual feature is the repeating crochet shell stitch, sometimes described as a fan stitch, surrounded by open chain spaces. Those chain spaces create the light lace effect visible across the band, while the clusters of taller stitches provide enough structure to prevent the headband from becoming too loose or shapeless. Adding a small section of elastic at the back is especially useful because it improves fit and makes the finished accessory easier to put on and remove without stretching the crochet fabric excessively.
One of the best qualities of this easy crochet headband is its versatility. You can create a neutral version for everyday outfits, use a sparkling yarn for a dressier accessory, or choose bright colors for a playful handmade gift. Lavender, dusty rose, cream, soft blue, burgundy, charcoal, and jewel tones can all work beautifully with the openwork texture. The project is also fairly economical because a headband requires much less yarn than a scarf, shawl, or garment. Throughout this tutorial, you will learn how to create the foundation, form repeating lace shells, maintain straight edges, check the fit, attach elastic, and finish the piece neatly. The result is a comfortable wide crochet headband with a handmade appearance inspired by the project in the photograph.
Understanding the Crochet Headband Pattern and Choosing Materials
Before beginning the Crochet Headband Pattern, it helps to understand the construction. Instead of crocheting continuously in a circle, this version is worked as a rectangular lace strip. You crochet back and forth in rows until the strip reaches the required length. The two short ends are then connected with a covered elastic section, allowing the band to stretch comfortably around the head. This method also makes adjusting the finished circumference much easier.
For a similar appearance, choose a DK or light worsted weight yarn with good stitch definition. A yarn that is too fuzzy can hide the shell pattern, while an extremely stiff yarn may make the headband uncomfortable. Approximately 80 to 130 yards should be enough for most adult sizes, although the exact amount depends on the width, yarn weight, and final circumference. A subtle metallic or glitter strand can create the slightly sparkling appearance seen in the reference style.
A 4.0 mm to 4.5 mm crochet hook is a practical starting point for light worsted yarn. However, your hook should ultimately be chosen according to the yarn and the fabric you produce. If the stitches feel stiff, increase the hook size slightly. If the lace becomes excessively loose and loses its definition, try a smaller hook. Comfortable drape is more important than matching a specific gauge perfectly for this accessory.
You will also need scissors, a yarn needle, stitch markers, a flexible measuring tape, and approximately 3 to 4 inches of narrow elastic. Black, white, beige, or fabric-covered elastic can all work. Since part of the elastic may remain visible when the band is stretched, choose a color that coordinates with the yarn whenever possible. The elastic should feel secure without being extremely stiff.
The primary U.S. crochet stitches used for this project are chain (ch), single crochet (sc), double crochet (dc), slip stitch (sl st), and a shell stitch made from several double crochets worked into the same space. A shell creates the decorative fan shape. Chain spaces between shells form the open holes that give the headband its airy, lace-like appearance. These basic techniques make the project look more complicated than it actually is.
For an average adult, aim for a finished crochet section about 4 to 5 inches (10 to 12.5 cm) wide. The total finished circumference will usually fall around 20 to 22 inches (51 to 56 cm), depending on the wearer. Do not automatically crochet the strip to the full head measurement because the yarn and elastic both stretch. A slightly smaller finished circumference often creates a more secure fit. Measuring during construction is the safest approach.
Building the Lace Shell Stitch Step by Step
Begin your Crochet Headband Pattern with a foundation chain that produces the desired width. For a medium-width adult band, start with approximately 30 to 36 chains using your selected yarn and hook. Because different shell repeats require different multiples, treat this as a customizable starting point rather than an absolute count. Make the chain loosely so the first edge does not become tighter than the remaining fabric.
For Row 1, work a foundation of evenly spaced single crochet stitches or a simple combination of single crochet and chain spaces. One approachable method is to single crochet in the second chain from the hook and continue across. This creates a stable base before beginning the decorative section. Keep your tension relaxed and count the stitches at the end of the row to make sure no foundation stitches were accidentally skipped.
For Row 2, begin creating the lace structure. Chain 3 to represent the height of a double crochet. Skip approximately two stitches, then work a shell of 5 double crochets into the next stitch. Skip two stitches again and work a single crochet into the following stitch. Continue alternating shells and anchoring single crochets across the row. Adjust the spacing slightly at the edges when necessary so both sides remain symmetrical.
The next row introduces the open spaces. Chain 3 and turn. Work a double crochet near the beginning edge, then create several chain stitches above the center of the previous shell. Anchor the chain with a single crochet around or near the top of the shell, depending on your preferred lace structure. Continue using chain spaces between the main stitch groups. This creates the small diamond- or triangle-shaped openings that give the headband its decorative appearance.
On the following row, work new shells into the larger chain spaces from the previous row. Insert the hook underneath the chain rather than into individual chain loops whenever the pattern allows. Work 5 double crochets into the same chain space to form another crochet fan stitch. Anchor the shell with a single crochet in the next appropriate space. Repeating shells in this manner produces the layered floral texture visible across the headband.
Continue alternating the shell row and the openwork row. After several repeats, the design should begin to show a recognizable rhythm of fans surrounded by small openings. Check the width frequently. If the edges start becoming narrower, you may be unintentionally skipping an edge stitch. If the fabric becomes wider, you may be adding extra stitches at the beginning or end of a row. Using stitch markers in the first and last stitch can prevent these common mistakes.
Sizing, Shaping, and Finishing the Crochet Headband
Continue crocheting the repeating lace pattern until the strip measures approximately 17 to 19 inches (43 to 48 cm) for an average adult. Remember that an elastic section will be added, so the crochet portion normally should not equal the entire head circumference. Stop occasionally and gently stretch the strip around the intended wearer or compare it to the measurement you recorded before beginning.
To measure correctly, wrap a flexible tape around the head where the crochet hair band will naturally sit. Usually this means across the forehead or slightly behind the hairline, around the sides, and beneath the bun or lower back portion of the head. Record this number. If the measurement is 22 inches, for example, the final unstretched headband may be made slightly smaller because the elastic will provide flexibility.
When the crochet strip reaches the proper length, work one final stabilizing row along each short end if needed. A row of single crochet is useful because it provides a firm section for attaching the elastic. Do not tighten this row excessively. The edge should remain flat and approximately the same width as the decorative portion of the band.
Cut a piece of elastic about 3 to 4 inches (7.5 to 10 cm) long. Overlap approximately half an inch of one end with the short crochet edge. Sew the elastic securely using matching yarn and a tapestry needle. Make several passes through the elastic and crochet fabric. Avoid placing all the stitches through one tiny point because spreading the attachment stitches over a wider area creates a stronger connection.
Attach the opposite end of the elastic to the second short edge. Before making the final stitches permanent, test the fit. The finished handmade crochet headband should feel secure but comfortable. It should not slide easily when the head moves, but it should also not create strong pressure around the forehead or behind the ears. Adjust the elastic length if necessary before finishing.
Finally, weave all yarn tails securely into the wrong side of the crochet fabric. If desired, crochet a small rectangular cover that wraps around the exposed elastic. A simple strip of single crochet works well for this purpose. Wrap the strip loosely around the elastic and seam the long edges together without sewing through the elastic itself. This creates a more polished finish while allowing the elastic to stretch freely.
Crochet Headband Pattern FAQ
What yarn is best for a Crochet Headband Pattern? A soft DK, light worsted, or medium-weight yarn usually works well. Cotton provides excellent stitch definition, while acrylic blends can offer more flexibility and easy care. For a dressier headband, yarn containing a subtle metallic strand can create an attractive sparkle. Most importantly, choose yarn that feels comfortable against the forehead and ears.
How wide should a crochet headband be? There is no single required width, but the wide lace style shown here looks attractive at approximately 4 to 5 inches (10 to 12.5 cm). For a narrower accessory, reduce the number of foundation stitches or remove one pattern repeat. For a wider ear-warmer style, add additional repeats while making sure the stitch pattern remains symmetrical.
How do I make the Crochet Headband Pattern for different head sizes? Measure the head first, then crochet the strip until the crochet portion plus the relaxed elastic creates a circumference slightly smaller than the actual measurement. Children generally need a shorter strip, while larger adult sizes require additional rows. Because crochet stretches differently depending on yarn and tension, fitting the piece before permanently attaching the elastic gives the best result.
Can beginners make this crochet headband? Yes, especially if they already know chains, single crochet, and double crochet. The most important new skill is working multiple double crochets into one space to form a shell. Beginners may want to practice several shells on a small sample before beginning the final project. Once the repeat becomes familiar, the rows are repetitive and relaxing to crochet.
Why is my crochet headband becoming wider or narrower? This usually happens because stitches are being added or missed near the edges. Count the repeats regularly and place markers in the first and last stitch of each row. Another possibility is inconsistent tension. Try to maintain approximately the same amount of yarn tension while forming chains, shells, and edge stitches so the fabric remains balanced.
Can I make this headband without elastic? Yes. You can crochet the entire strip to the required circumference and seam the ends together, but the fit may change after repeated wear. Elastic helps the crochet lace headband return to its original size. Another option is to create crochet ties at each end, although that produces a different appearance. For a secure headband similar to the reference project, a short elastic section is especially practical.
Conclusion
The Crochet Headband Pattern combines a decorative lace design with a practical construction that can be customized for many different sizes and styles. In this tutorial, you learned how to choose comfortable yarn, select an appropriate crochet hook, build a stable foundation, create shell stitches, form decorative chain spaces, repeat the lace pattern, measure the headband correctly, and add elastic for a flexible fit. These techniques can also be useful in many other crochet accessories because shell stitches and openwork patterns are versatile skills.
One of the most important lessons is to pay attention to measurement rather than relying only on a fixed number of rows. Every crocheter has slightly different tension, and different yarns can stretch in different ways. By checking the length as you crochet and testing the elastic before permanently sewing it in place, you can create a comfortable crochet headband that feels secure without being too tight.
The decorative fan texture is what gives this project its special appearance. Once you understand how shells are formed by placing several double crochet stitches into one space, the pattern becomes much easier to repeat. The surrounding chain spaces keep the fabric lightweight and make the stitch pattern visible, while the solid shell groups provide enough structure for everyday wear.
You can also personalize your Crochet Headband Pattern by experimenting with yarn colors and finishes. Soft lavender creates a romantic appearance similar to the reference project, while cream can look classic, burgundy can feel warm and elegant, and sparkling yarn can make the accessory suitable for festive outfits. Small changes in yarn and width can give the same basic pattern a completely different personality.