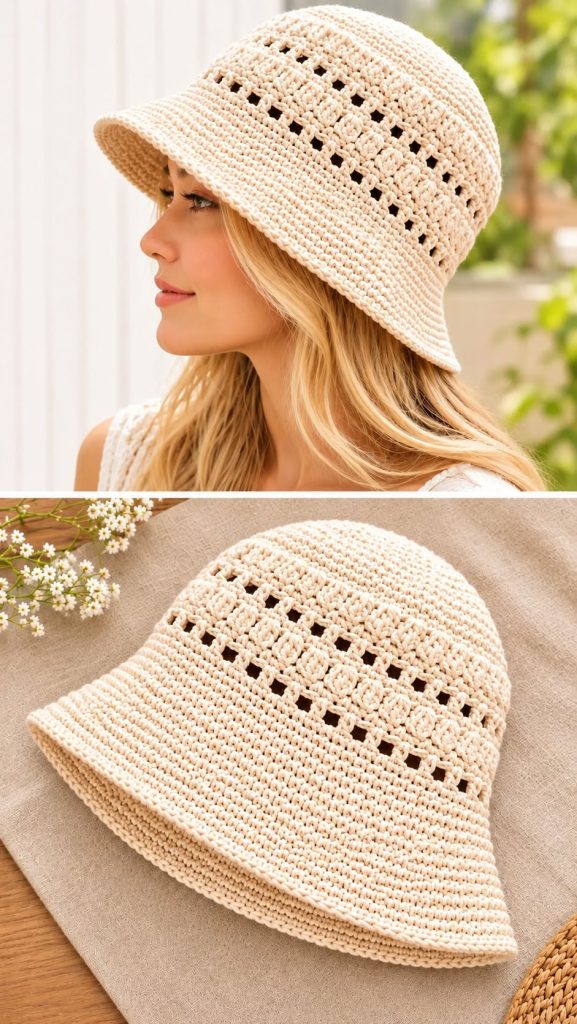
The Elegant Crochet Summer Bucket Hat is a beautiful combination of timeless fashion, delicate crochet stitches, and everyday comfort. Featuring a softly rounded crown, an intricate openwork lace band, and a gently flared brim, this handmade accessory is perfect for sunny afternoons, beach vacations, garden walks, and casual summer outfits. Its natural cream color creates a sophisticated appearance that complements almost any wardrobe.
One of the most attractive features of this crochet bucket hat pattern is the contrast between the solid crochet sections and the decorative lace stitches around the middle. The textured openwork design adds visual interest while allowing air to circulate through the hat. The wide brim provides additional shade for the face, making the design both fashionable and practical for warmer days.
Creating your own handmade crochet summer hat is also a wonderful opportunity to explore different crochet techniques while making something beautiful and useful. This project combines basic stitches, simple shaping, and decorative stitch combinations that produce a professional-looking result.
With the right materials, careful measurements, and a little patience, you can make a lovely accessory that reflects your personal style.
Materials and Measurements for the Elegant Crochet Bucket Hat
Choosing the right yarn is one of the most important steps when creating a crochet summer bucket hat. Lightweight cotton yarn is an excellent option because it offers breathability, stitch definition, and enough structure to help the brim maintain its shape.
For a design similar to the one shown, natural cotton yarn in ivory, cream, or soft beige creates an elegant appearance. These neutral shades highlight the decorative stitches and make the finished hat easy to coordinate with summer clothing.
Materials Needed
- Approximately 150–200 grams of DK or light worsted-weight cotton yarn
- 3.5 mm or 4.0 mm crochet hook, depending on gauge
- Stitch markers for identifying the beginning of each round
- Measuring tape for checking the hat circumference
- Yarn needle for weaving in loose ends
- Small scissors
- Optional fabric stiffener for additional brim structure
The recommended finished circumference for an average adult woman’s hat is approximately 56–58 cm (22–23 inches). However, the pattern can be adjusted to accommodate smaller or larger head sizes.
The crown should measure approximately 17.5–18.5 cm (6.9–7.3 inches) across when laid flat, depending on the desired fit. The overall hat depth before the brim is approximately 17–19 cm (6.7–7.5 inches).
For a beautifully balanced result, the brim can extend approximately 6–8 cm (2.4–3.1 inches) beyond the lower edge of the hat. This creates the gently flowing bucket-hat silhouette visible in the design.
Always create a small gauge swatch before beginning. A useful starting gauge is approximately 18 single crochet stitches and 20 rounds per 10 cm (4 inches), although the exact result will depend on yarn thickness and personal crochet tension.
Step-by-Step Crochet Summer Bucket Hat Tutorial
The construction of this elegant crochet hat begins at the center of the crown and continues downward in circular rounds. The hat is divided into four main sections: the rounded crown, the upper body, the decorative lace band, and the gently expanding brim.
This tutorial provides an original, adaptable construction inspired by the pictured hat. The decorative stitch arrangement is designed to produce a similar appearance rather than claim an exact stitch-for-stitch reproduction.
Step 1: Creating the Rounded Crown
Start with a magic ring and crochet 6 single crochet stitches into the center. Pull the yarn tail gently to close the ring, creating a small, neat circle.
For the next round, work 2 single crochet stitches into each stitch around, increasing the total stitch count to 12. Continue increasing evenly in subsequent rounds to create a smooth circular crown.
For a six-section crown, increase by 6 stitches per round. For example, work one round with an increase after every stitch, followed by another round with an increase after every two stitches.
Continue following this progression until the crown reaches the required diameter. Measure frequently and adjust your increases when necessary to prevent excessive rippling or curling.
Once the correct diameter has been achieved, crochet several rounds without increases. This begins forming the curved sides of the bucket hat and establishes its comfortable rounded shape.
Step 2: Working the Upper Hat Body
Continue crocheting single crochet stitches evenly around the hat. These solid rounds create a smooth and structured surface that supports the decorative lace section.
For a more textured appearance, you may alternate single crochet rounds with half double crochet rounds. Maintain a consistent stitch count throughout this section.
Work until the upper solid portion measures approximately 5–7 cm (2–2.8 inches) below the point where the crown begins curving downward. The exact measurement depends on the final hat depth you want.
Check the circumference periodically to ensure that the hat fits comfortably without becoming too tight. Cotton yarn generally has less elasticity than wool, so a slightly relaxed fit is desirable.
The upper body should sit smoothly against the head without forming sharp corners. If the fabric becomes excessively loose, adjust your stitch count before beginning the lace section.
Step 3: Creating the Decorative Crochet Lace Band
The beautiful openwork band is the most distinctive element of this crochet lace bucket hat. It creates small decorative openings between raised stitch clusters, giving the hat a delicate and breathable appearance.
For an accessible lace variation, use a repeating combination of double crochet clusters and chain spaces. The following stitch arrangement creates a textured pattern with small decorative openings.
Begin with a round of alternating double crochet stitches and chain-one spaces. Work the repeat evenly around the hat, making minor stitch adjustments if needed so the pattern joins neatly.
In the next round, create small three-double-crochet clusters inside selected chain spaces. Separate each cluster with chain stitches to preserve the airy appearance of the design.
Continue alternating decorative cluster rounds and open chain-space rounds. Arrange the clusters so that they appear slightly staggered rather than forming perfectly straight vertical columns.
Work approximately 5–7 cm (2–2.8 inches) of decorative lace, or until the band reaches your preferred height. The repeated openwork stitches should be loose enough to remain breathable but firm enough to maintain the shape of the hat.
Step 4: Transitioning to the Solid Brim
Once the lace section is complete, crochet one or two solid rounds of single crochet stitches. These rounds help stabilize the lower edge of the openwork band.
The transition should feel smooth, without sudden changes in circumference. If the lace pattern has altered the stitch count, distribute any necessary adjustments evenly.
Begin the brim with single crochet or half double crochet stitches. Both options work well, although single crochet generally creates a denser and more structured fabric.
To widen the brim gradually, add evenly spaced increases across selected rounds. A common approach is to increase by approximately 8–12 stitches during an increase round.
Avoid adding too many increases at once, because excessive stitches may cause the brim to ripple. Conversely, too few increases can make the brim curl downward more sharply than intended.
Step 5: Shaping the Wide Summer Brim
Continue working the brim in circular rounds, alternating increase rounds with plain rounds. This controlled shaping produces the softly flared silhouette characteristic of a classic crochet bucket hat.
After every two or three rounds, place the hat on a flat surface to inspect the shape. The brim should expand gently without forming pronounced waves.
For a casual bucket-hat style, allow the brim to curve slightly downward. For a broader sun-hat appearance, add additional shaping until the brim becomes wider.
Continue until the brim measures approximately 6–8 cm (2.4–3.1 inches). The finished width can be modified according to personal preference.
End with one or two rounds of tight single crochet stitches to reinforce the outer edge. This gives the brim a polished appearance and helps reduce stretching.
Step 6: Finishing and Blocking the Hat
Fasten off the yarn and leave a short tail. Use a yarn needle to weave the loose ends securely into the inside of the crochet fabric.
Lightly dampen the hat with cool water and gently shape it over an appropriately sized bowl or hat form. Adjust the crown and brim until they appear symmetrical.
Allow the hat to dry completely before removing it from the form. Cotton yarn often becomes smoother and more defined after gentle blocking.
If the brim needs extra structure, consider using a lightweight fabric stiffener suitable for cotton crochet. Always test the product on a small hidden area first.
The result is a beautifully shaped handmade crochet bucket hat featuring a rounded crown, decorative lace details, and an elegant summer brim.
Styling Ideas, Color Combinations, and Personalization
One of the greatest advantages of making your own crochet summer hat is the ability to customize every detail. From yarn color to brim width, small adjustments can completely transform the finished appearance.
Classic cream and ivory shades are particularly attractive for a sophisticated summer accessory. They pair beautifully with linen dresses, cotton blouses, denim shorts, and neutral sandals.
For a romantic vintage-inspired version, consider dusty rose, pale lavender, soft sage, or warm champagne. These delicate shades highlight the openwork stitches without overwhelming the design.
If you prefer a more dramatic accessory, try deep navy blue, emerald green, chocolate brown, or burgundy. These darker colors create a striking contrast when worn with light summer clothing.
The decorative lace band also offers opportunities for customization. You can experiment with shell stitches, puff stitches, small flower motifs, or simple chain-space patterns to create a unique texture.
Another beautiful option is adding a narrow crocheted ribbon around the base of the crown. This creates a subtle decorative accent while preserving the soft, natural appearance of the original hat.
For an especially polished result, keep the stitching consistent throughout the project. Even tension helps the crown remain smooth, the lace pattern appear balanced, and the brim maintain an attractive shape.
Caring for Your Handmade Crochet Hat
Proper care helps maintain the beauty of your cotton crochet bucket hat for many seasons. Because the finished accessory contains shaped sections, gentle handling is particularly important.
Hand-washing in cool water with a mild detergent is generally recommended for cotton crochet. Avoid aggressive scrubbing, twisting, or wringing the fabric.
After washing, carefully press excess water out with a clean towel. Reshape the hat while damp and allow it to air-dry on a suitable form.
Store the hat in a clean, dry location where the brim will not become compressed. Avoid hanging it from a narrow hook for extended periods, as this may stretch the crochet fabric.
With careful maintenance, the delicate lace stitches and structured brim can continue looking attractive through many sunny seasons.
Frequently Asked Questions About Crochet Bucket Hats
Is this crochet summer bucket hat suitable for beginners?
This project is best suited to confident beginners or intermediate crocheters. The solid crown and brim use basic stitches, while the decorative lace band requires some familiarity with stitch repeats and cluster patterns.
What is the best yarn for a summer crochet hat?
Cotton yarn is an excellent choice because it is breathable, durable, and comfortable against the skin. Cotton blends may also work, but the finished structure and brim flexibility can vary.
How can I make the crochet bucket hat larger?
Increase the diameter of the crown before working the straight sides. You may also need to adjust the number of stitches in the lace pattern to maintain an even repeat.
How can I make the brim more structured?
Use a slightly smaller crochet hook, work tighter stitches, or incorporate a suitable stiffening treatment. A more compact stitch pattern can also improve the brim’s stability.
Can I make this hat using different colors?
Absolutely. The pattern looks beautiful in cream, beige, pastel pink, light blue, lavender, sage green, and many other shades. You can also use contrasting yarn for the lace band or outer brim.
How long does it take to crochet this hat?
An experienced crocheter may finish the project in approximately 6–10 hours. Beginners may need additional time, especially when practicing the decorative lace stitches.
Does the crochet brim provide sun protection?
The brim provides some shade, but crochet fabric, especially openwork sections, does not guarantee UV protection. For extended time outdoors, use appropriate sunscreen and other sun-protective measures.
Conclusion
The Elegant Crochet Summer Bucket Hat Pattern combines graceful design, practical construction, and the personal satisfaction of handmade craftsmanship. Its beautiful openwork band, rounded crown, and softly flared brim create an accessory that feels both classic and modern.
Whether you choose natural ivory cotton for a sophisticated appearance or experiment with colorful yarn for a more playful style, this project offers countless opportunities for creativity. Every carefully worked stitch contributes to a charming piece that can become a favorite accessory.
With quality materials, consistent crochet tension, and attention to detail, you can create a beautiful handmade summer hat that complements your wardrobe and showcases your crochet skills. It is a rewarding project for anyone who enjoys transforming simple yarn into elegant, wearable art.