The Crochet Cactus Pattern is a charming project for anyone who enjoys creating small handmade decorations with yarn. Inspired by the adorable potted cactus shown in the photo, this design combines simple amigurumi crochet techniques, basic stitches, gentle shaping, and a little stuffing to create a miniature plant that never needs watering.
The rounded central cactus, two curved side arms, textured soil, and compact crochet pot give the finished piece a cozy handmade appearance. Because most sections are worked with repetitive stitches, this project can also be a relaxing introduction to three-dimensional crochet for beginners who already understand the basic crochet movements.
One of the nicest features of this Crochet cactus Pattern is how easily it can be personalized. You can make the cactus in traditional green, choose sage or pastel yarn for a softer decorative style, or even create several cacti in different shades for a handmade collection. The pot can also be customized with cream, beige, terracotta, pink, or any color that matches your home décor.
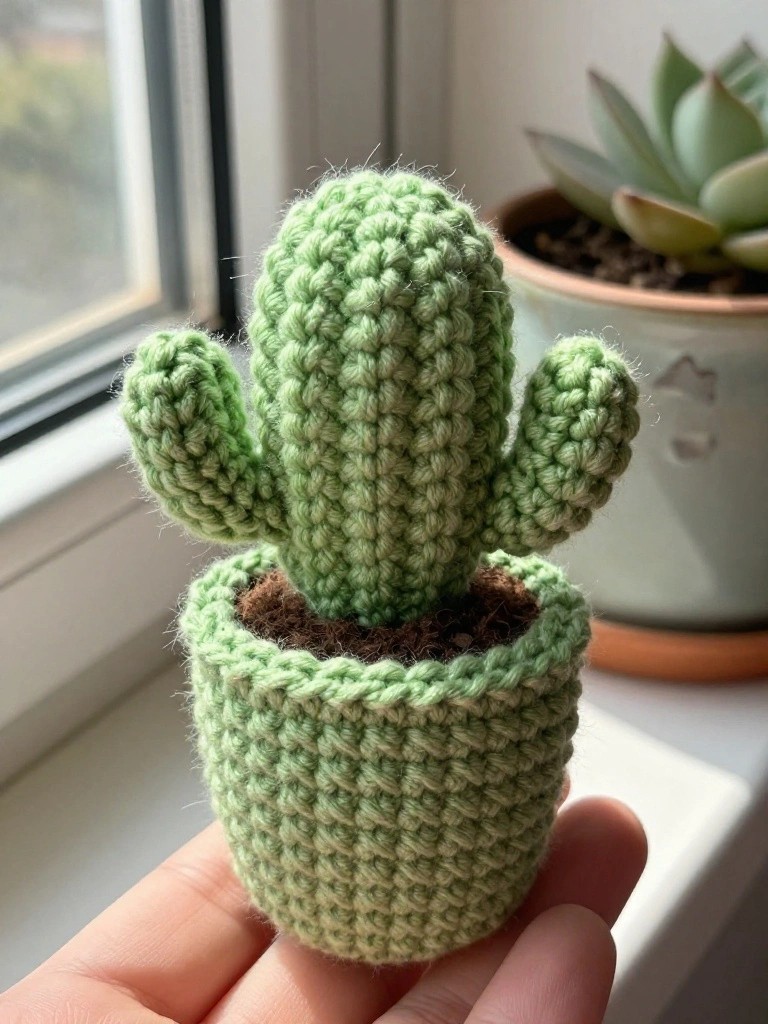
Although the photograph is useful as visual inspiration, exact measurements are not required. What matters most is maintaining consistent tension and keeping the proportions of the cactus, arms, soil, and pot balanced as you crochet.
This tutorial uses standard US crochet terminology and explains the project section by section. The main techniques are single crochet, magic ring, increase, decrease, working in continuous rounds, stuffing, and sewing small crochet pieces together. If you are familiar with these fundamentals, you can comfortably adjust the pattern to make your cactus larger or smaller. The instructions below create a compact decorative cactus similar in proportion to the photographed example, but your finished measurements will naturally vary depending on your yarn weight, hook size, tension, and stuffing.
1. Materials, Crochet Abbreviations, and Preparation
For this Crochet Cactus Pattern, choose a medium or light worsted-weight yarn that creates a firm fabric when crocheted. You will need green yarn for the cactus and its arms, light green or another preferred shade for the pot, and brown yarn for the soil. Cotton yarn gives excellent stitch definition, while acrylic yarn can create a slightly softer and fuzzier appearance. Small amounts of each color are usually sufficient for a miniature project.
Choose a crochet hook slightly smaller than the size normally suggested for your yarn. A hook around 3.0 mm to 3.5 mm can work well with many medium-light yarns, although this is only a guideline. Amigurumi stitches should be tight enough that the stuffing does not show through the gaps. You will also need polyester fiberfill, a yarn needle, scissors, stitch markers, and optionally a small piece of cardboard or plastic canvas for reinforcing the bottom of the pot.
Before starting, become familiar with the main crochet abbreviations used throughout the pattern. MR means magic ring, ch means chain, sc means single crochet, inc means increase by working two single crochet stitches into one stitch, dec means decrease, sl st means slip stitch, and BLO means back loop only. Numbers inside parentheses indicate the approximate stitch count at the end of a round.
Most parts of this crochet cactus amigurumi are worked in continuous spiral rounds. This means you do not join every round with a slip stitch unless specifically instructed. Place a stitch marker into the first stitch of each round and move it upward as you work. Keeping track of the beginning of each round prevents accidental increases or decreases and helps maintain the correct shape.
Gauge is less important in amigurumi than it is in garments, but crochet tension still matters. Try to maintain firm and even stitches throughout the cactus. Loose tension may allow stuffing to become visible, while extremely tight tension can make inserting the hook uncomfortable. If the fabric feels too loose, move down one hook size instead of pulling the yarn excessively tight.
A useful approximate finished size for this project is around 4 to 6 inches tall, depending on your materials. Rather than trying to reproduce an exact measurement from the photograph, concentrate on proportions. The central cactus should be noticeably taller and wider than the arms, while the pot should be wide enough to support the entire arrangement without visually overwhelming the plant.
2. Crocheting the Main Cactus and Side Arms
Begin the central section of the Crochet Cactus Pattern with green yarn. Round 1: Create an MR and work 6 sc into the ring (6). Round 2: Work inc in every stitch around (12). Round 3: Repeat 1 sc, inc around (18). Round 4: Repeat 2 sc, inc around (24). These increases form the softly rounded top of the cactus.
For the main body, continue with Rounds 5–18: sc in each stitch around (24). You can add or remove several rounds depending on how tall you want your cactus to be. Working identical rounds creates the cylindrical shape visible in the reference design. Check the piece occasionally and gently stretch it lengthwise with your fingers so that you can evaluate its proportions before finishing.
Start stuffing the cactus after several inches have been completed. Add small pieces of polyester fiberfill rather than inserting one large clump. This produces a smoother shape and helps prevent bumps. Keep the rounded top firmly stuffed while leaving the bottom slightly more flexible so it can be attached neatly to the soil. Once you are satisfied with the height, finish off with a long yarn tail for sewing.
Next, make the first cactus arm. Round 1: MR, 6 sc (6). Round 2: inc around (12). Rounds 3–8: sc around (12). Lightly stuff the piece. For a subtle curved effect, you can shape the arm with your fingers after stuffing or sew it to the body at a slight upward angle. Finish off and leave a long tail.
Make the second arm using the same method, but changing the number of straight rounds can give the cactus a more natural appearance. For example, work Rounds 3–7: sc around (12) for a slightly shorter arm. Small differences between the two sides can make the finished crochet cactus look more organic rather than perfectly symmetrical.
Position the arms before sewing them permanently. In the photographed style, the arms begin around the lower-middle portion of the central cactus and point upward. Use the long yarn tails to sew around each open edge securely. Pass the needle through both the arm and the main cactus stitches, checking the position frequently. When the attachment is secure, weave the yarn tails inside the cactus.
3. Making the Crochet Pot, Soil, and Final Assembly
The pot is an important part of this Crochet cactus Pattern because it provides both decoration and support. Start at the bottom with your chosen pot color. Round 1: MR, 6 sc (6). Round 2: inc around (12). Round 3: 1 sc, inc around (18). Round 4: 2 sc, inc around (24). Round 5: 3 sc, inc around (30). This creates a flat circular base.
To turn the flat circle into a container, work Round 6 in BLO: sc around (30). Crocheting through the back loops creates a visible edge and encourages the fabric to turn upward. Then work Rounds 7–13: sc around (30). If you want a pot that widens toward the top, add a few evenly spaced increases during one or two of these rounds.
For a decorative upper rim, work one additional round of single crochet or slip stitches around the opening. Another option is to work one round in the front loops to create a slightly raised border. The photographed cactus has a substantial rim, so you can create a similar effect by working one round of sc, followed by another round with relaxed tension. Finish neatly and weave in the yarn end.
The brown soil can be made as a separate crochet circle. Using brown yarn, work Round 1: MR, 6 sc (6), Round 2: inc around (12), Round 3: 1 sc, inc around (18), Round 4: 2 sc, inc around (24), and continue increasing if necessary until the circle fits just inside the opening of the pot. The soil should sit close to the upper rim without extending beyond it.
Place the lower end of the cactus in the center of the soil circle and sew it securely into position. Reinforce the stitches around the base so the cactus remains upright. Then insert the assembled cactus and soil into the pot. Add a small amount of stuffing underneath and around the soil if additional support is needed. Avoid overstuffing because too much filling can distort the sides of the crochet pot.
Sew the outer edge of the soil to the inside edge of the pot using small, evenly spaced stitches. Before closing the final section, check the cactus from every direction and adjust its position. It should stand upright while still retaining the soft handmade character of amigurumi. Once everything looks balanced, complete the seam and hide all yarn tails inside the project.
4. Finishing Techniques, Customization, and Crochet Tips
One advantage of this Crochet Cactus Pattern is that the basic construction can become the foundation for many variations. After learning how to make the central body, arms, soil, and pot, you can change the proportions to create an entire cactus collection. Make one tall and narrow, another short and round, or experiment with different arm placements while keeping the same fundamental crochet construction.
Color is another easy way to personalize the pattern. Sage green produces a calm botanical appearance, while bright green creates a playful amigurumi style. The pot can contrast with the cactus using cream, dusty pink, yellow, terracotta, blue, or neutral beige. Choosing colors with clear contrast between the cactus, soil, and pot makes each section easier to distinguish visually.
You can also add small crochet flowers to the cactus. Make a tiny flower by creating a magic ring and working several small chain loops or simple petals around it. Sew the flower near the top of the cactus or onto one of the arms. Keep decorative elements proportional to the plant so that they complement rather than hide the texture of the crochet stitches.
For a professional finish, pay special attention to stuffing. A common mistake in amigurumi crochet is overfilling narrow pieces. The cactus should feel firm enough to retain its shape but should not become so tightly packed that the stitches stretch apart. Add stuffing gradually, using the blunt end of a crochet hook or a stuffing tool to distribute fiberfill into small areas.
If your cactus leans after assembly, the problem is usually caused by uneven stuffing or a weak attachment between the cactus and soil. Add extra stitches around the base or redistribute the stuffing before completely closing the pot. A small circular insert made from lightweight plastic canvas can also be placed at the bottom of the pot if you want a flatter and more stable base.
Finally, remember that handmade crochet does not need to be perfectly identical to the reference image. Slight variations in stitch tension, arm angle, yarn texture, and pot shape give each handmade crochet cactus its own character. Concentrate on consistent stitches, secure seams, and balanced proportions. Those details will have a greater impact on the finished project than reproducing every measurement exactly.
FAQ About the Crochet Cactus Pattern
Is the Crochet Cactus Pattern suitable for beginners?
Yes. This pattern is suitable for an adventurous beginner who understands basic single crochet, increases, decreases, and working in rounds. The construction uses repetitive stitches, so it is also a useful project for practicing amigurumi shaping.
What yarn is best for a crochet cactus?
Cotton and acrylic yarn can both work well. Cotton generally creates crisp, clearly defined stitches, while acrylic can provide a softer appearance. The most important consideration is choosing a yarn that allows you to create a dense crochet fabric without large gaps.
What crochet hook should I use?
A hook around 3.0–3.5 mm is a practical starting point for many medium-light yarns, but always match the hook to your particular yarn and tension. For amigurumi, many crocheters choose a hook slightly smaller than the manufacturer’s general recommendation to create tighter stitches.
Why can I see stuffing through my crochet stitches?
Visible stuffing usually means the stitches are too loose or the project has been overstuffed. Try using a smaller crochet hook, maintaining consistent tension, and adding fiberfill gradually. Avoid stretching the stitches unnecessarily while stuffing.
How can I make the cactus larger?
The easiest method is to use thicker yarn and a larger hook while following the same general construction. You can also add more increase rounds to create a wider cactus and additional straight rounds to increase its height. Remember to enlarge the pot proportionally.
How can I make the cactus smaller?
Use thinner yarn with an appropriately smaller hook, or reduce the number of increase and straight rounds. When reducing the pattern, keep the relationship between the main cactus, side arms, and pot balanced.
Does a crochet cactus need safety eyes?
No. The design shown here is botanical rather than character-based, so eyes are unnecessary. Its charm comes from the shape, stitch texture, curved arms, soil, and miniature crochet pot.
Can I add flowers to the cactus?
Absolutely. Tiny crochet flowers can add a colorful accent to the top or side arms. Pink, yellow, white, red, and orange are particularly attractive against green yarn. Sew embellishments firmly so they remain securely attached.
How do I keep the crochet cactus standing upright?
Use firm but controlled stuffing in the main cactus and secure its base thoroughly to the soil. The pot should also have a relatively flat base. Adding some stuffing around the lower portion of the cactus can provide extra support without making the pot excessively bulky.
Can I make several cacti using the same pattern?
Yes. The basic Crochet cactus Pattern is highly adaptable. Change the height, number of arms, yarn shades, pot colors, or decorative flowers to make each cactus unique while following the same basic techniques.
What does “inc” mean in this crochet pattern?
An increase (inc) means working two single crochet stitches into the same stitch. Increases expand the circumference of the piece and are particularly important when creating the rounded top and circular bottom sections.
What does “BLO” mean?
BLO, or back loop only, means inserting the hook only through the back loop of a stitch instead of through both loops. In this project, that technique helps create a defined turning edge between the flat base and vertical wall of the crochet pot.
Should the cactus arms be exactly the same size?
They do not have to be. Slightly different arm sizes can actually create a more natural and interesting silhouette. You can make one arm a round or two shorter or attach the arms at slightly different heights.
How long does a crochet cactus take to make?
The time varies according to experience, yarn, size, and working speed. Because the project consists mostly of single crochet rounds and small pieces, it can be completed more quickly than many larger amigurumi projects.
Can this pattern be used for home decoration?
Yes. A finished crochet cactus can be displayed on a desk, craft-room shelf, windowsill, bookcase, or sewing table. Because it is made from yarn rather than a living plant, it is especially convenient for spaces where maintaining real plants is difficult.
Conclusion
The Crochet Cactus Pattern combines straightforward amigurumi techniques with a delightful botanical design. Throughout this tutorial, you learned how to create the rounded central cactus with single crochet stitches, form and attach two small cactus arms, crochet a stable miniature pot, create a separate brown soil section, stuff the individual pieces, and assemble everything into one finished decoration.
The most important techniques to remember are working evenly in continuous rounds, counting stitches carefully, using increases to shape circular sections, maintaining firm crochet tension, and adding stuffing gradually. These simple skills can be reused in countless other amigurumi projects, making this small cactus a useful practice project as well as an attractive finished piece.
Once you understand the basic construction, feel free to make the design your own. Experiment with different greens, colorful pots, miniature flowers, taller cactus bodies, or differently shaped arms. A handmade project becomes especially enjoyable when the basic pattern provides enough flexibility for your own creative choices.
If you make this Crochet cactus Pattern, leave your sincere opinion about the project and share your suggestions. Which colors would you choose for your cactus and pot? Your ideas and creative variations can inspire even more ways to transform this simple crochet pattern into a unique handmade decoration.